2005 Nissan Pathfinder Serpentine Belt Diagram
Navigating the world of automotive repair can often feel like deciphering a secret language. One of the most fundamental "documents" in that language is the serpentine belt diagram. Specifically, for the 2005 Nissan Pathfinder, understanding this diagram is crucial for routine maintenance, troubleshooting, and even performance modifications. This article provides a detailed explanation of the 2005 Nissan Pathfinder serpentine belt diagram, empowering you to confidently tackle related tasks.
Purpose of the Serpentine Belt Diagram
The serpentine belt diagram isn't just a pretty picture; it's a vital resource for several reasons:
- Belt Replacement: The most common use. If your belt is cracked, frayed, or showing signs of wear, the diagram shows you the correct routing for the new belt. Improper routing can lead to component failure and potential engine damage.
- Troubleshooting: A squealing noise under the hood is often a sign of a loose or misaligned serpentine belt. The diagram helps you identify the belt's path and pinpoint potential issues with pulleys or tensioners.
- Component Diagnosis: If an accessory isn't working correctly (e.g., air conditioning, power steering), the diagram helps determine if the serpentine belt is the culprit. A broken or slipping belt can prevent these accessories from functioning.
- Learning and Understanding: Even if you don't plan on doing the work yourself, understanding the diagram allows you to communicate more effectively with your mechanic and understand the scope of the repair.
- Modifications: When adding aftermarket components (like a supercharger, although rare on Pathfinders), you might need to adjust the belt routing or length. The diagram serves as a baseline for planning these modifications.
Key Specs and Main Parts of the 2005 Pathfinder Serpentine Belt System
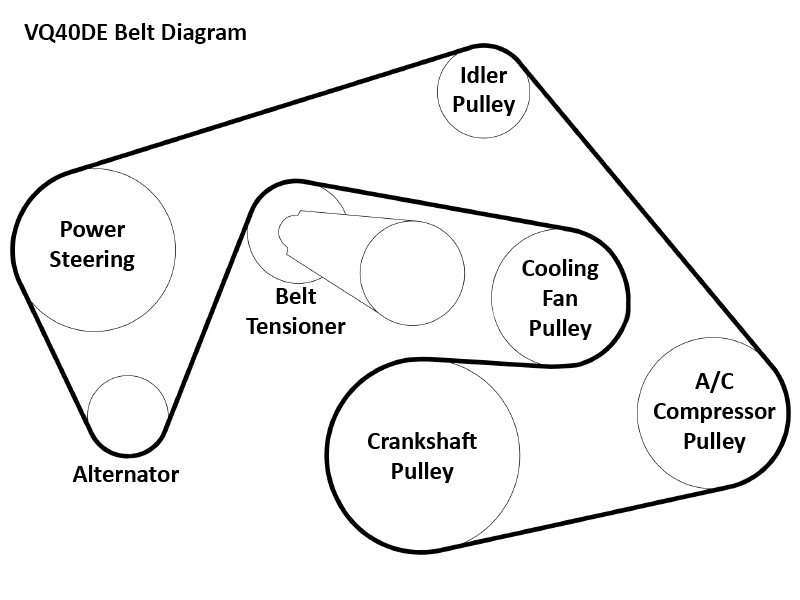
The 2005 Nissan Pathfinder, depending on the engine (most commonly the 4.0L V6), uses a single serpentine belt to drive multiple engine accessories. Here's a breakdown of the key components:
- Crankshaft Pulley (Harmonic Balancer): This is the driving force behind the entire system. It's connected to the crankshaft and transmits rotational force to the serpentine belt. Its diameter affects the speed of all the driven accessories.
- Water Pump Pulley: Drives the water pump, which circulates coolant to regulate engine temperature. A failing water pump can quickly lead to overheating.
- Alternator Pulley: Powers the alternator, which charges the battery and provides electricity to the vehicle's electrical system.
- Power Steering Pump Pulley: Provides hydraulic pressure for power-assisted steering.
- Air Conditioning Compressor Pulley: Drives the A/C compressor, which circulates refrigerant for cooling.
- Idler Pulley(s): Smooth, non-driven pulleys used to guide the belt and maintain proper tension and wrap angle around other pulleys. These are essentially bearings with a sheave and are prone to wear.
- Belt Tensioner Pulley: This spring-loaded pulley applies the necessary tension to the serpentine belt. The tensioner ensures the belt maintains adequate grip on all the pulleys. A failing tensioner can cause belt slippage and noise.
- Serpentine Belt: The continuous belt that connects all the pulleys. It's made of reinforced rubber and is subject to wear and tear.
A typical serpentine belt for the 2005 Pathfinder 4.0L V6 will be around 90-92 inches in length. Always verify the specific part number against your vehicle's VIN for accurate fitment. Using the incorrect belt length can cause serious damage.
Symbols and Conventions on the Serpentine Belt Diagram
Understanding the diagram's symbols is key to proper belt routing:
- Solid Lines: Represent the visible path of the serpentine belt. Follow these lines precisely when installing a new belt.
- Dotted Lines: Often indicate the hidden path of the belt, usually behind other components.
- Arrows: Show the direction of belt travel. Pay close attention to these arrows, as they indicate the rotational direction of each pulley.
- Pulleys: Depicted as circles, often with abbreviations indicating the component they drive (e.g., "ALT" for Alternator, "A/C" for Air Conditioning). Some diagrams may also show the number of grooves on the pulley.
- Tensioner: Typically represented by a spring symbol or a drawing of the tensioner assembly. The diagram may also indicate the direction in which to move the tensioner to release belt tension.
- Routing Labels: Some diagrams might include labels like "Over" or "Under" to indicate whether the belt should pass over or under a particular pulley.
Colors are rarely used in serpentine belt diagrams, but if present, they might highlight specific sections or pathways. Always refer to the diagram's key to understand any color-coding.
How the Serpentine Belt System Works
The crankshaft pulley is the heart of the system. As the engine runs, the crankshaft rotates, turning the crankshaft pulley. This rotation is then transferred to the serpentine belt, which, in turn, drives all the other accessory pulleys. The belt tensioner maintains the proper tension on the belt, preventing slippage and ensuring efficient power transfer. Each accessory then performs its specific function: the alternator charges the battery, the water pump circulates coolant, the power steering pump provides power steering assistance, and the A/C compressor cools the cabin.
The entire system relies on friction between the belt and the pulleys. If the belt is loose, worn, or contaminated with oil, it will slip, reducing the efficiency of the accessories and potentially causing damage. A properly tensioned and maintained serpentine belt is critical for the reliable operation of all these systems.
Real-World Use and Basic Troubleshooting Tips
Here's how you can use the serpentine belt diagram in practical situations:
- Squealing Noise: If you hear a squealing noise, especially when the engine is cold or under load (e.g., turning the steering wheel), inspect the serpentine belt. Check for cracks, fraying, or glazing (a shiny, hard surface). Also, check the tensioner. If the tensioner arm is bouncing excessively, it may be failing. Consult the diagram to ensure correct belt routing.
- Accessory Malfunction: If your air conditioning, power steering, or charging system is malfunctioning, check the serpentine belt. A snapped belt will immediately stop all these accessories from working. A slipping belt can cause intermittent issues. Use the diagram to verify the belt is properly routed around the affected accessory's pulley.
- Belt Inspection: Regularly inspect the serpentine belt for wear and tear. Look for cracks, fraying, missing chunks, or oil contamination. Refer to the diagram to ensure the belt is properly aligned on all the pulleys.
- Belt Replacement: When replacing the serpentine belt, always refer to the diagram. Incorrect routing is a common mistake that can lead to component failure. Before removing the old belt, take a picture or draw a sketch of the existing routing to ensure you route the new belt correctly.
If you suspect a problem with the tensioner, you can often use a wrench to move the tensioner arm and relieve tension on the belt. Observe the tensioner's movement. If it's stiff, loose, or makes noise, it likely needs replacement.
Safety Considerations
Working on the serpentine belt system can be risky. Here are some crucial safety precautions:
- Disconnect the Battery: Always disconnect the negative battery terminal before working on the serpentine belt system. This prevents accidental starting of the engine, which could cause serious injury.
- Hot Engine: Never work on the serpentine belt system when the engine is hot. Allow the engine to cool completely before starting any repairs.
- Moving Parts: Be extremely careful around moving parts. Keep your hands, clothing, and tools clear of the serpentine belt and pulleys when the engine is running.
- Tensioner Spring: The belt tensioner is spring-loaded and can exert significant force. Use the appropriate tools to relieve tension on the belt and avoid injury.
- Eye Protection: Always wear safety glasses to protect your eyes from debris.
- Correct Tools: Use the correct tools for the job. Attempting to use makeshift tools can damage components and increase the risk of injury.
The crankshaft pulley is a particularly dangerous component if the engine is running. Its high rotational speed can cause severe injuries if you come into contact with it. The tensioner, under spring pressure, can also snap back unexpectedly if not handled carefully.
Remember, if you're not comfortable performing these repairs yourself, it's always best to consult a qualified mechanic.
We have a high-resolution file of the 2005 Nissan Pathfinder serpentine belt diagram available for download. This will give you a clear visual aid for your repairs and maintenance. [Link to Diagram Download]