2005 Toyota Corolla Serpentine Belt Diagram
Alright folks, let's dive into the serpentine belt diagram for the 2005 Toyota Corolla. This seemingly simple diagram is your roadmap to understanding, maintaining, and troubleshooting a crucial component of your engine – the serpentine belt system. Knowing how it all fits together can save you a ton of money on repairs and give you a deeper understanding of how your car operates.
Purpose of the Serpentine Belt Diagram
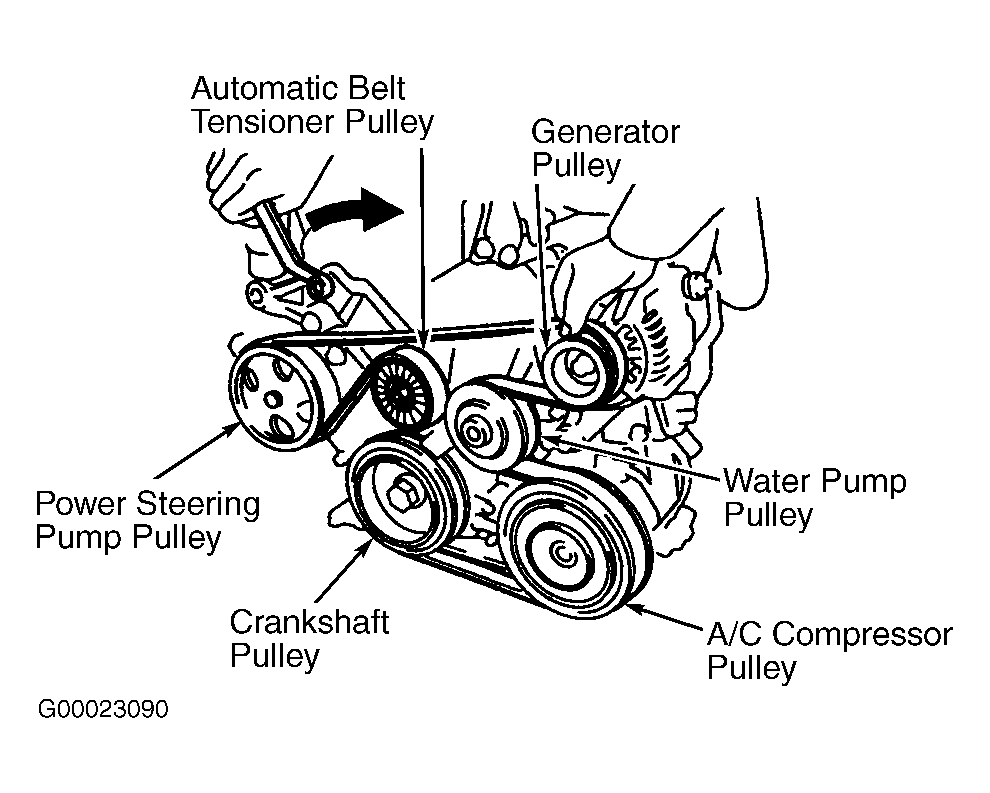
Why bother with this diagram? Well, the serpentine belt is responsible for driving several vital engine accessories. We're talking about the alternator (which charges your battery), the power steering pump, the air conditioning compressor, and sometimes even the water pump. If the belt breaks, slips, or is improperly routed, these accessories stop functioning, leading to a whole host of problems. A serpentine belt diagram provides a visual reference showing:
- Correct Belt Routing: Essential for proper accessory function and preventing damage.
- Pulley Locations: Helps identify and inspect each pulley within the system.
- Tensioner Location: Shows where the belt tensioner is and how it applies the correct tension.
Having this diagram handy is invaluable for:
- Belt Replacement: Ensuring you route the new belt correctly.
- Troubleshooting: Identifying potential problems like misrouting or a failing tensioner.
- Maintenance: Inspecting the belt and pulleys for wear and tear.
- Learning: Gaining a better understanding of your engine's accessory drive system.
Key Specs and Main Parts
Let's break down the key components and specifications related to the 2005 Toyota Corolla serpentine belt system. While there might be minor variations depending on the specific engine (1.8L 1ZZ-FE), the fundamental principles remain the same.
Main Parts:
- Serpentine Belt: The heart of the system. This single, continuous belt snakes around all the pulleys. A typical belt spec may be something like 6PK1830, which translates to 6 ribs and a length of approximately 1830 mm.
- Crankshaft Pulley (Harmonic Balancer): Driven directly by the engine's crankshaft, it's the primary driver of the serpentine belt.
- Alternator Pulley: Driven by the serpentine belt to power the alternator and charge the battery.
- Power Steering Pump Pulley: Driven by the serpentine belt to provide hydraulic assistance for steering.
- Air Conditioning Compressor Pulley: Driven by the serpentine belt to compress refrigerant for the air conditioning system.
- Water Pump Pulley (Sometimes): In some configurations, the water pump is also driven by the serpentine belt, circulating coolant through the engine.
- Tensioner Pulley: This spring-loaded pulley automatically adjusts the belt tension, keeping it within the optimal range. It's *critical* for preventing slippage and premature wear.
- Idler Pulley: A smooth, bearing-mounted pulley that guides the belt around the engine and prevents it from contacting other components.
Symbols and Diagram Interpretation
Serpentine belt diagrams usually employ a straightforward set of symbols. Understanding these symbols is key to correctly interpreting the diagram:
- Solid Lines: Represent the path of the serpentine belt. Follow these lines precisely when routing the belt.
- Arrows: Indicate the direction of rotation of each pulley. This helps you understand which way the belt should be moving around each component.
- Labels: Each pulley will be labeled with its corresponding component (e.g., ALT for alternator, P/S for power steering, A/C for air conditioning).
- Tensioner Symbol: The tensioner is typically represented by a pulley with a spring symbol or a dashed line indicating its adjustable range.
Colors are not always used, but if present, they might indicate the front and back sides of the belt as it passes over or under pulleys.
How It Works
The serpentine belt system is a brilliantly simple yet effective design. The engine's crankshaft spins the crankshaft pulley. This pulley, in turn, drives the serpentine belt. The belt then wraps around the pulleys of the various accessories (alternator, power steering pump, A/C compressor, etc.), transferring the rotational energy from the engine to these components. The tensioner pulley plays a vital role by maintaining the correct belt tension. Without proper tension, the belt will slip, causing the accessories to function poorly or not at all. The idler pulley is strategically placed to provide the correct belt path and prevent interference.
Think of it like a series of gears linked together by the belt. Each pulley needs the correct amount of grip to function efficiently. If the belt is too loose (insufficient tension), it will slip, reducing the accessory's performance. If the belt is too tight (excessive tension), it can put excessive stress on the bearings of the pulleys, leading to premature failure.
Real-World Use and Basic Troubleshooting
Let's talk about how to use this knowledge in the real world and some basic troubleshooting tips.
- Squealing Noise: A common symptom of a loose or worn serpentine belt. Inspect the belt for cracks, glazing, or fraying. Check the tensioner for proper function. If the tensioner is weak or the belt is worn, replace them.
- Accessory Malfunction: If your alternator isn't charging, your power steering isn't working, or your A/C isn't blowing cold, a broken or slipping serpentine belt could be the culprit. Visually inspect the belt for damage and ensure it's properly routed.
- Belt Routing Errors: After replacing the belt, double-check the routing against the diagram. A misrouted belt can cause immediate problems or lead to premature wear.
- Pulley Inspection: While the belt is off, spin each pulley by hand. Listen for any unusual noises (grinding, squealing) and feel for any roughness. A bad pulley can damage a new belt.
For example, if you hear a squealing noise that gets worse when you turn on the air conditioner, the A/C compressor pulley or the belt's grip on it might be the problem. A quick visual inspection might reveal a worn belt or a misaligned pulley.
Safety Considerations
Working on the serpentine belt system can be risky if you're not careful. Here are some key safety precautions:
- Disconnect the Battery: Before working on any electrical components, disconnect the negative terminal of the battery to prevent accidental shocks.
- Engine Off and Cool: Never work on the serpentine belt system while the engine is running or hot. Allow the engine to cool down completely before starting work.
- Keep Hands and Clothing Clear: Keep your hands, fingers, hair, and clothing away from the moving belt and pulleys. The rotating parts can cause serious injury.
- Eye Protection: Wear safety glasses to protect your eyes from flying debris.
- Tensioner Spring: Be extremely careful when releasing the tensioner. The spring can be very strong and can cause injury if it snaps back unexpectedly. Use the correct tool to relieve tension and follow the manufacturer's instructions carefully.
Diagram Download
We have a high-resolution PDF file of the 2005 Toyota Corolla serpentine belt diagram ready for you to download. Click [link to download] to get your copy. This diagram will be an invaluable resource for maintaining and troubleshooting your Corolla's serpentine belt system.
Remember, while this article provides a good overview, always consult your vehicle's repair manual for specific instructions and torque specifications. With the right knowledge and tools, you can confidently tackle serpentine belt maintenance and repairs on your 2005 Toyota Corolla!