2006 Buick Lacrosse Serpentine Belt Diagram
Alright, let's dive into the serpentine belt diagram for the 2006 Buick LaCrosse. This unassuming little piece of paper (or more likely a digital file these days!) is your key to maintaining a healthy engine. Whether you're tackling a squealing belt, replacing a worn-out component, or just expanding your automotive knowledge, understanding this diagram is crucial. We have the downloadable file containing the diagram at the end of the article, and with it, you’ll be well on your way to tackling serpentine belt issues like a pro.
Purpose of the Serpentine Belt Diagram
The serpentine belt diagram is essentially a roadmap for your engine's accessory drive system. Its primary purpose is to show you the correct routing of the serpentine belt around the various pulleys connected to engine-driven accessories. Why is this so important? Because a misrouted belt can lead to serious problems, including:
- Accessory Failure: If the belt isn't contacting a pulley properly, that accessory (power steering pump, alternator, AC compressor, etc.) won't function correctly, or at all.
- Belt Damage: Improper routing can cause the belt to rub against other components, leading to premature wear and eventual breakage.
- Engine Overheating: If the water pump isn't being driven correctly, your engine can overheat rapidly.
Beyond preventing disaster, the diagram is also invaluable for:
- Diagnosis: When troubleshooting accessory issues, the diagram helps you verify that the belt is properly installed and that all accessories are receiving the correct drive force.
- Replacement: When installing a new belt, the diagram ensures you route it correctly the first time.
- Learning: Understanding the layout of your engine's accessory drive provides valuable insight into how your vehicle operates.
Key Specs and Main Parts (2006 Buick LaCrosse)
The 2006 Buick LaCrosse came with a few different engine options, and the serpentine belt routing differs slightly depending on which engine you have. Typically, it's either the 3.8L V6 (L36 or L26) or the 3.6L V6 (LY7). The key components you'll find in your serpentine belt system are:
- Crankshaft Pulley: This is the main driving force, connected directly to the crankshaft and providing the initial rotational energy.
- Alternator Pulley: Powers the electrical system and charges the battery.
- Power Steering Pump Pulley: Provides hydraulic assistance for steering.
- Air Conditioning Compressor Pulley: Compresses refrigerant for the air conditioning system.
- Water Pump Pulley: Circulates coolant throughout the engine to maintain operating temperature.
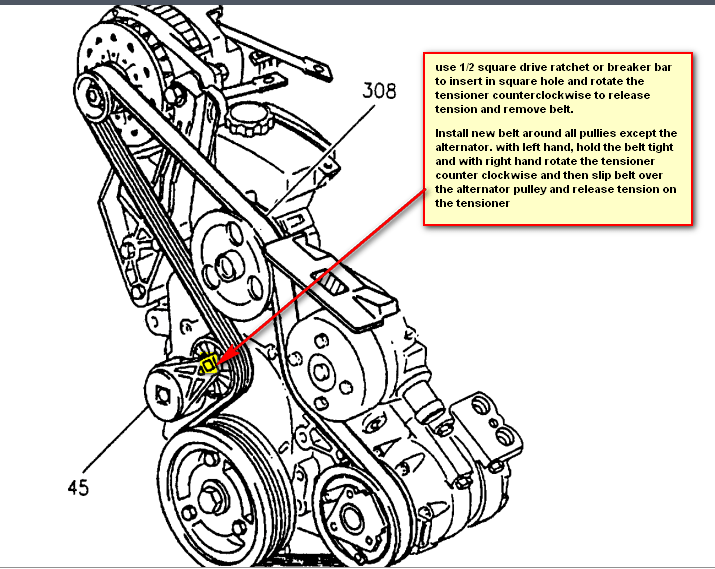
- Tensioner Pulley: This spring-loaded pulley maintains the proper tension on the belt. It's critical for ensuring all accessories receive adequate power and preventing belt slippage. This often consists of a Tensioner Body and a Tensioner Pulley.
- Idler Pulley: A smooth pulley used to guide the belt and change its direction. Not all engines have these, but they're common.
Important Specifications: While a generic diagram helps, knowing the specific belt length and type is crucial for replacement. Refer to your vehicle's owner's manual or a reputable auto parts store to find the correct belt for your engine.
Understanding the Diagram Symbols
Serpentine belt diagrams are designed to be easy to understand. Here's a breakdown of common symbols you'll encounter:
- Solid Lines: Represent the path of the serpentine belt. Pay close attention to how the belt wraps around each pulley.
- Arrows: Indicate the direction of belt rotation. This is particularly important for identifying which side of the belt (ribbed or smooth) should contact each pulley.
- Pulleys: Represented as circles. The diameter of the circle doesn't necessarily reflect the actual size of the pulley. The diagrams are usually only schematic.
- Component Labels: Each pulley is labeled with its corresponding component (ALT for alternator, PS for power steering, AC for air conditioning, etc.).
- Tensioner Symbol: The tensioner pulley is often distinguished with a spring symbol indicating its spring-loaded nature.
While color coding isn't always present, some diagrams may use color to highlight different sections of the belt or to differentiate between the front and back of the engine. In the absence of color, focus on the direction of the arrows and the position of the components.
How It Works: The Serpentine Belt System
The serpentine belt system is a single, continuous belt that wraps around multiple pulleys, powering various engine accessories. The crankshaft provides the rotational force, which is then transferred to each accessory through the belt. The tensioner pulley maintains the correct belt tension, ensuring that all accessories receive adequate power without causing excessive wear on the belt.
The key to understanding the system is recognizing the importance of belt tension. Too little tension, and the belt will slip, causing accessories to malfunction or stop working altogether. Too much tension, and you risk damaging the belt, pulleys, or even the accessories themselves. The tensioner is a spring loaded pulley, and there should be little to no play when depressing the tensioner.
Think of it like a bicycle chain. If the chain is too loose, it will slip off the gears. If it's too tight, it will put excessive stress on the gears and wear them out quickly.
Real-World Use: Troubleshooting Tips
Here are a few common scenarios where the serpentine belt diagram can come in handy:
- Squealing Noise: A squealing noise often indicates a slipping belt. Use the diagram to check if the belt is properly routed and that the tensioner is functioning correctly. A worn or glazed belt can also cause squealing.
- Accessory Malfunction: If your power steering, AC, or alternator stops working, first consult the diagram to verify the belt is still intact and properly routed. Then, check the tensioner. If the belt is off or shredded, replace the belt after identifying and correcting any underlying issues (e.g., seized pulley).
- Belt Replacement: Before removing the old belt, take a picture or sketch of the routing. Then, use the diagram to ensure the new belt is installed correctly. This is especially important if the old belt broke and you can't see how it was routed.
Pro Tip: When replacing the serpentine belt, it's a good idea to inspect the pulleys for signs of wear or damage. A worn or damaged pulley can quickly destroy a new belt.
Safety Considerations
Working on the serpentine belt system can be risky if you're not careful. Here are a few safety precautions to keep in mind:
- Disconnect the Battery: Before working on any electrical components (like the alternator), disconnect the negative battery terminal to prevent accidental shocks or damage to the electrical system.
- Hot Engine: Never work on the serpentine belt system when the engine is hot. Allow the engine to cool completely before starting any repairs.
- Moving Parts: Keep your hands and clothing away from moving parts. The engine can start unexpectedly, even with the key out of the ignition, especially when other people are working on the car at the same time.
- Eye Protection: Wear safety glasses to protect your eyes from debris.
Warning: The crankshaft pulley rotates at high speed and can cause serious injury. Be extremely cautious when working near it. The tensioner also has a very strong spring and can cause injury if released suddenly.
We hope this detailed explanation has been helpful. Remember, the 2006 Buick LaCrosse Serpentine Belt Diagram is your best friend when working on this system. Now that you understand the key components, symbols, and troubleshooting tips, you're well-equipped to tackle most serpentine belt-related issues.
You can download the detailed diagram HERE (link placeholder). It’s in PDF format for easy viewing and printing. Happy wrenching!