2006 Chevy Silverado Aftermarket Radio Wiring Harness
So, you're tackling the exciting project of upgrading the stereo in your 2006 Chevy Silverado, and you've realized you need to understand the aftermarket radio wiring harness. This isn't just about plugging things in and hoping for the best. Understanding the harness is crucial for a clean, functional, and, most importantly, safe installation. This guide will walk you through the specifics, arming you with the knowledge to confidently wire that new head unit.
Purpose of the Aftermarket Radio Wiring Harness
The primary purpose of an aftermarket radio wiring harness is to provide a plug-and-play interface between your new radio and the Silverado's existing electrical system. Without it, you'd be forced to cut and splice factory wiring, a messy and potentially damaging process. The harness eliminates this need, simplifying installation, preserving your truck's factory wiring integrity, and making it much easier to revert to the original radio if needed.
This knowledge is valuable for several reasons:
- Upgrading Your Stereo: The most common reason. A harness allows you to connect your new head unit without damaging the factory wiring.
- Troubleshooting Audio Issues: If you're experiencing audio problems, understanding the harness can help you isolate the source of the issue.
- Learning Automotive Electrical Systems: Working with a wiring harness is a great way to deepen your understanding of how your truck's electrical system functions.
- Reverting to Factory Radio: If you decide to sell your Silverado or simply prefer the original radio, the harness makes it easy to switch back.
Key Specs and Main Parts
The aftermarket radio wiring harness for a 2006 Chevy Silverado typically includes the following:
- Power Wires: These supply the radio with the necessary voltage (usually 12V DC). You'll find a constant power wire (for memory and clock functions) and a switched power wire (activated by the ignition).
- Ground Wire: Provides the return path for the electrical current, completing the circuit. A solid, reliable ground connection is essential for proper operation.
- Speaker Wires: These carry the audio signal from the radio to the speakers. Each speaker has a positive (+) and negative (-) wire. It is extremely important to maintain correct polarity during speaker connection. If polarity is reversed, the sound quality and bass response will suffer.
- Antenna Wire: Connects to the truck's antenna, allowing you to receive radio signals. Many harnesses have a standard Motorola connector.
- Illumination Wire: Dims the radio's display when the headlights are turned on. This wire is usually connected to the vehicle's headlight circuit.
- Remote Turn-On Wire (Amplifier): This wire signals an external amplifier to turn on when the radio is powered on. It's typically a thin, blue wire, and is sometimes called a remote amp turn-on.
- Reverse Wire (Optional): Some aftermarket radios support backup cameras. This wire activates the camera when the vehicle is shifted into reverse.
- Steering Wheel Control Interface (Optional): If your Silverado has steering wheel audio controls, you may need a separate interface module to retain functionality with the new radio. The harness may include wires for connection to this interface.
Symbols – Understanding the Diagram
Wiring diagrams use standardized symbols and conventions. Here's a breakdown of what you might encounter:
- Lines: Lines represent wires. Solid lines indicate a direct connection, while dashed lines may indicate a shielded wire or a connection that's not always present.
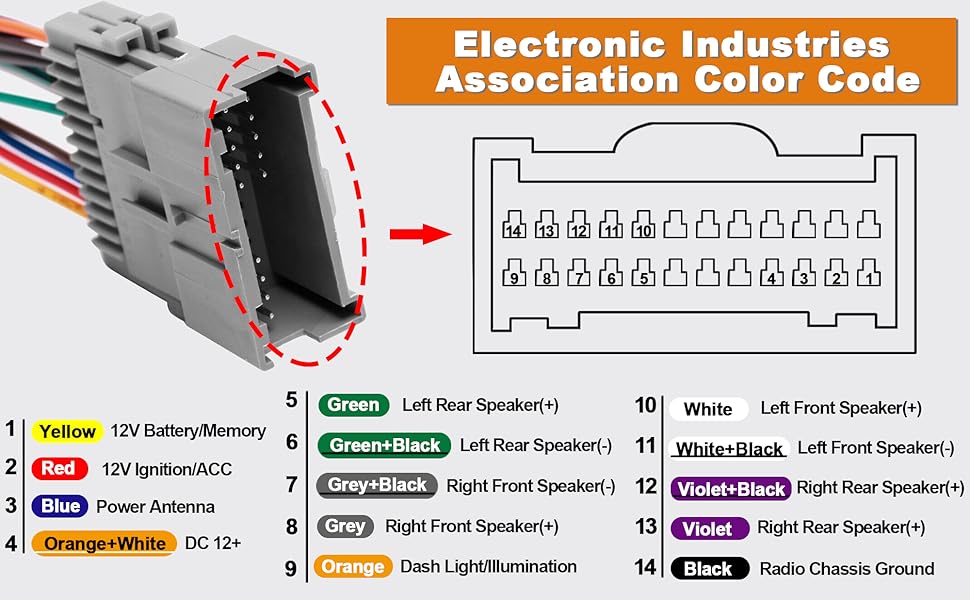
- Colors: Each wire has a specific color code. These color codes are standardized within the automotive industry (though slight variations exist). Common colors include red (power), black (ground), yellow (constant power), blue (remote turn-on), and various colors for speaker wires (e.g., white, gray, green, purple).
- Circles/Dots: Indicate connection points or splices.
- Rectangles: Represent components like the radio, speakers, or other electronic modules.
- Resistors: Zig-zag lines represent resistors, components that limit current flow.
- Capacitors: Two parallel lines represent capacitors, components that store electrical energy.
- Fuses: A small, often rectangular, symbol with a line running through it. Indicates a fuse, which protects the circuit from overcurrent.
- Ground Symbol: Typically represented by three lines decreasing in size, resembling an upside-down triangle, indicating a connection to the vehicle's chassis ground.
- Abbreviations: Common abbreviations include "GND" (ground), "BAT" (battery), "ACC" (accessory), "ILL" (illumination), "RR" (rear right), "FL" (front left), etc.
The diagram will show how each wire on the aftermarket harness corresponds to a specific wire on the Silverado's factory harness. This is the key to successful installation.
How It Works
The harness bridges the gap between your aftermarket radio and your Silverado's existing electrical system. When you connect the harness, you're essentially creating a series of electrical circuits. Let's break down the core functions:
- Power Supply: The red (constant power) and yellow (switched power) wires provide the necessary voltage to power the radio. The constant power wire keeps the radio's memory and clock running even when the ignition is off. The switched power wire turns the radio on and off with the ignition.
- Grounding: The black wire connects to the vehicle's chassis, providing a return path for the electrical current. A good ground connection is essential for proper operation and preventing noise.
- Audio Output: The speaker wires transmit the audio signal from the radio's amplifier to the speakers. Each speaker has a positive and negative wire to maintain correct polarity.
- Control Signals: The illumination and remote turn-on wires provide control signals to dim the display and activate external amplifiers, respectively.
The harness simplifies this process by providing connectors that mate with both the radio and the Silverado's factory wiring harness. This eliminates the need to cut and splice wires, making the installation much easier and reversible.
Real-World Use – Basic Troubleshooting Tips
Even with a harness, issues can arise. Here are some common problems and troubleshooting tips:
- No Power to Radio: Check the fuses (both on the radio and in the Silverado's fuse box). Verify that the constant and switched power wires are properly connected and receiving voltage using a multimeter. Make sure the ground connection is secure and making good contact with the chassis.
- No Sound: Ensure that the speaker wires are correctly connected and that the polarity is correct. Check the radio's speaker settings to ensure that the correct speakers are enabled. If you're using an external amplifier, verify that it's powered on and receiving a signal from the radio.
- Humming or Whining Noise: This is often caused by a ground loop. Try grounding the radio to a different location on the chassis. You can also try using a ground loop isolator.
- Radio Loses Memory: The constant power wire (typically yellow) may not be connected correctly or is not receiving constant power. Check the fuse for the constant power circuit and verify the connection.
Remember to always disconnect the negative battery terminal before working on your vehicle's electrical system.
Safety – Highlight Risky Components
Working with automotive electrical systems involves inherent risks. Here's what to watch out for:
- Short Circuits: A short circuit occurs when a positive wire comes into contact with a ground wire. This can cause a large amount of current to flow, potentially damaging the wiring, the radio, or even causing a fire. Always disconnect the negative battery terminal before working on the electrical system.
- Incorrect Wiring: Connecting wires incorrectly can damage the radio or the Silverado's electrical system. Double-check your wiring diagram and ensure that each wire is connected to the correct location.
- Airbags: Be extremely careful when working near airbag components. Disconnecting and reconnecting the battery can sometimes trigger the airbag system. Consult your Silverado's service manual for specific instructions on disabling the airbag system before working near it.
- Battery Acid: Battery acid is corrosive and can cause burns. Wear gloves and eye protection when working with the battery.
Always prioritize safety! If you're unsure about any aspect of the installation, consult a qualified professional.
With the information outlined above, you are well equipped to tackle the aftermarket stereo installation in your 2006 Chevy Silverado. Remember to take your time, pay close attention to detail, and prioritize safety. Good luck!