2006 Chevy Silverado Radio Wiring Color Code
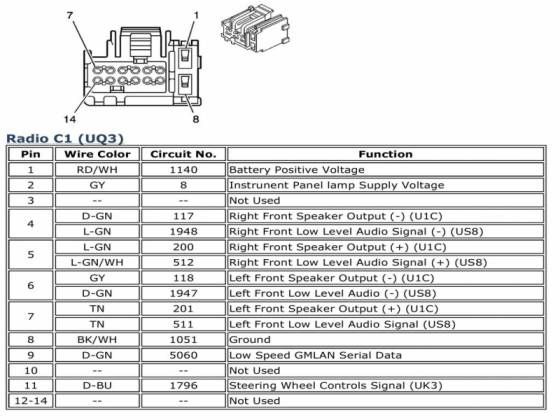
If you're tackling any electrical work on the radio of your 2006 Chevy Silverado, understanding the wiring color code is absolutely crucial. Whether you're replacing a faulty factory head unit, installing an aftermarket amplifier, adding new speakers, or just trying to diagnose a problem, having the right information prevents headaches, blown fuses, and potentially even more serious electrical damage. This article provides a detailed breakdown of the 2006 Silverado radio wiring color code, covering its purpose, key specs, symbols, how it works, real-world use, and safety precautions.
Purpose: Why You Need This Information
The wiring color code serves as a universal language within the automotive electrical system. Without it, identifying and connecting the correct wires would be a guessing game, leading to incorrect connections and malfunctions. Specifically, knowing the color code for your 2006 Silverado's radio wiring is vital for:
- Radio Replacement/Upgrade: Easily connect an aftermarket head unit to the factory wiring harness.
- Amplifier Installation: Tap into the correct wires for signal input and remote turn-on.
- Speaker Upgrades: Ensure proper speaker polarity and wiring for optimal sound quality.
- Troubleshooting: Diagnose and repair radio-related electrical issues, such as a blown fuse or no sound.
- Customization: Add features like a backup camera or subwoofer without damaging the factory wiring.
- Learning: Gain a deeper understanding of automotive electrical systems.
Key Specs and Main Parts of the Radio System
The 2006 Chevy Silverado radio system, at its core, comprises the following:
- Head Unit: The central control unit, responsible for receiving radio signals, playing CDs/MP3s, and processing audio.
- Wiring Harness: A collection of wires bundled together, connecting the head unit to the vehicle's electrical system. This includes power, ground, speaker outputs, and other control signals.
- Speakers: Devices that convert electrical audio signals into sound waves. Typical configurations include front and rear speakers.
- Antenna: Receives radio signals from broadcasting stations.
- Amplifier (Optional): Some Silverados came with a factory amplifier to boost the audio signal. If present, it's typically located under the center console or behind the glove box.
Important Specs: Understanding voltage levels is important. The Silverado's electrical system runs on 12V DC (Direct Current). All radio components operate within this voltage range. Knowing the amperage rating of the radio fuse is also vital to avoid electrical overloading. The radio fuse is usually between 10-20 amps.
Symbols: Decoding the Wiring Diagram
A wiring diagram is a schematic representation of the electrical system. It uses symbols and color codes to depict the function of each wire. Here's a breakdown of common symbols and their meanings:
- Solid Lines: Represent wires. The thickness of the line doesn't usually indicate wire gauge (thickness), but rather is used for clarity.
- Dashed Lines: Often represent shielded wires or connections that are not direct (e.g., a signal passing through a module).
- Color Codes: Each wire is identified by a specific color or color combination (e.g., RED, BLK, WHT/BLU). These are crucial for identification.
- GND (Ground): Indicates a connection to the vehicle's chassis, which provides a common return path for electrical current. Usually Black or Brown.
- +12V (Battery/Power): Indicates a connection to the vehicle's battery, providing a constant power supply. Usually Red or Orange.
- ACC (Accessory): Indicates a power supply that is only active when the ignition is in the accessory or run position. Usually Yellow or Pink.
- Speaker Symbols: Represent the speakers and their connections. Polarity is usually indicated by a "+" and "-" sign, or by a specific wire color designation.
- Connectors: Illustrated as squares or circles with numbers inside, indicating the pin number within the connector.
Understanding these symbols allows you to trace the flow of electricity through the radio system and identify the function of each wire.
How It Works: The Flow of Audio and Power
The 2006 Silverado radio system works by receiving radio signals through the antenna, processing them in the head unit, amplifying the audio signal (either in the head unit or a separate amplifier), and then sending the amplified signal to the speakers. Here's a simplified breakdown of the power and audio flow:
- Power Supply: The head unit receives power from the battery (+12V constant), the ignition switch (ACC), and ground (GND). The constant power maintains the radio's memory (presets, clock), the ACC power turns the radio on and off with the ignition, and the ground provides the return path for the electrical current.
- Signal Reception: The antenna receives radio signals and sends them to the head unit.
- Audio Processing: The head unit processes the radio signal or audio input (CD, MP3) and prepares it for amplification.
- Amplification: The head unit (or a separate amplifier) increases the power of the audio signal.
- Speaker Output: The amplified audio signal is sent to the speakers through the speaker wires. These wires are typically paired, with one wire carrying the positive (+) signal and the other carrying the negative (-) signal. Proper polarity is essential for optimal sound quality.
Important Considerations: The radio system interacts with other systems in the vehicle. For example, the radio might dim the display when the headlights are turned on (illumination wire), or it might mute the audio when a phone call is received (if equipped with OnStar or Bluetooth). These interactions are also represented in the wiring diagram.
Real-World Use: Basic Troubleshooting Tips
Here are some common troubleshooting scenarios and how the wiring color code can help:
- No Power to Radio: Check the +12V (typically red or orange) and ACC (typically yellow) wires for voltage with a multimeter. Also, inspect the ground wire (typically black or brown) for a secure connection to the chassis. Verify the radio fuse is not blown.
- No Sound: Check the speaker wires for continuity with a multimeter. Verify the speaker connections are secure and that the speakers themselves are not damaged. If an amplifier is present, check its power and signal connections.
- Distorted Sound: Check the speaker wires for shorts to ground. Verify the speaker polarity is correct. A reversed polarity can cause phasing issues and distorted sound.
- Radio Turns On/Off Randomly: Check the +12V and ACC wires for loose connections or intermittent voltage drops. Inspect the ground wire for corrosion or a loose connection.
Example: Let's say your aftermarket radio isn't turning on. You would first check the fuse. If the fuse is good, you'd use the wiring diagram to identify the +12V constant (likely Orange) and the +12V switched (likely Yellow) wires coming from the Silverado's harness. Use a multimeter to confirm you have 12V on these wires with the ignition on for the Yellow wire. If you don't have voltage, you know to trace the wiring back towards the ignition switch or battery to find the break.
Safety: Identifying Risky Components
Working with automotive electrical systems can be dangerous if proper precautions are not taken. Here are some key safety considerations:
- Disconnect the Battery: Always disconnect the negative battery terminal before working on any electrical components. This prevents accidental shorts and potential electrical shocks.
- Identify Airbag Wires: Do not cut or splice any wires that are related to the airbag system. These wires are usually wrapped in yellow insulation and are clearly labeled. Mishandling airbag wires can trigger the airbags, causing serious injury.
- Use Proper Tools: Use insulated tools specifically designed for automotive electrical work. This includes wire strippers, crimpers, and multimeters.
- Avoid Working in Wet Conditions: Water and electricity are a dangerous combination. Work in a dry environment to prevent electrical shock.
- Protect Wires: Always protect exposed wires with electrical tape or heat shrink tubing to prevent shorts and corrosion.
- Consult a Professional: If you are unsure about any aspect of the wiring or the repair process, consult a qualified automotive electrician. It's better to be safe than sorry.
Remember, short circuits can damage electronic components, blow fuses, and even start a fire. Always double-check your wiring connections before reconnecting the battery.
By understanding the 2006 Chevy Silverado radio wiring color code and following these safety precautions, you can confidently tackle radio-related repairs and upgrades. Remember to always consult a wiring diagram specific to your vehicle's trim level and options for the most accurate information.
We have a downloadable PDF version of the 2006 Chevy Silverado Radio Wiring Diagram available. Please contact us via the form below to request the file.
[Placeholder for Contact Form or Download Link to Diagram]