2006 Chevy Silverado Radio Wiring Harness Adapter
Alright, let's dive into the 2006 Chevy Silverado radio wiring harness adapter. Whether you're upgrading your head unit, diagnosing audio issues, or just trying to understand how your truck's sound system is wired, knowing the ins and outs of this adapter is crucial. This isn't just about plugging things in and hoping for the best; it's about understanding the flow of electricity and data within your vehicle.
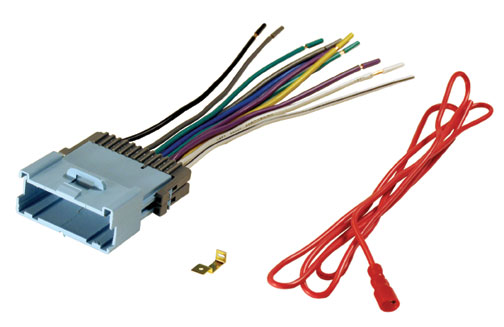
Purpose of Understanding the Radio Wiring Harness Adapter
Why should you care about this adapter? Well, a few key reasons come to mind. First, upgrading your radio. The stock Silverado radio might be functional, but it lacks modern features. Replacing it requires understanding how to connect the new unit to the existing wiring. Second, repairs. Audio problems are common in older vehicles. Tracing faults in the wiring harness often leads you to the adapter. Third, learning and customization. Understanding the radio wiring harness is a gateway to understanding your truck's entire electrical system, enabling more advanced modifications down the road. Having a solid grasp can prevent blown fuses, short circuits, and potentially fried components. Finally, it can save you a significant amount of money by avoiding costly trips to a mechanic or installer.
Key Specs and Main Parts
The radio wiring harness adapter for a 2006 Chevy Silverado essentially acts as an intermediary between the factory wiring and an aftermarket head unit. Instead of cutting and splicing wires (which is generally a bad idea), you use the adapter to create a plug-and-play connection. Here are the main components and key specs:
- Main Connector(s): This is the primary interface that plugs into the Silverado's factory radio harness. It typically has a rectangular shape with multiple pins. There might be more than one connector depending on the trim level and features (like OnStar or Bose audio).
- Aftermarket Connector(s): This connector is designed to plug directly into the back of your new aftermarket radio. Standard connectors like the ISO 10487 are common.
- Wiring: Individual wires connect the pins on both connectors, carrying signals for power, ground, speakers, and other functions. The wires are color-coded for identification.
- Ground Wire: Usually black, this is crucial for completing the electrical circuit. A poor ground connection can cause all sorts of problems, from radio failure to alternator whine.
- 12V Constant (Memory) Wire: Typically yellow, this wire provides constant power to the radio, allowing it to retain memory settings like preset stations.
- 12V Switched (Ignition) Wire: Usually red, this wire provides power only when the ignition is turned on. It controls the radio's on/off function.
- Speaker Wires: These wires (usually in pairs, one positive and one negative for each speaker) carry the audio signal to the speakers. They are typically grouped into front left, front right, rear left, and rear right.
- Antenna Adapter: While not part of the main wiring harness adapter, you'll likely need an antenna adapter to connect the factory antenna cable to your new radio.
- Optional Wires: Some adapters include additional wires for features like remote turn-on for amplifiers, illumination (dimming the radio display when the headlights are on), or steering wheel control interfaces.
Symbols and Conventions
Understanding a wiring diagram is like learning a new language. Here's a breakdown of common symbols and conventions:
- Lines: Lines represent wires. Thicker lines might indicate a wire with a larger gauge (meaning it can carry more current).
- Colors: Each wire is color-coded to identify its function. Standard colors are used, but variations can occur. Common colors include:
- Black: Ground
- Red: Switched Power (12V Ignition)
- Yellow: Constant Power (12V Battery)
- Blue: Remote Turn-On (for amplifiers)
- White/Gray/Green/Purple: Speaker Wires (typically with a stripe indicating positive or negative)
- Ground Symbol: Typically represented by three horizontal lines decreasing in size, indicating a connection to the vehicle's chassis ground.
- Connectors: Shown as rectangles or other shapes with pins. The number of pins and their arrangement are critical for matching the correct wires.
- Labels: Wires are often labeled with abbreviations like "GND" for ground, "BAT" for battery (constant power), "ACC" for accessory (switched power), and "FL+", "FL-" for front left speaker positive and negative, respectively.
How It Works: The Electrical Flow
The radio wiring harness adapter works by creating a pathway for electrical signals between the truck's existing wiring and the aftermarket radio. Here's a simplified explanation of the electrical flow:
- Power: The 12V constant wire from the truck's battery provides continuous power to the radio, allowing it to retain settings even when the ignition is off. The 12V switched wire provides power only when the ignition is on, turning the radio on and off with the vehicle.
- Ground: The ground wire provides a return path for the electrical current, completing the circuit. A solid ground connection is essential for proper operation.
- Speakers: The speaker wires carry the audio signal from the radio's amplifier to the speakers. Each speaker has a positive and a negative wire. Connecting these wires incorrectly (reversing polarity) can result in phase cancellation and poor sound quality.
- Antenna: The antenna adapter connects the factory antenna cable to the aftermarket radio, allowing it to receive radio signals.
- Optional Signals: Other wires may carry signals for features like remote turn-on for amplifiers, illumination, or steering wheel controls. These signals allow the radio to interact with other components in the vehicle.
Real-World Use and Basic Troubleshooting
Let's talk practical application. Here are some common issues and how to troubleshoot them using your understanding of the wiring harness adapter:
- No Power to Radio: Check the 12V constant and 12V switched wires with a multimeter. Ensure they are receiving the correct voltage. Also, check the ground connection.
- Radio Turns On But No Sound: Verify that the speaker wires are connected correctly and that the speakers are not damaged. Use a multimeter to check for continuity in the speaker wires.
- Alternator Whine: This is usually caused by a grounding issue. Try grounding the radio directly to the vehicle's chassis.
- Radio Loses Memory: Check the 12V constant wire. It may not be receiving power when the ignition is off.
- Steering Wheel Controls Not Working: Ensure that the steering wheel control interface (if applicable) is properly connected and programmed.
Safety Considerations
Working with automotive electrical systems involves inherent risks. Here are some important safety precautions:
- Disconnect the Battery: Always disconnect the negative terminal of the battery before working on the electrical system. This prevents accidental short circuits and potential electrocution.
- Avoid Cutting Wires: Use the wiring harness adapter whenever possible to avoid cutting and splicing wires. Cutting wires can damage the factory harness and make it difficult to revert to the original configuration.
- Use Proper Tools: Use high-quality crimping tools and wire strippers to ensure secure and reliable connections.
- Protect Wires: Protect exposed wires with electrical tape or heat shrink tubing to prevent short circuits.
- Fuses: Understand the role of fuses. They protect the electrical system from overcurrent. If a fuse blows, find the cause of the short circuit before replacing the fuse.
Remember that the 12V constant wire can deliver a significant amount of current, even with the ignition off. Shorting this wire to ground can cause serious damage and potential injury.
With a solid understanding of the 2006 Chevy Silverado radio wiring harness adapter, you'll be well-equipped to tackle audio upgrades, repairs, and customizations with confidence. Always double-check your connections and consult wiring diagrams for accuracy.
We have the wiring diagram file available. If you would like access to the file, feel free to download it.