2006 Chrysler 300 Fuse Box Diagram In Trunk
For the experienced DIY car enthusiast, accessing and understanding your vehicle's electrical system is crucial for maintenance, repairs, and modifications. When it comes to the 2006 Chrysler 300, the fuse box located in the trunk is a vital component. This article dives deep into the 2006 Chrysler 300 trunk fuse box diagram, explaining its purpose, key features, how it works, and how to use it effectively.
Purpose of the 2006 Chrysler 300 Trunk Fuse Box Diagram
The fuse box diagram is essentially a road map for your car's electrical system. Its primary purpose is to identify the function of each fuse and relay within the fuse box. This is incredibly important for:
- Troubleshooting Electrical Problems: When an electrical component malfunctions, the first step is often to check the corresponding fuse. The diagram tells you which fuse to check.
- Performing Repairs: Knowing the function of each fuse allows you to safely disconnect circuits when performing repairs, preventing short circuits and potential damage.
- Adding Accessories: If you're adding aftermarket accessories like a new amplifier or lighting system, the diagram helps you identify suitable power sources and protect the existing circuits.
- Understanding Your Vehicle: Familiarizing yourself with the fuse box diagram gives you a better understanding of how your car's electrical system is organized.
Without the diagram, diagnosing and repairing electrical issues becomes significantly more difficult and potentially dangerous.
Key Specs and Main Parts of the 2006 Chrysler 300 Trunk Fuse Box
The trunk fuse box in the 2006 Chrysler 300 is officially known as the Rear Power Distribution Center (PDC). It's typically located on the driver's side of the trunk, behind a trim panel. Here are some key aspects:
- Location: Driver's side of the trunk, behind the trim panel.
- Components: The fuse box contains fuses, relays, and sometimes circuit breakers.
- Fuse Types: The 2006 Chrysler 300 uses various types of fuses, including ATO/ATC (standard blade-type fuses) and mini-fuses. Each fuse is rated for a specific amperage, indicated by its color.
- Relays: Relays are electromechanical switches that control high-current circuits using a low-current control signal. They are used for components like the fuel pump, starter motor, and headlights.
- Cover: The fuse box has a cover with a diagram printed on the inside. However, having a separate, larger diagram is always beneficial.
Understanding Fuse Box Diagram Symbols
The fuse box diagram uses various symbols to represent different electrical components. Learning to interpret these symbols is key to understanding the diagram.
- Lines: Solid lines represent electrical conductors (wires). Dashed lines might represent ground connections or less critical circuits.
- Colors: Different colors on the diagram usually correspond to the color of the wires in the vehicle's harness. This helps you trace circuits.
- Fuse Symbols: Fuses are typically represented by a zigzag line inside a rectangular box. The number next to the fuse symbol indicates its amperage rating (e.g., 10A, 15A, 20A).
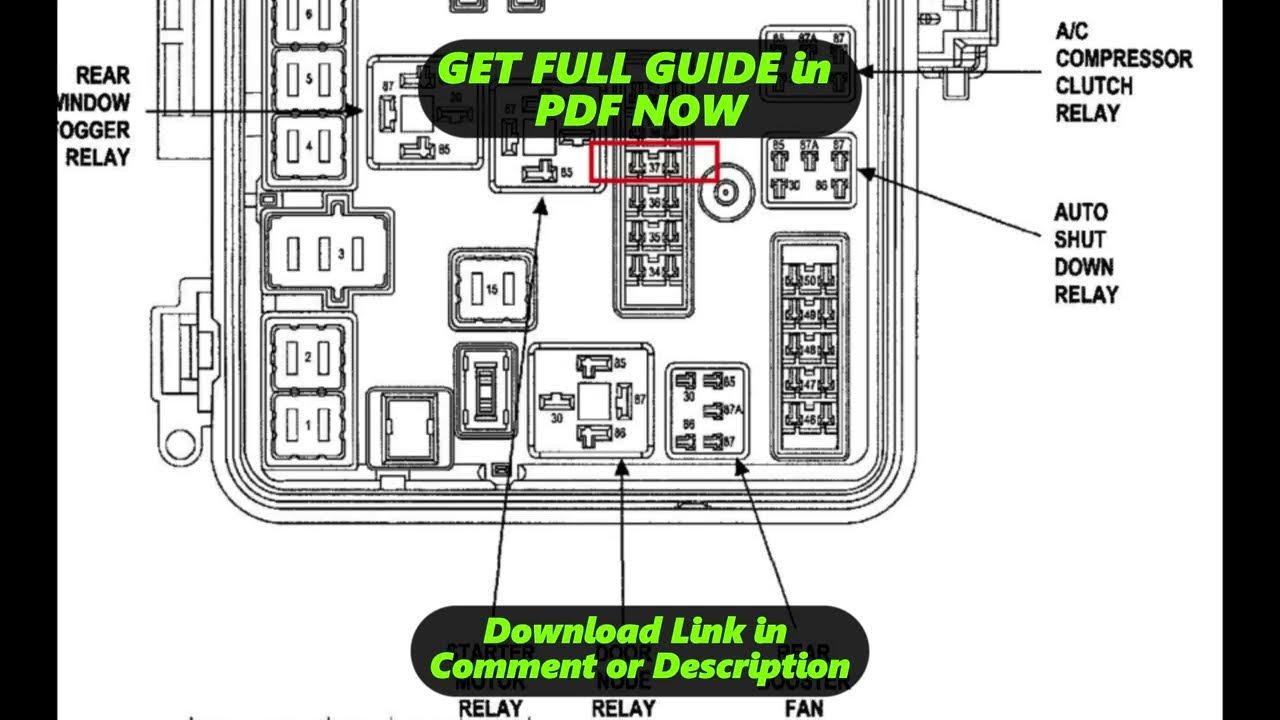
- Relay Symbols: Relays are depicted as a coil (representing the electromagnet) and a switch (representing the contacts that open and close the circuit).
- Component Icons: The diagram often uses icons to represent the components that each fuse protects. Common icons include headlights, tail lights, power windows, the radio, etc. Sometimes, abbreviations are used (e.g., "PCM" for Powertrain Control Module).
It is important to remember that some diagrams may vary slightly, so always cross-reference the diagram with the actual components in the fuse box.
How the Fuse Box Works
The fuse box acts as a central distribution point for electrical power in the vehicle. Power from the battery is routed to the fuse box, and from there, it's distributed to various circuits throughout the car.
Fuses are designed to protect these circuits from overcurrent. If a circuit draws too much current (due to a short circuit or a malfunctioning component), the fuse blows, interrupting the flow of electricity and preventing damage to the wiring and components.
Relays allow low-current circuits to control high-current circuits. For example, the headlight switch only carries a small current, but it controls a relay that switches on the headlights, which draw a much larger current.
Real-World Use: Basic Troubleshooting Tips
Here's how you can use the fuse box diagram for basic troubleshooting:
- Identify the Problem: Determine which electrical component is not working (e.g., the radio, a power window, etc.).
- Consult the Diagram: Find the fuse that corresponds to the malfunctioning component on the fuse box diagram.
- Locate the Fuse: Locate the corresponding fuse in the fuse box.
- Inspect the Fuse: Visually inspect the fuse. A blown fuse will have a broken filament inside. You can also use a multimeter set to continuity to test the fuse. A good fuse will show continuity (a beep or a reading of 0 ohms).
- Replace the Fuse: If the fuse is blown, replace it with a new fuse of the same amperage rating. Never use a fuse with a higher amperage rating, as this could damage the circuit.
- Test the Component: After replacing the fuse, test the component to see if it's working. If the fuse blows again immediately, there is likely a short circuit in the wiring or a problem with the component itself. Further diagnosis is needed.
Safety Precautions
Working with automotive electrical systems can be dangerous. Here are some safety precautions to keep in mind:
- Disconnect the Battery: Before working on the fuse box, disconnect the negative terminal of the battery to prevent accidental short circuits.
- Use Proper Tools: Use insulated tools to avoid electrical shock.
- Never Replace a Fuse with a Higher Amperage: This can overload the circuit and cause a fire.
- Avoid Working in Wet Conditions: Water is a conductor of electricity, increasing the risk of shock.
- Be Careful Around Relays: Relays can be sensitive to static electricity. Ground yourself before touching them.
- Airbags: Be extremely careful when working near airbag modules. Improper handling can cause the airbags to deploy, resulting in serious injury. Refer to your vehicle's service manual for specific instructions on disabling the airbag system before working in its vicinity. The fuse to the airbag module is usually clearly marked and should be removed as a precautionary measure.
Understanding the 2006 Chrysler 300 trunk fuse box diagram empowers you to diagnose and resolve electrical issues efficiently and safely. Remember to always prioritize safety and consult a qualified mechanic if you're unsure about any procedure.
We have a high-resolution PDF file of the 2006 Chrysler 300 Trunk Fuse Box Diagram available for download. Having this diagram on hand will be invaluable for your troubleshooting and repair endeavors.