2006 Dodge Charger 5.7 Engine Wiring Harness
Alright, let's dive into the 2006 Dodge Charger 5.7L Hemi engine wiring harness. Understanding this complex web of wires is crucial whether you're tackling a repair, performing modifications, or simply expanding your automotive knowledge. This article will break down the harness, covering its purpose, key components, symbols used in wiring diagrams, how it functions, real-world troubleshooting tips, and essential safety precautions. We'll also let you know that we have a detailed wiring diagram file available for download.
Why Understanding the Wiring Harness Matters
The engine wiring harness is the nervous system of your Charger's 5.7L Hemi. It provides the vital electrical connections between the engine control unit (ECU) – the car's brain – and all the engine's sensors, actuators, and other components. A faulty harness can lead to a myriad of problems, from intermittent performance issues to a complete no-start condition. Specifically, understanding the harness allows you to:
- Diagnose and repair electrical faults accurately.
- Perform engine swaps or modifications safely.
- Understand how the engine management system functions.
- Avoid costly trips to the mechanic by tackling repairs yourself.
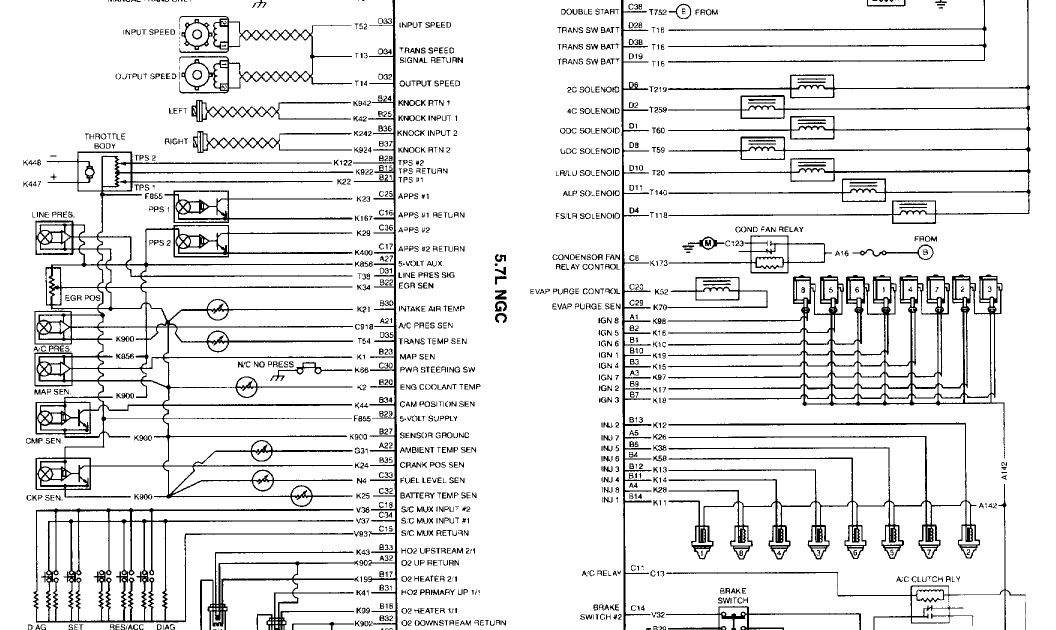
Key Specs and Main Parts of the 2006 Dodge Charger 5.7L Hemi Wiring Harness
The 2006 Charger 5.7L Hemi wiring harness is a complex assembly consisting of numerous wires, connectors, and protective coverings. Key specifications to consider are the wire gauge (thickness) and insulation type, as these determine the wire's current-carrying capacity and resistance to heat and abrasion. Here are some of the main components you'll find in the harness:
- ECU Connectors: These are the main connection points to the Engine Control Unit. They're typically multi-pin connectors with locking mechanisms. They relay signals to and from the ECU.
- Sensor Connectors: These connect to various sensors, including:
- Crankshaft Position Sensor (CKP): Detects the position and speed of the crankshaft.
- Camshaft Position Sensor (CMP): Detects the position of the camshaft.
- Manifold Absolute Pressure (MAP) Sensor: Measures the pressure inside the intake manifold.
- Throttle Position Sensor (TPS): Measures the throttle plate angle.
- Engine Coolant Temperature (ECT) Sensor: Measures the engine coolant temperature.
- Oxygen (O2) Sensors: Monitors the oxygen content in the exhaust.
- Actuator Connectors: These connect to various actuators, including:
- Fuel Injectors: Spray fuel into the cylinders.
- Ignition Coils: Generate the high voltage needed to ignite the air-fuel mixture.
- Idle Air Control (IAC) Valve: Controls the amount of air bypassing the throttle plate at idle.
- Grounding Points: These are critical for providing a return path for electrical current. A poor ground connection can cause all sorts of electrical problems.
- Relays and Fuses: Relays act as electrical switches, controlling high-current circuits with a low-current signal. Fuses protect the wiring and components from overcurrent.
- Wire Bundles and Protective Loom: These bundles of wires are wrapped in a protective loom (usually made of plastic or woven fabric) to protect them from abrasion, heat, and moisture.
Understanding Wiring Diagram Symbols
Wiring diagrams use standardized symbols to represent electrical components and connections. Here's a breakdown of some common symbols you'll encounter:
- Lines: Lines represent wires. A solid line indicates a direct wire connection. Dashed lines may indicate a shielded wire or a connection within a component.
- Colors: Wire colors are typically indicated by abbreviations (e.g., BLK for black, RED for red, GRN for green, YEL for yellow, BLU for blue, WHT for white). Color coding helps trace wires within the harness.
- Connectors: Connectors are usually represented by circles, squares, or other geometric shapes with numbers indicating the pin locations.
- Ground Symbols: A ground symbol typically looks like a downward-pointing triangle or a series of stacked lines.
- Sensor and Actuator Symbols: Sensors and actuators have specific symbols representing their function (e.g., a resistor symbol for a temperature sensor, a coil symbol for a relay).
How the Wiring Harness Works
The wiring harness acts as a communication network between the ECU and the engine's components. The ECU sends signals to actuators (like fuel injectors and ignition coils) to control engine operation. At the same time, sensors provide feedback to the ECU about various engine parameters (like temperature, pressure, and speed). Based on this information, the ECU adjusts the actuators to optimize engine performance, fuel efficiency, and emissions. This constant feedback loop is essential for proper engine operation. The wiring harness allows the correct voltage and current to flow as intended through a clean connection and proper insulation.
Real-World Troubleshooting Tips
When troubleshooting electrical problems in your 2006 Charger 5.7L Hemi, start with the basics:
- Visual Inspection: Look for any obvious signs of damage to the wiring harness, such as frayed wires, broken connectors, or corrosion.
- Continuity Testing: Use a multimeter to check the continuity of wires. Disconnect the battery before performing this test. Continuity means there is an unbroken electrical path.
- Voltage Testing: Use a multimeter to check for proper voltage at various points in the harness. Consult the wiring diagram to identify the correct voltage levels.
- Resistance Testing: Use a multimeter to check the resistance of sensors and actuators. Compare your readings to the manufacturer's specifications.
- Scan Tool Diagnostics: Use a scan tool to retrieve diagnostic trouble codes (DTCs) from the ECU. These codes can provide valuable clues about the source of the problem. Common codes are P0300 series(Misfire) and P0100 series (MAF sensor).
Example: If you're experiencing a misfire (P0300 DTC), you might start by checking the ignition coil connectors and wiring for the affected cylinder. Use a multimeter to test the coil's primary and secondary resistance. Also, check the wiring for shorts or opens.
Example: If the car won't start, and you suspect the crank position sensor, use a multimeter to check the voltage and continuity to the sensor. Replace the sensor if needed.
Safety Precautions
Working with electrical systems can be dangerous. Always observe the following safety precautions:
- Disconnect the Battery: Always disconnect the negative battery terminal before working on the wiring harness. This will prevent accidental shorts and electrical shocks.
- Use Proper Tools: Use insulated tools designed for electrical work.
- Work in a Well-Ventilated Area: Some components, like fuel injectors, may contain flammable materials.
- Be Careful Around High-Voltage Components: Ignition coils and other high-voltage components can deliver a dangerous shock even after the engine is turned off. Allow time for these components to discharge before touching them.
- Pay Attention to Airbag System Wiring: Do NOT disrupt or tamper with wiring and connectors for the supplemental restraint system (SRS). Improper work can cause accidental airbag deployment and serious injury.
Specifically, be extremely careful around the ignition coils and fuel injectors. These components carry high voltage and fuel pressure, respectively. Disconnect the battery and allow the system to depressurize before working on these components.
Remember, if you're not comfortable working with electrical systems, it's always best to consult a qualified mechanic.
Important Note: The information provided in this article is for general guidance only. Always refer to the official Dodge service manual for your specific vehicle for detailed wiring diagrams and repair procedures.
We have a detailed wiring diagram file for the 2006 Dodge Charger 5.7L Hemi engine available for download. This diagram will provide you with a comprehensive overview of the wiring harness layout, wire colors, and connector locations. This file would serve as a valuable resource when tackling any electrical troubleshooting or repair work.