2006 Ford F150 Front Suspension Diagram
Alright, let's dive into the front suspension of the 2006 Ford F-150. This diagram is your roadmap for understanding, maintaining, and repairing this critical part of your truck. Whether you're diagnosing a clunk, planning a lift kit installation, or just want to understand how your front end works, this article will be your guide. We've got the full diagram available for download (link at the end), but first, let's break down everything you need to know.
Purpose of Understanding the Front Suspension Diagram
Why should you bother with this diagram? Simple: It's essential for:
- Diagnosis: Identifying the source of noises, vibrations, or handling issues.
- Repair: Performing maintenance and repairs correctly, from replacing ball joints to overhauling the entire system.
- Modification: Understanding the geometry and limitations before attempting modifications like lift kits or leveling kits.
- Safety: Ensuring that your suspension is in good working order for safe driving.
- Learning: Gaining a deeper understanding of how your vehicle works.
Key Specs and Main Parts
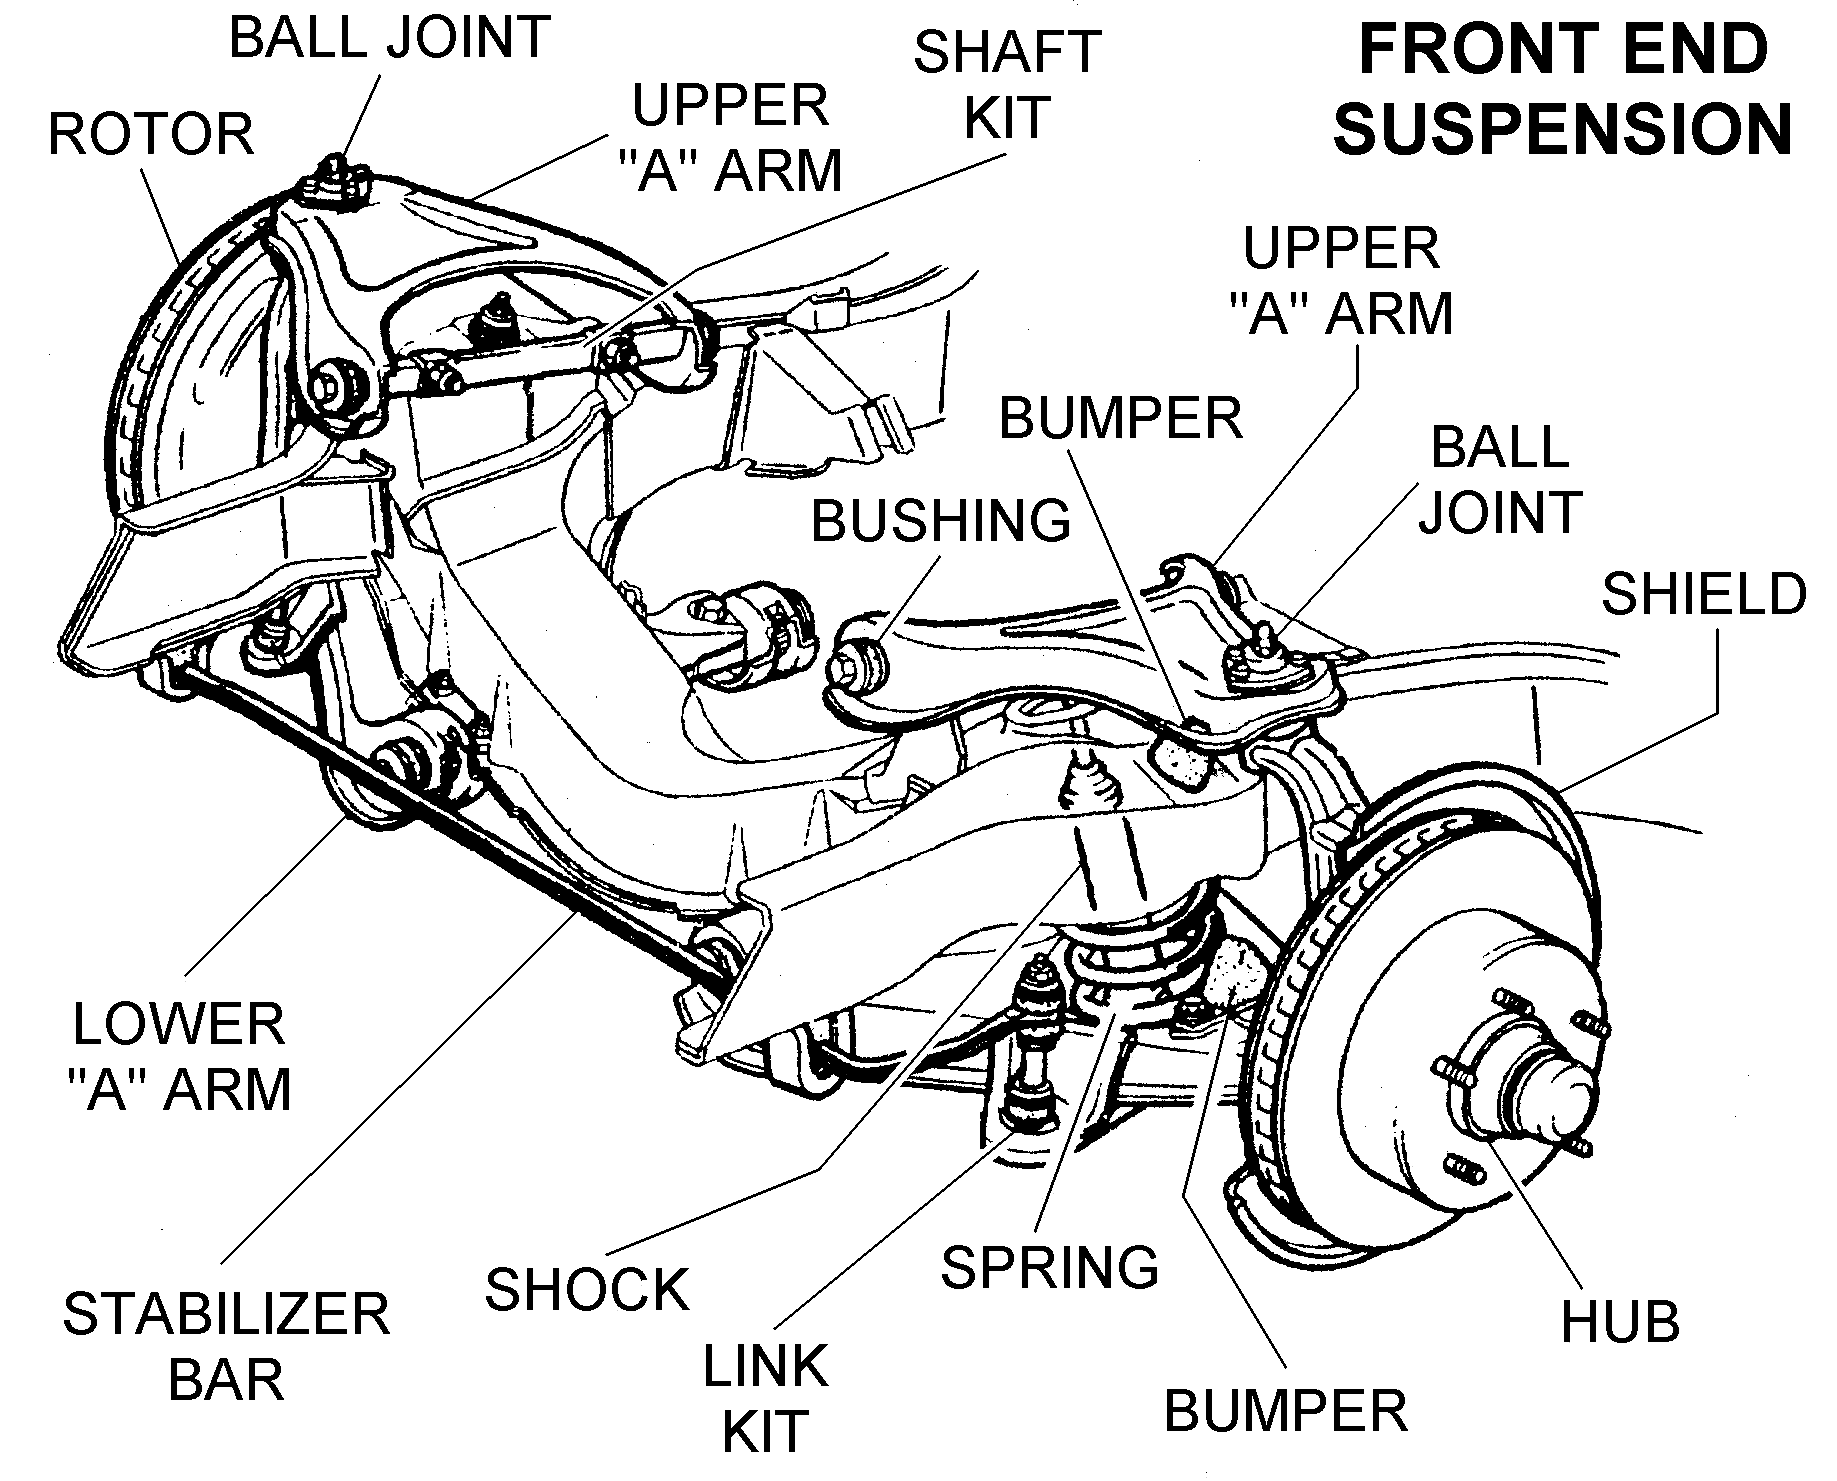
The 2006 F-150 utilizes an independent front suspension, specifically a double wishbone (or double A-arm) configuration. This design is common for its good ride quality and handling characteristics. Here's a breakdown of the key components:
Main Suspension Components:
- Upper Control Arm: The upper suspension link connecting the spindle/knuckle to the frame. It controls the upper part of the wheel's movement.
- Lower Control Arm: The lower suspension link, usually larger and more robust than the upper arm. It bears more of the load and influences handling significantly.
- Spindle/Knuckle: The part that connects the wheel hub, bearings, and brakes to the control arms. It pivots, allowing the wheels to steer.
- Coil Spring: The primary spring, absorbing bumps and supporting the weight of the vehicle. It's what provides the "spring" in the suspension.
- Shock Absorber (Damper): Controls the oscillation of the spring, preventing excessive bouncing and maintaining tire contact with the road. It dampens the spring's energy.
- Upper Ball Joint: A ball-and-socket joint connecting the upper control arm to the spindle/knuckle, allowing for articulation.
- Lower Ball Joint: A ball-and-socket joint connecting the lower control arm to the spindle/knuckle. Typically, it carries more of the weight.
- Tie Rod End (Inner and Outer): Connects the steering rack to the spindle/knuckle, translating steering input into wheel movement.
- Sway Bar (Anti-Roll Bar): Connects the left and right sides of the suspension, reducing body roll during cornering.
- Sway Bar Links: Connect the sway bar to the control arms.
Important Specs: While specific measurements will vary depending on the cab configuration (regular, supercab, crew cab), drivetrain (2WD, 4WD), and trim level, understanding the basic setup is crucial. Things like ride height, control arm lengths, and spring rates are key factors. The 4WD models have a more complex design due to the presence of the front differential and axles.
Understanding Diagram Symbols
The diagram isn't just a pretty picture; it's a technical drawing with its own language. Here's a guide to interpreting the common symbols:
- Solid Lines: Typically represent physical components like control arms, spindles, and the frame. Thicker lines often indicate major structural elements.
- Dashed Lines: May indicate hidden components, assembly pathways, or theoretical boundaries.
- Arrows: Show direction of movement or force (e.g., suspension travel, steering input).
- Circles/Dots: Indicate pivot points or joints, such as ball joints or bushings.
- Shading/Cross-hatching: Used to differentiate materials or highlight specific components.
- Callouts and Labels: These are crucial! They identify each part with a number or name, which you can cross-reference with a parts list.
- Colors: (In color diagrams) May be used to distinguish different systems or materials. For example, hydraulic lines might be colored differently than electrical wiring.
Pay close attention to the legend or key included with the diagram. This will clarify any symbols specific to that drawing.
How the Front Suspension Works
When the wheel encounters a bump, the suspension compresses. The lower control arm pivots upwards, carrying the spindle/knuckle and wheel with it. The coil spring compresses, absorbing the energy of the impact. The shock absorber dampens the spring's oscillation, preventing the wheel from bouncing excessively. The upper control arm controls the camber angle (the tilt of the wheel relative to the vertical axis) as the suspension moves.
The sway bar helps to distribute the force of a bump to both wheels, reducing body roll. When cornering, the sway bar resists the tilting force, keeping the vehicle more level. The steering system works by transmitting input from the steering wheel through the steering rack, which pushes or pulls the tie rod ends. These, in turn, steer the wheels by pivoting the spindles/knuckles.
Real-World Use: Basic Troubleshooting
Here's how the diagram can help you diagnose common problems:
- Clunking Noise: Could be worn ball joints, tie rod ends, sway bar links, or bushings. The diagram shows you where these components are located, allowing you to visually inspect them for wear or damage.
- Squeaking Noise: Often caused by dry or worn bushings in the control arms or sway bar. Locate these bushings on the diagram and lubricate them or replace them if necessary.
- Vibrations: Can be caused by unbalanced tires, worn wheel bearings, or damaged suspension components. The diagram helps you identify these components and check them for play or damage.
- Poor Handling: Could be due to worn shocks, loose ball joints, or incorrect alignment. The diagram helps you understand how these components affect handling.
For example, if you hear a clunking when going over bumps, use the diagram to identify the sway bar links. Then, physically check them for looseness or damage. Similarly, if you have excessive body roll during cornering, inspect the sway bar and its bushings.
Safety Considerations
Working on suspension components can be dangerous due to stored energy in the springs and the weight of the vehicle. Always use proper safety precautions:
- Support the Vehicle Properly: Use jack stands under the frame, not just a jack.
- Spring Compressors: If you need to remove the coil spring, use a spring compressor to safely contain the spring's energy. Never attempt to disassemble a coil spring without a compressor – the spring can release with tremendous force and cause serious injury.
- Wear Safety Glasses: Protect your eyes from debris.
- Disconnect the Battery: Prevents accidental electrical shorts.
- Torque to Spec: Always torque bolts to the manufacturer's specifications. Undertightening can cause components to loosen, while overtightening can damage threads.
Ball joints and tie rod ends are especially critical components for steering and safety. If you're unsure about their condition, have them inspected by a professional. A failure in these components can lead to a loss of steering control.
By using this diagram and following proper safety procedures, you can confidently tackle many front suspension repairs and maintenance tasks on your 2006 Ford F-150. Remember to always consult your vehicle's repair manual for specific instructions and torque specifications. Good luck!
Ready to get started? We have the complete 2006 Ford F-150 Front Suspension Diagram available for download. [Hyperlink to the PDF diagram here].