
2006 Ford F150 Serpentine Belt Diagram
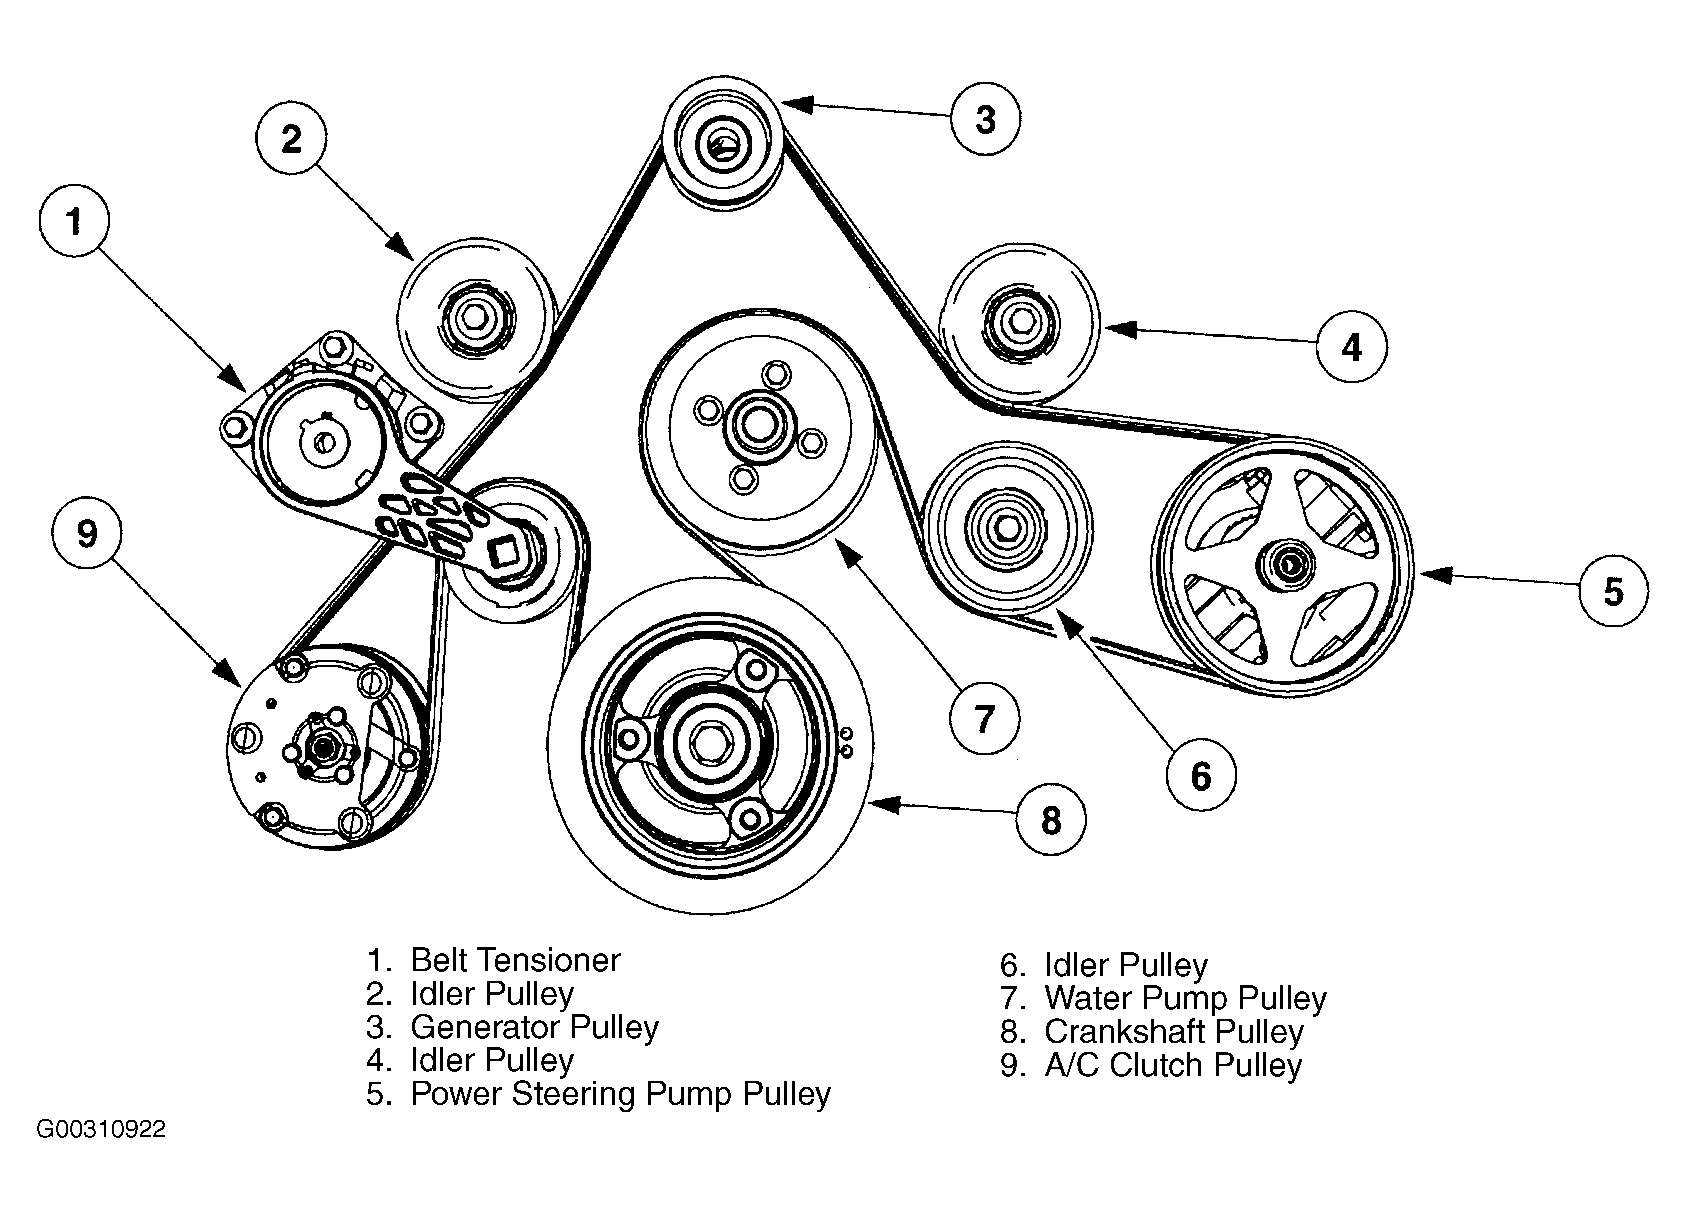
So, you're tackling the serpentine belt on your 2006 Ford F-150. Smart move! Understanding the belt routing and tensioning system is crucial for successful repairs, preventative maintenance, and even just expanding your automotive knowledge. This article will break down the serpentine belt diagram for your specific year and model F-150, giving you the confidence to get the job done right. We’ll cover everything from reading the diagram to diagnosing common issues.
Why This Diagram Matters
Let's be honest, a snapped serpentine belt can leave you stranded. Beyond that immediate inconvenience, a malfunctioning or incorrectly installed belt can lead to serious engine damage. The serpentine belt is the unsung hero powering crucial accessories like your power steering pump, air conditioning compressor, alternator (which charges your battery), and sometimes even your water pump. A faulty belt can cause:
- Overheating: If the belt isn't driving the water pump efficiently, your engine temperature will skyrocket.
- Loss of Power Steering: Prepare for some serious arm workouts if this goes out.
- No Air Conditioning: Uncomfortable drives, especially in the summer, are guaranteed.
- Dead Battery: A non-functioning alternator won't charge your battery, leaving you stuck.
A diagram ensures correct belt routing, proper tension, and helps you identify potential problems before they escalate. Whether you're replacing a worn belt, diagnosing a squealing noise, or just learning about your truck, having a clear understanding of the serpentine belt system is essential. It's also indispensable when replacing any of the components driven by the belt. The diagram becomes even more important when you're dealing with slightly different engine options available on the 2006 F-150, as the routing *can* vary.
Key Specs and Main Parts
The 2006 Ford F-150 was available with several engine options, which slightly affects the serpentine belt configuration. The most common engines include:
- 4.2L V6: This is the base engine and has a relatively straightforward belt routing.
- 4.6L V8: A common upgrade from the V6, this engine has a different belt path.
- 5.4L V8: The top-of-the-line engine for this year, it also has a unique belt configuration.
Always confirm your specific engine before referencing a diagram. The diagrams are engine-specific.
Here are the primary components the serpentine belt drives:
- Crankshaft Pulley: This is the driving force behind the entire system, connected directly to the engine's crankshaft.
- Alternator Pulley: Powers the alternator, which charges the battery and provides electrical power.
- Power Steering Pump Pulley: Provides hydraulic pressure for power steering assistance.
- Air Conditioning Compressor Pulley: Runs the air conditioning compressor, responsible for cooling the cabin.
- Water Pump Pulley: Circulates coolant throughout the engine to prevent overheating.
- Idler Pulley(s): These smooth, bearing-mounted pulleys guide the belt and maintain proper routing. They have no driven function.
- Tensioner Pulley: This spring-loaded pulley maintains the correct tension on the belt, preventing slippage and premature wear. The tensioner is critically important.
Decoding the Serpentine Belt Diagram: Symbols and Lines
Serpentine belt diagrams use standardized symbols and line styles to represent the components and belt path. Here's a breakdown:
- Solid Lines: These represent the *front* of the serpentine belt – the part that is directly visible.
- Dashed Lines: These usually indicate the *back* of the belt, where it wraps around a pulley from behind.
- Circles: Represent pulleys. The size and any markings on the circle usually indicate the component type (e.g., alternator, power steering pump).
- Arrows: Indicate the direction of belt travel. Follow these arrows carefully when routing the belt.
- Text Labels: Each pulley is typically labeled with an abbreviation or full name of the component it belongs to (e.g., ALT for alternator, P/S for power steering).
- Tensioner Symbol: The tensioner pulley often has a unique symbol representing its spring-loaded mechanism, often a spring.
Color-coding is less common on serpentine belt diagrams but *might* be used to highlight specific sections or components. Pay attention to any key or legend provided with the diagram.
How It Works: The Serpentine Belt System
The serpentine belt system is a marvel of efficiency. A single, continuous belt snakes around various pulleys, driven by the crankshaft pulley. The crankshaft pulley's rotation transfers energy to all the accessories. The tensioner pulley plays a crucial role by maintaining the proper belt tension. Too little tension leads to slippage, noise, and reduced performance of the accessories. Too much tension can cause premature bearing wear in the components or even belt failure.
The "serpentine" name comes from the belt's snake-like path as it winds its way through the engine bay. Correct routing is *essential* for proper operation. An incorrectly routed belt can cause:
- Reduced performance of accessories: Your power steering might feel weak, or your A/C might not cool effectively.
- Belt slippage and squealing: A common symptom of incorrect tension or routing.
- Premature belt wear: The belt will rub against components and fail quickly.
- Component damage: Incorrect routing can place undue stress on pulleys and bearings.
Real-World Use: Troubleshooting Tips
Here are some common problems you might encounter and how the serpentine belt diagram can help you diagnose them:
- Squealing Noise: A squealing noise often indicates a slipping belt. Check the belt tension, look for signs of wear or damage (cracks, fraying, glazing), and ensure the belt is properly routed according to the diagram. Sometimes, a worn or failing tensioner can cause slippage.
- Belt Breaks Frequently: This could be due to excessive tension, misaligned pulleys, or a damaged pulley. Use the diagram to inspect the routing and ensure all pulleys are aligned correctly. Look for any rust or damage to the pulleys.
- Accessory Malfunction: If a specific accessory isn't working correctly (e.g., power steering failure), check the belt routing and tension. Make sure the belt is properly engaged with the pulley of the malfunctioning accessory.
- Visual Inspection: Regularly inspect your serpentine belt for cracks, fraying, glazing (a shiny, hardened surface), or missing chunks. Replace the belt if you see any of these signs of wear. A good rule of thumb is to replace the belt every 60,000-80,000 miles, or as recommended in your owner's manual.
Safety First!
Working on the serpentine belt system involves working around a running engine and potentially hot components. Here are some critical safety precautions:
- Disconnect the Negative Battery Terminal: This is crucial to prevent accidental electrical shocks and to disable the starter motor.
- Never Work on a Hot Engine: Allow the engine to cool completely before starting any work. Exhaust manifolds and other engine components can reach extremely high temperatures.
- Keep Loose Clothing and Hair Away From Moving Parts: A running engine has many rotating parts that can easily catch loose clothing or hair.
- Use the Correct Tools: Use a serpentine belt tool to release the tension on the tensioner pulley when removing or installing the belt. Do NOT try to pry the belt off without releasing the tension.
- Be Aware of the Cooling Fan: The engine's cooling fan can start unexpectedly, even with the engine off. Keep your hands and tools clear of the fan blades.
- The area around the tensioner is particularly risky. The spring mechanism can be powerful, and if the tool slips, you could easily injure yourself. Always wear safety glasses.
By following these precautions and understanding the serpentine belt diagram, you can safely and effectively maintain your 2006 Ford F-150's serpentine belt system. Remember to always double-check your work and consult a professional mechanic if you're unsure about any aspect of the repair.
We have the serpentine belt diagrams for all 2006 Ford F-150 engine options. You can download the relevant diagram for your specific engine. This will greatly assist you in your maintenance and repair efforts.