2006 Ford F150 Stereo Wiring Diagram
Let's dive into the world of the 2006 Ford F-150 stereo wiring diagram. This document, seemingly complex at first glance, is your key to understanding, repairing, and even upgrading the audio system in your truck. Whether you're battling a mysteriously silent speaker, planning a head unit swap, or simply curious about how all those wires connect, this guide will equip you with the knowledge you need.
Purpose of the 2006 F-150 Stereo Wiring Diagram
The wiring diagram acts as a roadmap for the entire audio system. It details the paths electricity takes to power the various components, including the head unit (radio), speakers, amplifier (if equipped), and even accessories like steering wheel audio controls. Why is this important? Several reasons:
- Troubleshooting: When something goes wrong with your audio, the diagram helps you trace the fault. No sound from a particular speaker? The diagram tells you which wires to check for continuity or shorts.
- Upgrading: Planning to install a new aftermarket head unit, amplifier, or speakers? The diagram clarifies which wires are power, ground, speaker outputs, and remote turn-on, making the installation process significantly smoother and safer.
- Repairing: If a wire is cut, frayed, or disconnected, the diagram shows you exactly where it needs to be reconnected.
- Learning: Even if you don't have immediate plans to modify your system, understanding the diagram provides a deeper understanding of automotive electrical systems in general.
Key Specs and Main Parts of the Audio System
Before we dissect the diagram itself, let's identify the core components of a typical 2006 Ford F-150 audio system. Keep in mind that configurations may vary depending on the trim level and optional packages.
- Head Unit (Radio): The brain of the operation. It provides the user interface, processes audio signals, and distributes power to other components. OEM (Original Equipment Manufacturer) head units usually have specific connectors and wiring arrangements.
- Speakers: These convert electrical signals into audible sound. The F-150 typically has speakers in the front doors, and possibly in the rear doors or behind the seats, depending on the cab configuration.
- Amplifier (Optional): Some higher-end systems include a dedicated amplifier to boost the audio signal, providing more power to the speakers. This is usually located under the rear seat or behind a trim panel. If your truck is so equipped, the wiring will be substantially different.
- Wiring Harnesses: Bundles of wires that connect the various components. The main harness usually plugs directly into the back of the head unit.
- Antenna: Receives radio signals and sends them to the head unit.
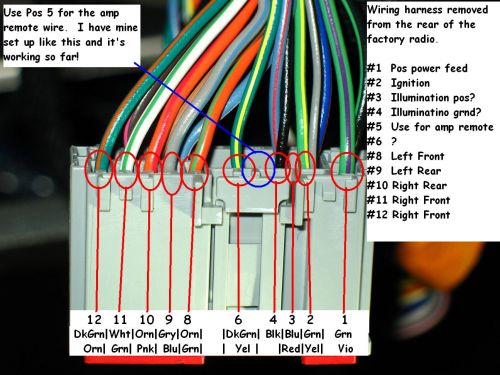
The 2006 F-150 often utilized a 20-pin connector for the main head unit wiring. However, always verify this with your specific vehicle and the wiring diagram.
Decoding the Wiring Diagram: Symbols, Lines, and Colors
The wiring diagram uses a standardized set of symbols and conventions to represent electrical components and connections. Understanding these is crucial for interpreting the information correctly.
- Lines: Solid lines represent wires. Dashed lines may indicate shielded wires, ground connections, or wires within a harness.
- Colors: Each wire is assigned a color code, usually abbreviated (e.g., "RD" for red, "BLU" for blue, "BLK" for black, "GRN" for green). Refer to the diagram's color code legend for accurate identification. These codes are critical because Ford, like other manufacturers, frequently changes the color of wires in similar locations across different model years. A common example is RD/WH, which represents a red wire with a white stripe.
- Symbols:
- Ground: Typically represented by a series of downward-pointing triangles or a horizontal line with angled lines beneath it. This indicates where the wire is connected to the vehicle's chassis for a ground.
- Resistors: Represented by a zig-zag line.
- Capacitors: Represented by two parallel lines.
- Fuses: Represented by a squiggly line within a rectangle or a simple rectangular box.
- Switches: Show the flow of electricity depending on the switch's position (open or closed).
- Connectors: Usually shown as rectangular boxes with numbers or letters indicating the pin assignments. Understanding pinouts of connectors is essential for safe and effective rewiring or upgrades.
- Numerical and Alphanumeric Codes: These identify specific wires, connectors, or components.
How It Works: Tracing the Circuit
Let's consider a simple example: tracing the power supply to the head unit. You'll typically find two power wires: a constant 12V+ (used to maintain memory settings) and a switched 12V+ (activated when the ignition is turned on). Locate these wires on the diagram. They will originate from the vehicle's fuse box, pass through a fuse (identified on the diagram), and then connect to the head unit. By following the lines, you can see the exact path the power takes and identify any intermediate connectors or components. If you're experiencing a problem where the head unit isn't turning on, you can use a multimeter to check for voltage at the fuse and at the head unit connector, pinpointing the location of the fault.
Speaker wires are relatively simple; they run from the head unit (or amplifier) directly to the speakers. The diagram will clearly show the positive (+) and negative (-) speaker wires for each speaker, identified by color codes.
Real-World Use: Basic Troubleshooting Tips
Here are a few practical troubleshooting scenarios where the wiring diagram is invaluable:
- No Sound from One Speaker: Use the diagram to identify the speaker wires for that speaker. Check for continuity from the head unit (or amplifier) to the speaker using a multimeter. Also, inspect the speaker itself for damage.
- Head Unit Not Turning On: Verify that both the constant and switched 12V+ wires are receiving power. Check the fuses associated with the audio system. Also, ensure the ground wire is securely connected to the chassis.
- Aftermarket Head Unit Installation Issues: The diagram provides the correct wiring information for connecting the aftermarket head unit. Use a wiring harness adapter to avoid cutting the factory wiring. This adapter maps the aftermarket head unit's standard wire colors to the Ford-specific wiring.
Safety First: Highlighting Risky Components
Working with automotive electrical systems can be dangerous. Always observe these precautions:
- Disconnect the Battery: Before working on any wiring, disconnect the negative terminal of the battery to prevent short circuits and potential electrical shocks. This is paramount.
- Use a Multimeter: A multimeter is your best friend for testing voltage, continuity, and resistance. Learn how to use it safely and effectively.
- Never Cut Wires Without Knowing What They Are: Use the wiring diagram to identify wires before cutting or splicing them. Guessing can lead to serious damage to your vehicle's electrical system.
- Fuses are There for a Reason: Never replace a blown fuse with a higher amperage fuse. This can overload the circuit and cause a fire.
- Avoid Water: Keep electrical components dry to prevent short circuits.
- Airbags: Be extremely cautious when working near airbags. Disconnect the battery and allow ample time for the airbag system to discharge before working near any airbag components.
Modifying your audio system can also affect other vehicle systems, especially those tied into the CAN bus (Controller Area Network). If you are unsure of what you are doing, consult a professional.
With the 2006 Ford F-150 stereo wiring diagram in hand and a good understanding of electrical principles, you're well-equipped to tackle a variety of audio-related tasks. Remember to prioritize safety, double-check your connections, and take your time. Good luck!
We have the wiring diagram file available for download. It provides a detailed visual representation of the connections within the F-150's audio system.