
2006 Ford Focus Serpentine Belt Diagram
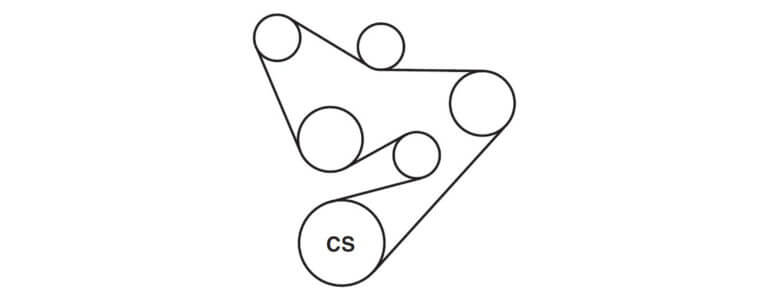
Alright, let's talk about the serpentine belt diagram for your 2006 Ford Focus. Whether you're tackling a routine maintenance job, diagnosing a squealing noise, or simply expanding your automotive know-how, understanding this diagram is crucial. We're going to break down everything you need to know in a clear and accessible way. Plus, we've got a printable diagram you can download to keep handy in your garage.
Purpose of the Serpentine Belt Diagram
Why bother with a serpentine belt diagram? Simple: it’s your roadmap for the accessory drive system. Without it, replacing a worn belt or troubleshooting issues becomes a guessing game. The diagram shows you:
- The correct routing of the serpentine belt around all the pulleys. A misrouted belt can damage components and prevent accessories from functioning correctly.
- The location of the tensioner pulley, which is essential for releasing tension when installing or removing the belt.
- The relationship between the belt and each accessory – alternator, power steering pump, air conditioning compressor, etc.
Ultimately, the diagram saves you time, prevents damage, and ensures your 2006 Ford Focus runs smoothly.
Key Specs and Main Parts of the 2006 Ford Focus Serpentine Belt System
Before diving into the diagram itself, let's define the key components. The serpentine belt system on a 2006 Ford Focus (specifically, we're talking about models with either the 2.0L or 2.3L engine, as belt routing can differ slightly between engines) comprises the following:
- Serpentine Belt: This is a single, continuous belt made of reinforced rubber that snakes around multiple pulleys to drive various engine accessories.
- Crankshaft Pulley (or Damper): Connected directly to the crankshaft, this pulley is the primary driver of the entire system. It's what the engine turns.
- Alternator Pulley: The alternator generates electrical power for the car. The serpentine belt spins its pulley.
- Power Steering Pump Pulley: If equipped with power steering, the serpentine belt drives the pump, which provides hydraulic assistance for steering.
- Air Conditioning Compressor Pulley: Engages when the A/C is turned on, compressing refrigerant to cool the cabin.
- Idler Pulley(s): Smooth, bearing-mounted pulleys used to guide the belt and maintain proper wrap angle on other pulleys.
- Tensioner Pulley: This spring-loaded pulley maintains the correct tension on the serpentine belt. It's absolutely critical for the system to function correctly. A worn tensioner can cause belt slippage and noise.
Important note: There can be slight variations in the setup depending on whether your Focus has A/C or not. The diagram will illustrate this.
Decoding the Serpentine Belt Diagram: Understanding the Symbols
Serpentine belt diagrams use standardized symbols to represent different components and features. Here’s a breakdown of what you might encounter:
- Solid Lines: Represent the serpentine belt itself. The thickness of the line doesn't usually carry any specific meaning, but it denotes the belt's path.
- Pulleys: Usually depicted as circles. Sometimes they have a small icon inside indicating the component they belong to (e.g., a lightning bolt for the alternator).
- Arrows: Indicate the direction of rotation for each pulley. This is crucial for understanding how the belt should be routed. Pay attention to the direction!
- Tensioner Symbol: The tensioner pulley is often shown with a spring symbol attached, representing its spring-loaded mechanism.
- Ribbed vs. Smooth Pulleys: Some diagrams may differentiate between ribbed pulleys (which engage the grooved side of the belt) and smooth pulleys (which engage the back side of the belt). This might be indicated by shading or textures within the pulley symbol.
- Text Labels: The diagram will clearly label each pulley with the name of the component it's connected to (e.g., "ALT," "P/S," "A/C").
While color isn't usually a critical element in these diagrams, it can sometimes be used to highlight the belt path or distinguish different sections of the system. If the diagram uses color, there should be a key explaining what each color represents.
How the Serpentine Belt System Works
The fundamental principle is simple: the engine's crankshaft turns the crankshaft pulley. This pulley then drives the serpentine belt, which in turn drives all the other accessory pulleys. The tensioner pulley plays a crucial role in maintaining the correct belt tension. Too little tension, and the belt will slip, causing squealing and reduced accessory performance (e.g., weak A/C or dim headlights). Too much tension, and you risk damaging the belt, bearings within the accessories, or even the crankshaft itself.
The order in which the belt wraps around the pulleys is carefully engineered to provide sufficient wrap angle (the amount of contact the belt has with each pulley) for efficient power transfer. This is why following the diagram is so critical.
Real-World Use: Basic Troubleshooting Tips
Here are some common problems you might encounter and how the diagram can help you diagnose them:
- Squealing Noise: Often caused by a slipping belt. Check the belt tension and condition. Is the belt cracked, glazed, or excessively worn? Is the tensioner operating smoothly? The diagram will help you locate the tensioner and visually inspect the belt’s routing to ensure it’s correct.
- Accessory Malfunction: If the alternator isn't charging, the power steering isn't working, or the A/C isn't cooling, first verify that the serpentine belt is intact and properly routed. The diagram shows you which accessories are driven by the belt, helping you narrow down the possible causes.
- Belt Slippage: Besides tension, belt slippage can also be caused by contaminated pulleys (oil, coolant). Clean the pulleys and replace the belt if necessary. The diagram reminds you of each pulley’s location for inspection.
- Belt Jumping Off: This is usually a sign of a severely misaligned pulley, a damaged belt, or a failing tensioner. Carefully inspect each pulley for damage or misalignment. The diagram provides a visual reference for proper alignment.
Remember to always visually inspect the belt and pulleys while the engine is OFF. Look for cracks, fraying, glazing, and any signs of damage or wear. Also, check the tensioner for smooth operation and proper spring tension.
Safety First: Risky Components and Precautions
Working on the serpentine belt system can be hazardous if you're not careful. Here are some key safety precautions:
- Always disconnect the negative battery terminal before working on any electrical components. The alternator is a high-voltage component, and accidental shorts can cause serious injury or damage.
- Never work on the engine while it's running. The serpentine belt and pulleys are moving parts that can cause severe injury.
- Be aware of hot engine components. The engine and exhaust system can remain hot for some time after the engine is turned off. Allow them to cool before working near them.
- Use the correct tools. A serpentine belt tool (available at most auto parts stores) is essential for safely releasing the tension on the belt. Using the wrong tool can damage the tensioner or cause injury.
- Wear safety glasses to protect your eyes from debris.
The most dangerous component is arguably the running engine. The force of the belt and speed of pulleys can cause serious injury, so remember, never work on a running engine to adjust or inspect the serpentine belt.
We have the 2006 Ford Focus serpentine belt diagram available for download. This diagram will serve as your visual guide, assisting in proper belt alignment and helping you identify each accessory. Click the link below to download the file. Keep it in your glove compartment or toolbox for easy reference.
[Link to Downloadable Serpentine Belt Diagram]