2006 Ford Fusion 2.3 Serpentine Belt Diagram
Alright folks, let's dive into the serpentine belt system on the 2006 Ford Fusion with the 2.3L engine. Whether you're tackling a repair, just curious about how your engine's accessories are driven, or planning some performance upgrades, understanding this diagram is crucial. We're going to break down everything from its purpose to real-world troubleshooting.
Purpose of the Serpentine Belt Diagram
Why bother with a serpentine belt diagram? Well, it's your roadmap to correctly routing the belt. The serpentine belt, also known as the accessory drive belt, is a single continuous belt that powers multiple components on your engine. If you’re replacing a worn or broken belt, knowing the exact routing is absolutely essential to avoid damaging components or ending up with a non-functional system. A wrong routing can cause:
- Overheating: If the water pump isn't driven correctly.
- Loss of Power Steering: Making the car very difficult to steer.
- Battery Drain: If the alternator isn't spinning at the proper speed.
- Air Conditioning Failure: No cool air on a hot day.
Beyond replacement, a good understanding allows you to inspect for proper belt tension, identify potential issues early, and even plan for modifications that might impact the belt routing.
Key Specs and Main Parts
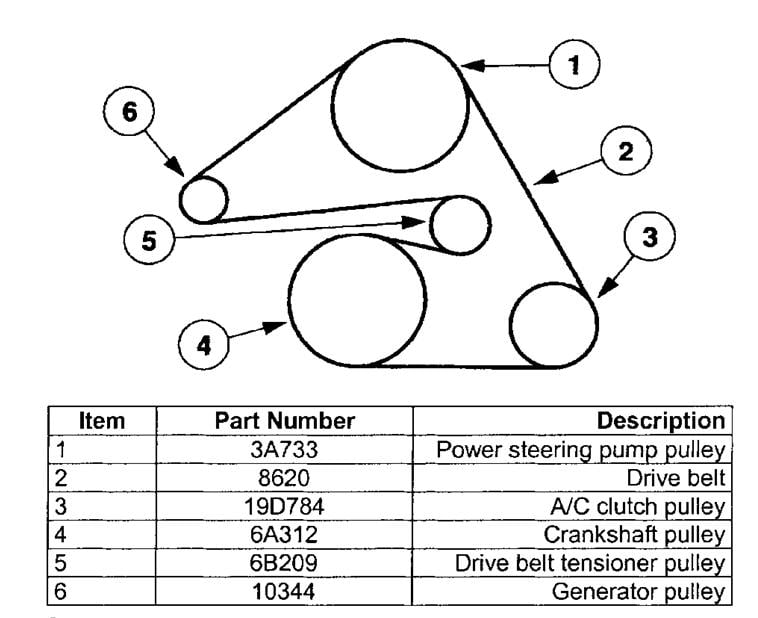
The 2006 Ford Fusion 2.3L engine uses a specific serpentine belt layout. While belt lengths may vary slightly between manufacturers, the routing remains consistent. Here are the key components the belt interacts with:
- Crankshaft Pulley: This is the main driver, connected directly to the engine's crankshaft. It’s typically the largest pulley in the system.
- Alternator Pulley: Powers the alternator, which charges the battery and provides electricity to the car's electrical system.
- Water Pump Pulley: Circulates coolant throughout the engine to prevent overheating.
- Power Steering Pump Pulley: Provides hydraulic pressure to assist with steering.
- Air Conditioning Compressor Pulley: Powers the A/C compressor, which cools the cabin air.
- Tensioner Pulley: This spring-loaded pulley maintains proper tension on the serpentine belt. It's critical for proper function and belt longevity.
- Idler Pulley: Sometimes present, these are smooth pulleys that simply guide the belt around the other components, optimizing its path and avoiding interference.
The belt itself is usually made of a durable, ribbed rubber compound designed to withstand high temperatures, friction, and constant flexing. The ribs on the belt engage with corresponding grooves on the pulleys to provide a secure grip and efficient power transfer.
Symbols Explained
A typical serpentine belt diagram uses several visual cues to convey information. Let’s decode them:
- Solid Lines: Represent the path of the serpentine belt as it travels around the pulleys.
- Arrows: Indicate the direction of belt travel. This is crucial, as some components require the belt to rotate in a specific direction.
- Component Labels: Abbreviations like "ALT" for alternator, "W/P" for water pump, "P/S" for power steering, "A/C" for air conditioning, and "TENS" for tensioner are commonly used to identify each pulley.
- Pulley Diagrams: Each pulley is usually represented by a circle, with a visual cue (like grooves) indicating whether it's a ribbed pulley or a smooth idler pulley.
- Tensioner Indicator: The tensioner is often shown with an arrow indicating the direction in which to move the tensioner to relieve belt tension for removal or installation.
Some diagrams might use color-coding, but this is less common. Generally, the focus is on clear and concise representation of the belt's path.
How It Works
The 2006 Ford Fusion 2.3L serpentine belt system is a relatively simple yet critical mechanism. The crankshaft, driven by the engine's combustion, rotates the crankshaft pulley. This pulley then transfers rotational force to the serpentine belt. The belt, in turn, wraps around and drives the various accessory pulleys. The tensioner is a crucial component; it automatically adjusts to maintain the correct amount of tension on the belt as it stretches over time or as engine loads change.
The proper tension ensures that the belt doesn't slip, which would lead to reduced performance of the accessories. Slipping can also generate heat, which can shorten the belt's lifespan and potentially damage the pulleys. The carefully designed routing ensures that each accessory receives the necessary power to function correctly.
Real-World Use: Basic Troubleshooting Tips
Here are a few common serpentine belt-related problems and how the diagram can help you diagnose them:
- Squealing Noise: Often indicates a loose or worn belt. Check the tensioner; it should be applying adequate pressure. Visually inspect the belt for cracks, fraying, or glazing. The diagram helps you quickly identify the tensioner's location.
- Accessory Malfunction: If your power steering isn't working, your A/C isn't cooling, or your battery isn't charging, the belt might be broken or slipping. The diagram helps you determine which accessories are on the same belt and whether the belt is properly routed around their pulleys.
- Visible Damage: Check for cracks, cuts, or missing ribs on the belt. Replace the belt if you find any significant damage. The diagram reminds you of the correct routing before you remove the old belt. It’s always a good idea to take a picture too!
When replacing the belt, always double-check the routing against the diagram before starting the engine. A misrouted belt can cause immediate damage and be dangerous.
Safety Considerations
Working on the serpentine belt system involves several safety risks:
- Hot Engine: Always allow the engine to cool completely before working on the belt system. Exhaust manifolds and other engine components can remain extremely hot for a significant time after the engine is turned off.
- Moving Parts: Never attempt to work on the serpentine belt system while the engine is running. The rapidly rotating pulleys can cause serious injury.
- Tensioner Spring: The tensioner spring is under significant pressure. Use the correct tool to relieve the tension before removing the belt. Improper handling can cause the tensioner to snap back violently, causing injury.
- Battery Disconnect: Consider disconnecting the negative battery terminal before working on the system, especially if you’re dealing with the alternator. This prevents accidental electrical shocks.
- Eye Protection: Always wear safety glasses to protect your eyes from debris.
Specifically, be extremely cautious when releasing the tension on the tensioner pulley. Use the correct wrench or tool to carefully move the tensioner arm and relieve the belt tension. Make sure you have a firm grip and that the tool is securely engaged.
By understanding the serpentine belt diagram and following proper safety procedures, you can confidently tackle belt replacement and other related maintenance tasks on your 2006 Ford Fusion 2.3L engine. Remember to always consult your vehicle's repair manual for specific instructions and torque specifications.
And remember, we have the high-resolution diagram file available for download. It provides a clear and detailed view of the belt routing, making your job even easier.