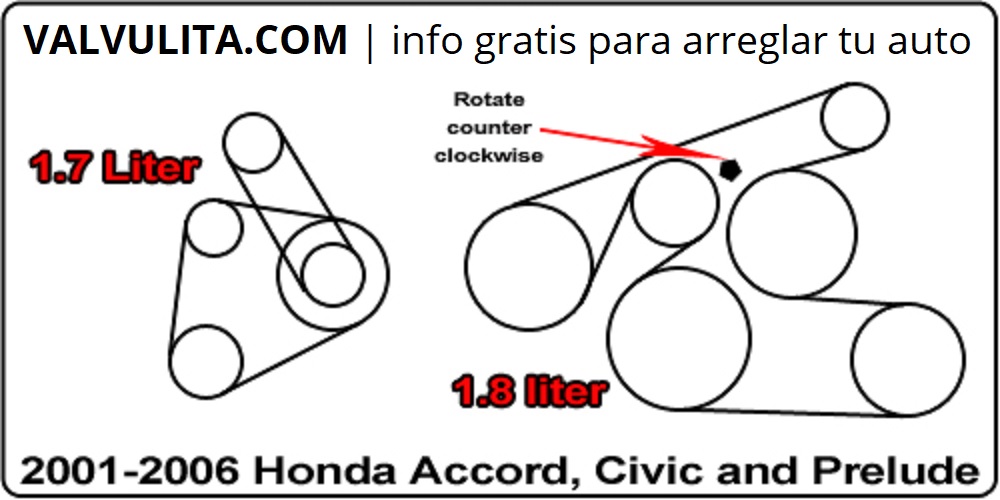
2006 Honda Civic Serpentine Belt Diagram 1.8
So, you're tackling a serpentine belt replacement on your 2006 Honda Civic with the 1.8L engine (R18A1). Excellent choice! It's a job a reasonably skilled DIYer can handle, and having a solid understanding of the serpentine belt diagram is crucial. This article provides an in-depth look at that diagram, helping you confidently navigate the replacement process, diagnose issues, or simply learn more about your Civic's engine.
Purpose of the Serpentine Belt Diagram
Why bother with a diagram? Simple. The serpentine belt snakes around multiple engine accessories. Its path is critical. A diagram helps you:
- Ensure Correct Installation: The most obvious reason. Installing the belt incorrectly will lead to accessory malfunction and potential engine damage.
- Troubleshoot Issues: A diagram allows you to visually trace the belt path and identify components that might be causing squealing, slipping, or breakage.
- Replace Accessories: If you're replacing an alternator, power steering pump, or AC compressor, you need to know how the belt is routed for proper reinstallation.
- General Understanding: Familiarity with the serpentine belt system gives you a better overall grasp of your engine's workings.
In essence, the diagram is your roadmap for understanding and interacting with this vital engine component. Think of it as the blueprint for your car's accessory drive system.
Key Specs and Main Parts
Before we dive into the diagram itself, let's cover some essential specifications and identify the key players:
- Engine: 1.8L R18A1 inline-4 cylinder. This is crucial, as other Civic engines (like the 2.0L) will have different belt routing.
- Belt Length: Typically around 80-81 inches. This varies slightly based on the manufacturer and presence of optional accessories (e.g., AC). Always confirm the correct belt length for your specific vehicle configuration.
- Key Components Driven by the Belt:
- Crankshaft Pulley: The driving force. This pulley is connected directly to the engine's crankshaft.
- Alternator: Supplies electrical power to the vehicle.
- Air Conditioning (AC) Compressor: Compresses refrigerant for the AC system.
- Power Steering Pump: Provides hydraulic assistance for steering.
- Tensioner Pulley: Maintains proper belt tension. This is spring-loaded and allows for belt wear and expansion/contraction due to temperature changes. The automatic tensioner is a critical part to inspect as it can be a cause of many noises associated with the serpentine belt.
- Idler Pulley (if equipped): A smooth pulley that guides the belt around the engine. Some configurations might not have an idler pulley.
It's also worth noting that the 2006 Civic does not have a separate belt for the water pump. The water pump is driven by the timing chain, which resides *inside* the engine and is a much more involved repair. The serpentine belt only handles the aforementioned accessories.
Understanding the Diagram's Symbols
The serpentine belt diagram, thankfully, isn't overly complex. Here's a breakdown of common symbols and notations:
- Solid Lines: Represent the path of the belt itself. Follow these lines carefully to understand how the belt is routed around each pulley.
- Pulleys: Depicted as circles. The larger the circle, generally the larger the pulley.
- Arrows: Indicate the direction of rotation for each pulley. This is important for understanding how the accessories are driven. Note that some accessories, like the power steering pump, might rotate in the opposite direction of the crankshaft.
- Text Labels: Clearly identify each pulley and its corresponding component (e.g., "ALT" for Alternator, "A/C COMP" for AC Compressor, "P/S" for Power Steering, "CRANK" for Crankshaft).
- Tensioner Indicator: The tensioner usually has an arrow or marker indicating the proper operating range. This is crucial when releasing and re-tensioning the belt. If the tensioner indicator is outside of its range, it suggests a stretched belt, malfunctioning tensioner, or an incorrect belt.
- Color Coding: While not always present, some diagrams might use color to highlight the belt path. Typically, this is not necessary due to the relative simplicity of the R18A1's serpentine system.
Beyond those basic symbols, the diagram will also indicate the position of the tensioner and the direction you need to move it to release the belt tension. Pay close attention to this, as using excessive force or the wrong tool can damage the tensioner.
How It Works
The serpentine belt system is elegantly simple in principle. The crankshaft pulley, driven directly by the engine's rotation, provides the motive force. The serpentine belt wraps around this pulley and transfers that rotational energy to all the other accessory pulleys. As the crankshaft spins, it turns the alternator (charging the battery), the AC compressor (providing cooling), and the power steering pump (assisting with steering). The tensioner pulley maintains constant pressure on the belt, preventing it from slipping or coming loose.
The design allows a single belt to drive all these accessories, simplifying the engine layout and reducing the number of moving parts compared to older systems that used multiple V-belts.
Real-World Use and Basic Troubleshooting
Okay, you've got the diagram, you know the parts, and you understand how it works. Now what? Here's how to use that knowledge in the real world:
- Squealing Belt: Often caused by a loose belt or worn pulleys. Check the tensioner. If the tensioner is within it's range, inspect the belt. If the belt looks fine, it may be worth spraying some belt dressing onto the belt (while the engine is running) to see if that stops the squealing. If it does, then the belt is worn and requires replacing.
- Belt Slipping: Slipping can occur in wet conditions or due to a worn belt. Inspect the belt for cracks, glazing, or missing chunks.
- Broken Belt: The worst-case scenario. Immediately stop the vehicle. A broken serpentine belt means no alternator (battery will drain), no power steering (steering will be very difficult), and no AC. Often, a broken belt is preceded by squealing or slipping.
- Accessory Malfunction: If your alternator isn't charging or your AC isn't working, the serpentine belt is a good place to start the investigation. Make sure the belt is properly routed and tensioned.
- Tensioner Issues: The tensioner can fail, leading to improper belt tension. A failing tensioner may cause the belt to oscillate (vibrate excessively) or make noise. Listen closely to the tensioner, it may be the source of the squealing.
Safety Considerations
Working on the serpentine belt system can be dangerous if you don't take proper precautions:
- Disconnect the Negative Battery Terminal: Always disconnect the negative battery terminal before working on any electrical components or the serpentine belt system. This prevents accidental shorts and potential electrical shocks.
- Hot Engine: Never work on the engine immediately after it has been running. Allow the engine to cool down completely to avoid burns.
- Moving Parts: Keep your hands and clothing away from moving parts when the engine is running. The serpentine belt and pulleys can cause serious injury.
- Tensioner Spring: The tensioner spring is under considerable pressure. Use the correct tool (usually a serpentine belt tool) to carefully release the tension. Never attempt to release the tensioner without the proper tool.
- Fan Blades: Be extremely cautious around the engine's cooling fan, especially if it's electric. Even with the engine off, the fan can sometimes cycle on unexpectedly.
Specifically, the crankshaft pulley should be considered a high-risk component. It's directly connected to the engine and spins at a high rate of speed. Keep your hands and tools well clear when the engine is running.
Remember, when in doubt, consult a qualified mechanic. This article is intended as a guide, but it's not a substitute for professional expertise.
You now have a solid foundation for understanding the serpentine belt system on your 2006 Honda Civic. By understanding the diagram and how it relates to the vehicle, you are in a great position to either fix any problems yourself, or to speak intelligently with a mechanic about issues.
We have a downloadable high-resolution diagram available for your reference. Feel free to access it to aid in your troubleshooting and repair efforts.