2006 Honda Ridgeline Serpentine Belt Diagram
The serpentine belt in your 2006 Honda Ridgeline is a critical component responsible for powering several vital engine accessories. Understanding its routing and function is essential for both preventative maintenance and diagnosing potential problems. This article provides a detailed breakdown of the serpentine belt diagram for the 2006 Ridgeline, empowering you with the knowledge to confidently tackle related repairs and maintenance tasks.
Purpose of the Serpentine Belt Diagram
The serpentine belt diagram is more than just a pretty picture; it's a vital reference tool for several reasons:
- Accurate Belt Installation: Ensures the belt is routed correctly around all pulleys, guaranteeing proper accessory operation. Incorrect routing can lead to component damage and belt failure.
- Troubleshooting: Helps diagnose problems related to the belt, such as squealing noises, accessory malfunction (e.g., no power steering), or battery charging issues.
- Maintenance: Facilitates belt inspection for wear and tear, and provides a guide for replacement.
- Learning & Understanding: Provides an overview of how the belt system works and how different engine accessories are interconnected.
Key Specs and Main Parts of the Serpentine Belt System
Before diving into the diagram, let's identify the key components involved in the serpentine belt system of your 2006 Honda Ridgeline:
- Crankshaft Pulley: Driven by the engine's crankshaft, this pulley is the primary power source for the serpentine belt.
- Alternator Pulley: The alternator generates electricity to charge the battery and power the electrical system. The serpentine belt drives its pulley.
- Power Steering Pump Pulley: The power steering pump provides hydraulic assistance for steering. Again, driven by the serpentine belt.
- Air Conditioning Compressor Pulley: The A/C compressor circulates refrigerant to cool the cabin. Its pulley is another stop for the serpentine belt.
- Idler Pulley(s): These pulleys provide tension and guide the belt's path. They do not drive any accessories.
- Tensioner Pulley: The tensioner maintains the correct tension on the serpentine belt. It's often spring-loaded and may be adjustable. Proper tension is crucial for belt life and accessory performance.
- Serpentine Belt: The key component. A single, continuous belt that drives all the aforementioned accessories.
Symbols and Conventions in the Diagram
Understanding the symbols used in the serpentine belt diagram is crucial for proper interpretation.
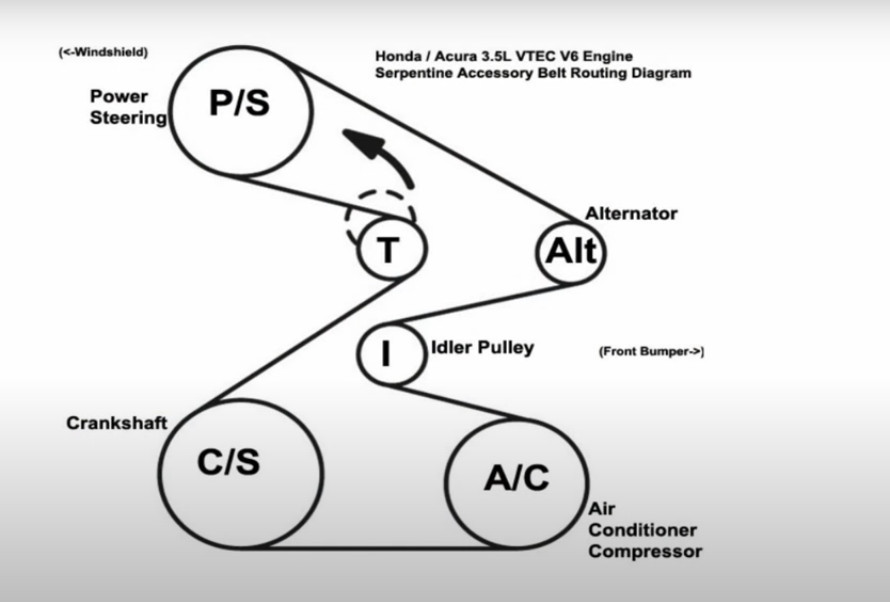
- Solid Lines: Represent the path of the serpentine belt as it travels around the pulleys. The thickness of the line doesn't typically signify anything specific in this type of diagram.
- Arrows: Indicate the direction of belt rotation around each pulley. Following the arrows ensures you route the belt in the correct direction.
- Pulley Icons: Each pulley is represented by a circle. Some diagrams may label the pulley with its corresponding component (e.g., "ALT" for Alternator).
- Tensioner Identification: The tensioner pulley is usually indicated by a specific symbol, often incorporating an arrow demonstrating the direction of tension release (for belt removal). Look for visual cues indicating it is spring-loaded or adjustable.
- Component Labels: Each component is labeled with an abbreviation. Common ones include:
- ALT: Alternator
- P/S: Power Steering Pump
- A/C: Air Conditioning Compressor
- CRANK: Crankshaft
- IDLER: Idler Pulley
- TENSIONER: Tensioner Pulley
How the Serpentine Belt System Works
The serpentine belt system is elegantly simple in concept. The engine's crankshaft rotates, which in turn spins the crankshaft pulley. The serpentine belt, wrapped around this pulley and all the other accessory pulleys, transfers this rotational force to the alternator, power steering pump, A/C compressor, and any idler or tensioner pulleys in the system.
The tensioner pulley is vital because it maintains consistent tension on the belt. As the belt stretches over time, the tensioner automatically adjusts to compensate, preventing slippage and ensuring proper accessory function. If the tensioner fails or the belt stretches excessively, the belt can slip, leading to squealing noises, reduced accessory performance, and eventually, belt failure.
Real-World Use: Basic Troubleshooting Tips
Here are some common issues related to the serpentine belt and how the diagram can help:
- Squealing Noise: Often indicates a slipping belt. Check the belt's tension and condition. Use the diagram to ensure the belt is routed correctly and the tensioner is functioning properly. A worn or glazed belt will need replacement.
- Loss of Power Steering: Could be due to a broken or slipping belt. The diagram will show you if the belt drives the power steering pump. If the belt is intact but loose, the tensioner may be faulty.
- Battery Charging Problems: If the alternator isn't being driven properly due to a slipping or broken belt, the battery won't charge correctly. The diagram confirms if the alternator relies on the serpentine belt.
- A/C Not Working: Similar to power steering issues, a broken or slipping belt can prevent the A/C compressor from operating. Verify the A/C compressor's belt dependency with the diagram.
- Belt Replacement: Before removing the old belt, carefully study the diagram and take a picture of the belt's routing. This ensures correct installation of the new belt. Incorrect routing is a common mistake that can lead to significant problems.
When diagnosing issues, inspect the belt for signs of wear such as cracks, fraying, or glazing. Check the pulleys for damage or misalignment. A misaligned pulley can cause premature belt wear and noise.
Safety Precautions
Working around the serpentine belt system involves certain risks. Here's what to keep in mind:
- Engine Must Be Off: Always ensure the engine is completely off and the key is removed from the ignition before working on the serpentine belt system. Accidental engine start-up could cause serious injury.
- Hot Engine Components: Allow the engine to cool down completely before touching any components in the serpentine belt system. Exhaust manifolds, coolant hoses, and other parts can be extremely hot.
- Rotating Parts: Keep your hands, clothing, and tools clear of rotating parts when the engine is running. The serpentine belt and pulleys can cause severe injury.
- Tensioner Spring: The tensioner pulley is typically spring-loaded and can snap back forcefully when released. Use the correct tools and techniques to relieve the tension safely. Refer to your repair manual for specific instructions.
- Battery Disconnect: While not always necessary for belt replacement, disconnecting the negative battery cable is a good practice to prevent accidental electrical shorts.
Specifically, the crankshaft pulley is the most risky component due to its direct connection to the engine and rapid rotation. Exercise extreme caution when working near it, even with the engine off.
Understanding the 2006 Honda Ridgeline serpentine belt diagram, coupled with proper safety precautions, empowers you to perform necessary maintenance and repairs with confidence. This system, while seemingly simple, demands respect and a careful approach.
We have the complete 2006 Honda Ridgeline Serpentine Belt Diagram available for download. This high-resolution file provides a clear and detailed view of the belt routing, pulley locations, and component labels. Click the link below to access the diagram and enhance your understanding of this critical engine system.