2006 Mini Cooper S Serpentine Belt Diagram
The serpentine belt in your 2006 Mini Cooper S is a critical component, responsible for powering several essential systems. Understanding its layout and function is paramount for performing routine maintenance, diagnosing issues, and preventing costly repairs. This article provides a comprehensive guide to the 2006 Mini Cooper S serpentine belt diagram, empowering you with the knowledge to confidently tackle DIY projects.
Purpose of the Serpentine Belt Diagram
Why bother with a diagram? Several reasons:
- Replacement: When replacing a worn or damaged serpentine belt, the diagram ensures correct routing. Incorrect routing can lead to premature belt wear, component damage, and system failure.
- Troubleshooting: A diagram helps you visually inspect the belt's path, identifying potential misalignment issues, worn pulleys, or components interfering with the belt's operation.
- Maintenance: Understanding the belt's path allows you to properly inspect it for cracks, fraying, or glazing. Early detection of these issues prevents complete belt failure.
- Learning: Familiarizing yourself with the serpentine system contributes to a broader understanding of your Mini Cooper S's engine and its operation.
Key Specs and Main Parts
Before diving into the diagram, let's identify the key components involved:
- Serpentine Belt: A long, continuous belt made of reinforced rubber, responsible for transmitting power from the crankshaft pulley to various engine accessories.
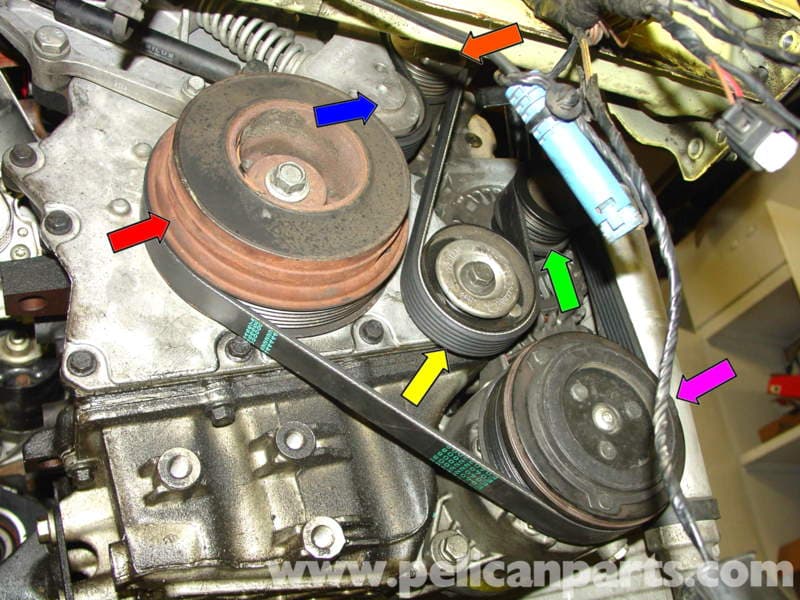
- Crankshaft Pulley (Damper): The pulley attached to the crankshaft that drives the serpentine belt. Its main function is to reduce torsional vibrations that occur during the engine's combustion cycle.
- Alternator Pulley: Driven by the serpentine belt, the alternator generates electricity to power the car's electrical system and charge the battery.
- Power Steering Pump Pulley: Driven by the serpentine belt, the power steering pump provides hydraulic pressure to assist with steering.
- Air Conditioning (A/C) Compressor Pulley: Driven by the serpentine belt, the A/C compressor circulates refrigerant, providing cool air to the cabin.
- Water Pump Pulley: Driven by the serpentine belt, the water pump circulates coolant through the engine and radiator, preventing overheating.
- Tensioner Pulley: A spring-loaded pulley that maintains the correct tension on the serpentine belt, preventing slippage and ensuring optimal performance of the driven accessories. This is crucial for proper system operation.
- Idler Pulley: A smooth pulley that guides the serpentine belt and prevents it from contacting other engine components. Not all configurations have an idler pulley.
For the 2006 Mini Cooper S (R53 model), the typical serpentine belt length is around 2095 mm (82.5 inches), but this can vary slightly depending on whether or not the car has A/C and other optional accessories. Always verify the correct part number for your specific vehicle.
Serpentine Belt Diagram Symbols
Serpentine belt diagrams use standardized symbols to represent different components and belt routing. Understanding these symbols is key to interpreting the diagram correctly:
- Solid Lines: Represent the serpentine belt itself. The thickness of the line may vary slightly depending on the diagram's source, but the meaning remains the same.
- Circles: Represent pulleys. The size of the circle may be proportionate to the actual pulley size, but this is not always the case.
- Arrows: Indicate the direction of rotation of each pulley. Pay attention to these arrows, as they help you understand how the belt transmits power.
- Dashed Lines (Less Common): May indicate the belt's path behind other components or a suggested belt routing.
- Tensioner Symbol: The tensioner pulley is often represented by a pulley symbol with an additional symbol, often a spring or arrow, indicating its spring-loaded function. This is a critical identifier.
How It Works
The serpentine belt system works by transmitting rotational power from the engine's crankshaft to various accessories. The crankshaft pulley drives the serpentine belt, which, in turn, drives the pulleys of the alternator, power steering pump, A/C compressor, and water pump. The tensioner pulley maintains the correct belt tension to prevent slippage and ensure efficient power transfer. The belt follows a specific route, as dictated by the diagram, ensuring that each accessory receives the necessary power.
The tensioner uses a spring mechanism to apply force against the belt, maintaining optimal tension. Over time, the tensioner's spring can weaken, leading to belt slippage and noise. A worn or damaged tensioner should be replaced to ensure proper belt operation and prevent damage to other components.
Real-World Use: Basic Troubleshooting Tips
A diagram proves invaluable during troubleshooting. Here's how:
- Squealing Noise: A squealing noise often indicates belt slippage. The diagram can help you identify if the belt is misaligned, routed incorrectly, or if a pulley is damaged. Also inspect the tensioner. A faulty tensioner is a common cause of belt slippage.
- Belt Wear: Inspect the belt for cracks, fraying, or glazing. The diagram helps you identify areas where the belt may be rubbing against other components.
- Component Failure: If an accessory (e.g., alternator, power steering pump) fails, the diagram helps you verify that the belt is properly routed and tensioned. It can also help identify if the failed component caused damage to the belt or other pulleys.
- Visual Inspection: Use the diagram to confirm the belt is routed correctly *before* starting the engine after any work. This prevents potentially catastrophic damage.
If you suspect a problem with your serpentine belt system, always start with a visual inspection. Compare the actual belt routing to the diagram. Look for any signs of damage, misalignment, or worn components. If you're unsure, consult a qualified mechanic.
Safety Considerations
Working on the serpentine belt system can be dangerous. Here are some crucial safety precautions:
- Disconnect the Battery: Always disconnect the negative battery terminal before working on any electrical components. This prevents accidental shorts and electrical shock.
- Hot Engine: Never work on the serpentine belt system while the engine is hot. Allow the engine to cool completely before proceeding.
- Moving Parts: Keep your hands, clothing, and tools away from moving parts. The serpentine belt system operates at high speeds and can cause serious injury.
- Tensioner Spring: The tensioner pulley is spring-loaded and can snap back forcefully when released. Use appropriate tools to safely relieve tension on the belt. Always wear safety glasses when working around the tensioner.
- Eye Protection: Always wear safety glasses to protect your eyes from debris and potential hazards.
The crankshaft pulley is particularly dangerous. Accidental contact with a rotating crankshaft pulley can cause severe injury. Exercise extreme caution when working near this component.
Accessing the Diagram
Having a readily available serpentine belt diagram is essential for any DIY mechanic or car enthusiast. We have the full 2006 Mini Cooper S Serpentine Belt Diagram available for download. This diagram provides a clear and concise representation of the belt's routing, making it an invaluable tool for maintenance, troubleshooting, and repairs.