
2006 Mustang Gt Serpentine Belt Diagram
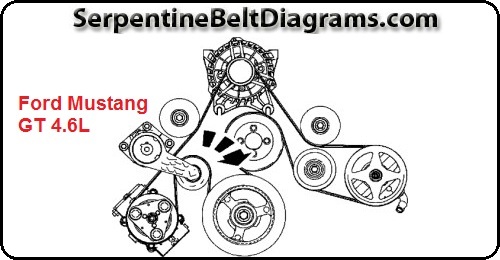
The serpentine belt on your 2006 Mustang GT is a critical component, responsible for powering numerous engine accessories. Knowing its routing and function is essential for routine maintenance, troubleshooting, and repairs. This guide provides a detailed overview of the 2006 Mustang GT serpentine belt diagram, empowering you to confidently tackle related tasks.
Purpose of the Serpentine Belt Diagram
The serpentine belt diagram is your visual guide for understanding the belt's routing around various pulleys. Its primary purposes are:
- Maintenance: Inspecting the belt for wear and tear is part of routine maintenance. The diagram helps you identify the correct path for proper inspection.
- Replacement: When the belt needs replacing (due to cracking, fraying, or excessive wear), the diagram ensures you install the new belt correctly. Incorrect routing can lead to accessory failure and potential engine damage.
- Troubleshooting: If you're experiencing issues like power steering failure, alternator problems, or air conditioning malfunctions, the diagram helps you isolate the belt and its associated components as potential causes.
- Learning: Understanding the serpentine belt system provides insight into how your engine's accessories are driven, enhancing your overall automotive knowledge.
Key Specs and Main Parts of the 2006 Mustang GT Serpentine Belt System
The 2006 Mustang GT is equipped with a 4.6L 3V V8 engine. The serpentine belt drives the following accessories:
- Crankshaft Pulley (Damper): This pulley is connected directly to the crankshaft and provides the rotational power to drive the belt. It also functions as a harmonic damper, absorbing vibrations.
- Alternator: The alternator generates electricity to power the car's electrical system and charge the battery.
- Power Steering Pump: This pump provides hydraulic pressure to assist steering.
- Air Conditioning Compressor: The compressor circulates refrigerant to cool the cabin air.
- Water Pump: The water pump circulates coolant through the engine to regulate temperature.
- Tensioner Pulley: This spring-loaded pulley maintains proper tension on the serpentine belt. It's crucial for preventing slippage and ensuring efficient accessory operation.
- Idler Pulley(s): These pulleys provide guidance and support to the belt, helping it maintain the correct path. Some configurations may have multiple idler pulleys.
A typical serpentine belt for the 2006 Mustang GT has a length of approximately 90 to 91 inches, although this can vary slightly depending on the specific model and options. The number of ribs is also important to match. Always check your vehicle's specifications or a trusted parts supplier for the correct belt size.
Symbols and Conventions in the Serpentine Belt Diagram
Understanding the symbols and conventions used in a serpentine belt diagram is crucial for accurate interpretation:
- Solid Lines: These represent the belt itself and indicate its path around the pulleys.
- Pulleys: These are depicted as circles, often with labels indicating the component they are attached to (e.g., ALT for alternator, P/S for power steering).
- Arrows: Arrows show the direction of belt rotation. Pay close attention to these, as incorrect routing can cause accessories to spin in the wrong direction, leading to damage.
- Tensioner: The tensioner pulley is often indicated with a specific symbol, sometimes resembling a spring or a pivoting arm. It's typically labeled.
- Smooth vs. Grooved Pulleys: The diagram may indicate whether a pulley is smooth (contacting the back of the belt) or grooved (contacting the ribbed side of the belt). This is essential for correct routing.
Some diagrams may also use color coding to differentiate between different belt sections or accessory systems, although this is less common.
How the Serpentine Belt System Works
The serpentine belt system is a closed-loop system driven by the crankshaft. As the engine turns, the crankshaft pulley rotates, driving the serpentine belt. The belt, in turn, drives all the accessories mentioned earlier. The tensioner pulley maintains the correct belt tension, preventing slippage and ensuring efficient power transfer to each accessory. Without proper tension, the belt may slip, leading to reduced accessory performance, squealing noises, and potential overheating.
The belt's routing pattern is crucial. It's designed to maximize contact with each pulley, ensuring adequate grip and preventing slippage. The specific path depends on the placement and configuration of the accessories within the engine compartment.
Real-World Use: Basic Troubleshooting Tips
The serpentine belt diagram is invaluable for troubleshooting common problems:
- Squealing Noise: A squealing noise, especially when the engine is first started or under load, often indicates a loose or worn serpentine belt. Check the belt tension and inspect the belt for signs of wear (cracks, fraying, glazing).
- Accessory Malfunction: If you experience power steering failure, alternator problems, or A/C issues, the serpentine belt is a prime suspect. Use the diagram to confirm that the belt is properly routed and tensioned.
- Belt Slippage: Slippage can cause reduced accessory performance and overheating. Check the belt tensioner for proper function. A weak tensioner spring may not provide enough tension, causing the belt to slip.
- Belt Damage: Regularly inspect the belt for cracks, fraying, missing chunks, or other signs of damage. Replace the belt immediately if you find any significant wear.
Example Troubleshooting Scenario: You notice that your power steering is intermittent, especially at low speeds. Consult the diagram to ensure the belt is correctly routed around the power steering pump pulley. Check the belt tension and inspect the belt for signs of glazing or wear. If the belt is loose or worn, it may be slipping on the pulley, causing the power steering to function improperly.
Safety Considerations
Working on the serpentine belt system involves potential hazards. Always observe the following safety precautions:
- Disconnect the Battery: Before working on any electrical components, disconnect the negative battery cable to prevent accidental shocks.
- Engine Off and Cool: Never work on the serpentine belt system while the engine is running or hot. Allow the engine to cool completely before starting any repairs.
- Moving Parts: Be extremely cautious around moving parts. Keep your hands and clothing clear of the belt and pulleys while the engine is running.
- Tensioner Spring: The tensioner pulley is spring-loaded and can snap back with considerable force. Use the appropriate tools and techniques to relieve the tension before removing the belt.
- Eye Protection: Wear safety glasses to protect your eyes from debris.
The crankshaft pulley is a particularly risky component. Never attempt to loosen or remove the crankshaft pulley bolt without the proper tools and techniques. Incorrect removal can damage the engine. If you're not comfortable working on the crankshaft pulley, it's best to consult a qualified mechanic.
Diagram Availability
Having a readily available serpentine belt diagram is crucial for performing maintenance and repairs on your 2006 Mustang GT. We have a high-resolution diagram available for download. This diagram provides a clear and accurate representation of the belt routing, helping you confidently tackle any serpentine belt-related tasks.
By understanding the serpentine belt system and using the diagram effectively, you can ensure your 2006 Mustang GT continues to run smoothly and reliably. Remember to prioritize safety and consult a qualified mechanic if you're unsure about any aspect of the repair process.