2006 Nissan Altima 2.5 Belt Diagram
Understanding the serpentine belt system in your 2006 Nissan Altima 2.5 is crucial for maintaining its performance and reliability. This article will serve as a comprehensive guide to the belt diagram, empowering you with the knowledge to tackle repairs, diagnose issues, and generally understand the layout of this vital component. We'll delve into the specifics of the diagram, its components, and practical applications, all while keeping safety a top priority.
Purpose of the Belt Diagram
The serpentine belt diagram is your roadmap to the 2006 Nissan Altima 2.5's accessory drive system. It illustrates the precise routing of the serpentine belt around various components. Knowing this routing is essential for several reasons:
- Belt Replacement: Correctly routing the new belt is paramount after removing the old one. An incorrect route can lead to component damage or failure, and even engine damage.
- Troubleshooting: The diagram helps you identify which accessory is malfunctioning based on symptoms. For instance, a squealing noise might indicate a slipping belt on the power steering pump.
- General Understanding: Familiarizing yourself with the diagram enhances your overall understanding of the engine's mechanics.
- Verification: If a repair has been made by someone else, you can use the diagram to verify the work was done correctly.
Key Specs and Main Parts
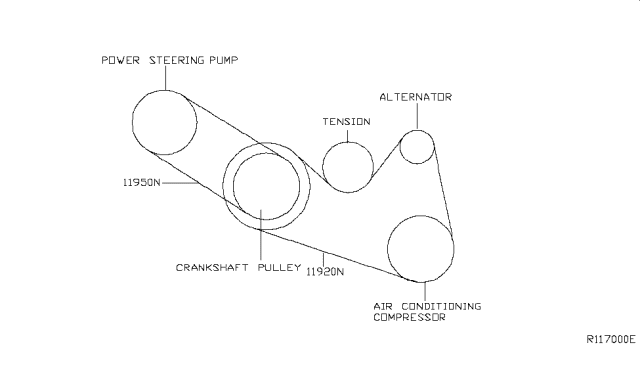
The 2006 Nissan Altima 2.5L uses a single serpentine belt to drive multiple engine accessories. The diagram illustrates the relationship between the following:
- Crankshaft Pulley (Harmonic Balancer): This is the main pulley driven by the engine, transferring power to the serpentine belt.
- Alternator Pulley: The alternator generates electrical power for the car's systems and charging the battery.
- Power Steering Pump Pulley: The power steering pump provides hydraulic assistance for steering.
- Air Conditioning (A/C) Compressor Pulley: The A/C compressor circulates refrigerant in the air conditioning system.
- Tensioner Pulley: The tensioner maintains the proper tension on the serpentine belt. It's typically spring-loaded and pivots to accommodate belt stretch.
- Idler Pulley (If equipped): An idler pulley provides a smooth surface for the belt to run against, often used to guide the belt around other components. Some models may or may not have an idler pulley.
- Serpentine Belt: A long, continuous belt made of reinforced rubber that transmits power from the crankshaft to the accessories.
Key Specs: The length and width of the serpentine belt are critical. While a specific part number is necessary for accurate replacement, the diagram illustrates how it fits, not necessarily what it is. Always consult your owner's manual or a parts catalog for the correct belt size and part number for your specific vehicle.
Symbols and Conventions in the Diagram
Understanding the symbols used in the belt diagram is essential for interpreting it correctly:
- Solid Lines: Represent the belt itself. The thicker the line, generally the more visible and important the segment is.
- Arrows: Indicate the direction of belt travel. Follow the arrows to understand how the belt moves around the various pulleys.
- Pulleys: Represented as circles or slightly stylized circles. Some diagrams might label the pulleys (e.g., "ALT" for alternator, "P/S" for power steering).
- Tensioner: The tensioner is typically shown with an arrow indicating the direction of tension. Sometimes, it's labeled with "TENSIONER" or a similar abbreviation.
- Color Coding (Less Common): Some advanced diagrams may use color coding to highlight specific sections or components. However, the standard 2006 Altima 2.5 belt diagram is usually black and white.
How the Serpentine Belt System Works
The serpentine belt system is ingeniously simple yet crucial. The crankshaft pulley, powered by the engine's combustion process, spins, driving the serpentine belt. This belt then snakes its way around the pulleys of the alternator, power steering pump, A/C compressor, and any idler pulleys. As the belt rotates these pulleys, it transfers mechanical energy, enabling these accessories to function.
The tensioner pulley plays a critical role in maintaining optimal belt tension. Too much tension can overload the bearings in the accessories, leading to premature failure. Too little tension causes the belt to slip, reducing the efficiency of the accessories and potentially generating noise. The tensioner's spring-loaded mechanism automatically adjusts to keep the belt properly tensioned, even as the belt stretches over time.
Real-World Use and Basic Troubleshooting
Here's how the belt diagram comes in handy in real-world situations:
- Squealing Noise: A high-pitched squealing noise, especially when the engine is first started or under load (e.g., turning the steering wheel), often indicates a slipping belt. Use the diagram to visually inspect the belt for cracks, wear, or glazing. Also, check the tensioner for proper operation. If the tensioner is bouncing excessively, it might need replacement.
- Accessory Failure: If your alternator stops charging, power steering fails, or A/C stops working, use the diagram to verify that the belt is properly routed and in good condition. A broken or missing belt will obviously cause all accessories to stop working.
- Belt Replacement: When replacing the belt, refer to the diagram to ensure correct routing. It's often helpful to take a picture of the old belt before removing it to serve as a reference. Use the tensioner to relieve tension on the belt, allowing you to easily remove and install the new belt.
Quick Checks:
- Visual inspection of the belt for cracks, fraying, or missing chunks.
- Checking the tensioner for proper spring action and alignment.
- Ensuring all pulleys are free to rotate smoothly.
Safety Precautions
Working on the serpentine belt system involves inherent risks. Always disconnect the negative battery cable before working on any part of the electrical system, including the alternator. Here are some other key safety considerations:
- Moving Parts: The engine must be OFF and cool before working near the serpentine belt. Accidental starting of the engine can cause severe injury or death.
- Hot Components: Avoid touching any components that may be hot, such as the engine block or exhaust manifold.
- Tools: Use the correct tools for the job. Using the wrong tool can damage components or cause injury.
- Eye Protection: Wear safety glasses to protect your eyes from debris.
- Tensioner Release: Be cautious when releasing the tensioner. The spring can be quite strong.
Risky Components: The crankshaft pulley, alternator, and A/C compressor are all directly connected to the engine and can cause serious injury if touched while the engine is running or if precautions are not taken during servicing. The tensioner spring can also be a source of injury if not handled correctly.
By understanding the 2006 Nissan Altima 2.5 belt diagram and following proper safety precautions, you can confidently maintain and troubleshoot this critical engine system.
We have a downloadable version of the belt diagram file available. Please follow the instructions below to get the file: [Instructions to download the diagram would go here].