2006 Nissan Altima 2.5 Serpentine Belt Diagram
For the seasoned DIY mechanic or experienced car owner tackling a 2006 Nissan Altima 2.5L, understanding the serpentine belt system is crucial. This article provides a detailed breakdown of the serpentine belt diagram for this vehicle, covering its purpose, key components, function, and troubleshooting. Consider this your comprehensive guide to keeping your Altima running smoothly.
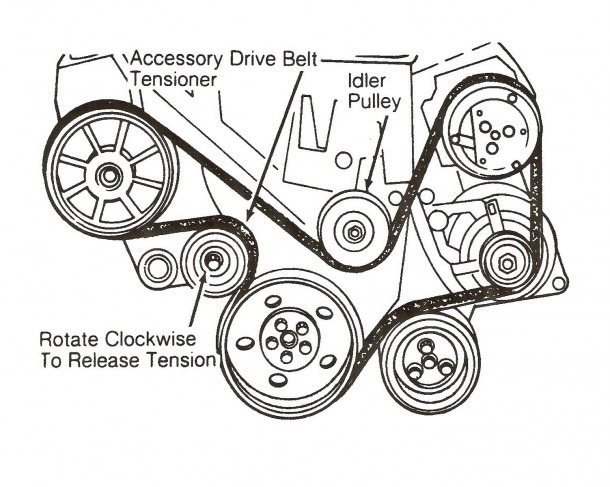
Why You Need the Serpentine Belt Diagram
The serpentine belt diagram isn't just a pretty picture; it's an indispensable tool for several reasons:
- Repair and Replacement: The most obvious use. When replacing a worn or broken serpentine belt, the diagram ensures you route the new belt correctly. Incorrect routing can lead to component failure and even engine damage.
- Troubleshooting Accessory Issues: If your power steering isn't working, your AC is blowing hot air, or your alternator isn't charging the battery, the serpentine belt or its components are prime suspects. The diagram helps you identify which accessories are driven by the belt.
- Preventative Maintenance: Regularly inspecting the serpentine belt for cracks, wear, or glazing is vital. The diagram aids in locating all the belt's contact points for a thorough inspection.
- Understanding Vehicle Systems: Even if you're not actively working on the car, understanding the serpentine belt system can deepen your knowledge of automotive mechanics and how the engine powers various accessories.
Key Specs and Main Parts
The 2006 Nissan Altima 2.5L utilizes a single, multi-ribbed serpentine belt to drive several key engine accessories. Here's a breakdown of the main components:
- Crankshaft Pulley (Harmonic Balancer): The crankshaft pulley, connected directly to the engine's crankshaft, is the driving force behind the entire system. It's a large pulley at the bottom of the engine.
- Alternator Pulley: The alternator, responsible for charging the battery, is driven by the serpentine belt.
- Power Steering Pump Pulley: The power steering pump, which provides hydraulic assistance to the steering system, is another accessory powered by the belt.
- Air Conditioning (AC) Compressor Pulley: The AC compressor, part of the air conditioning system, is also driven by the serpentine belt.
- Tensioner Pulley: The tensioner pulley is a spring-loaded pulley that maintains the correct tension on the serpentine belt. It's crucial for proper belt operation and prevents slippage. It typically has a bolt that allows you to relieve the tension for belt removal and installation.
- Idler Pulley (if equipped): Some Altima 2.5L engines may have an idler pulley. An idler pulley is a smooth pulley that guides the belt around the system and helps increase its contact area on other pulleys.
Deciphering the Diagram: Symbols and Conventions
Serpentine belt diagrams use a few standard symbols and conventions. Understanding these makes the diagram much easier to read:
- Solid Line: Represents the serpentine belt itself. The thickness of the line doesn't necessarily indicate anything specific.
- Pulleys: Pulleys are depicted as circles. Inside the circle, you'll usually find a label indicating what the pulley belongs to (e.g., "ALT" for alternator, "P/S" for power steering, "A/C" for air conditioning).
- Arrows: Arrows indicate the direction of belt travel. Pay close attention to these, as the belt must be routed correctly to ensure proper operation.
- Smooth vs. Grooved Pulleys: Smooth pulleys indicate the back (smooth side) of the belt makes contact, while grooved pulleys indicate the ribbed side of the belt makes contact.
- Tensioner Location: The tensioner pulley is usually clearly labeled and often has a symbol indicating the direction it needs to be moved to relieve tension (e.g., an arrow showing which way to push or rotate the tensioner).
How It Works: The Serpentine Belt System in Action
The serpentine belt system is relatively simple in principle. The crankshaft pulley, powered by the engine's combustion, drives the serpentine belt. The belt then wraps around the various accessory pulleys, transferring the rotational energy from the engine to these components. The tensioner pulley maintains consistent tension on the belt, preventing slippage and ensuring efficient power transfer. If the belt slips, accessories will not function properly and can cause damage to the engine and accessories.
The placement of the pulleys and the routing of the belt are carefully designed to ensure optimal contact area and efficient power transfer. The diagram shows you the correct way to route the belt to achieve this.
Real-World Use: Troubleshooting and Maintenance Tips
Here are some common issues related to the serpentine belt and how the diagram can help:
- Squealing Noise: A squealing noise, especially when the engine is first started or when the AC is turned on, often indicates a slipping serpentine belt. Check the belt tensioner for proper function and inspect the belt for wear, glazing, or contamination (oil or coolant). The diagram allows you to easily locate the tensioner.
- Accessory Malfunctions: If your power steering fails, the AC stops working, or the battery isn't charging, check the serpentine belt. A broken belt will immediately disable all accessories. A partially damaged belt can cause intermittent problems. The diagram will tell you which accessories are in the circuit.
- Belt Inspection: Regularly inspect the belt for cracks, fraying, or missing ribs. Replace the belt if you find any significant damage. Use the diagram to locate all the points where the belt makes contact with pulleys for a thorough inspection. A worn belt will look shiny and can be stiff.
- Proper Belt Installation: Always refer to the diagram when installing a new serpentine belt. Incorrect routing is a common mistake and can lead to serious problems. Before starting, take a photo or make your own drawing of how the belt is routed as a safeguard.
Safety Considerations
Working on the serpentine belt system can be dangerous if proper precautions aren't taken:
- Engine Off: Always work on the serpentine belt system with the engine off and the key removed from the ignition.
- Hot Engine: Allow the engine to cool down completely before working on the belt. The engine components can be extremely hot and cause severe burns.
- Moving Parts: Be aware of the potential for moving parts when the engine is running. Keep your hands and clothing away from the belt and pulleys when the engine is running, even for a brief inspection.
- Battery Disconnect: Consider disconnecting the negative terminal of the battery to prevent accidental starting of the engine while you're working on the system, especially if you're dealing with the alternator.
- Tensioner Tool: Use the correct tool to relieve the tension on the tensioner pulley. Using improvised tools can be dangerous and can damage the tensioner.
The serpentine belt system is a critical part of your 2006 Nissan Altima 2.5L. Understanding how it works and using the correct diagram will help you maintain your vehicle and troubleshoot problems effectively.
We have the 2006 Nissan Altima 2.5L Serpentine Belt Diagram available for download. This file will provide you with a clear visual representation of the belt routing, making maintenance and repairs much easier.