2006 Nissan Maxima Fuse Box Diagram Under The Hood
For the seasoned DIYer or car enthusiast working on a 2006 Nissan Maxima, understanding the under-the-hood fuse box is absolutely critical. This isn't just about swapping a blown fuse; it's about understanding your car's electrical architecture, troubleshooting issues effectively, and potentially even making informed modifications. This article dives deep into the 2006 Maxima's under-hood fuse box diagram, providing a comprehensive guide to its layout, functionality, and safe usage.
Purpose of the Fuse Box Diagram
The fuse box diagram is your roadmap to your car's electrical system. It's a visual representation of how different circuits are protected by individual fuses and relays. Why is this important? Consider these scenarios:
- Troubleshooting Electrical Issues: If your headlights suddenly stop working, or your power windows refuse to budge, the fuse box is the first place to look. The diagram will tell you which fuse controls that specific circuit.
- Performing Electrical Repairs: Replacing a faulty component might involve disconnecting power to that circuit. The diagram identifies the relevant fuse to pull, ensuring your safety and preventing damage to other systems.
- Adding Aftermarket Accessories: Installing a new stereo, fog lights, or any other electrical accessory requires tapping into the car's existing electrical system. The diagram helps you identify suitable power sources and ensures you're properly protecting the new circuit with an appropriate fuse.
- Learning and Understanding Your Car: For those who are simply curious about how their car works, the fuse box diagram provides valuable insights into the vehicle's electrical design.
Key Specs and Main Parts of the 2006 Maxima Under-Hood Fuse Box
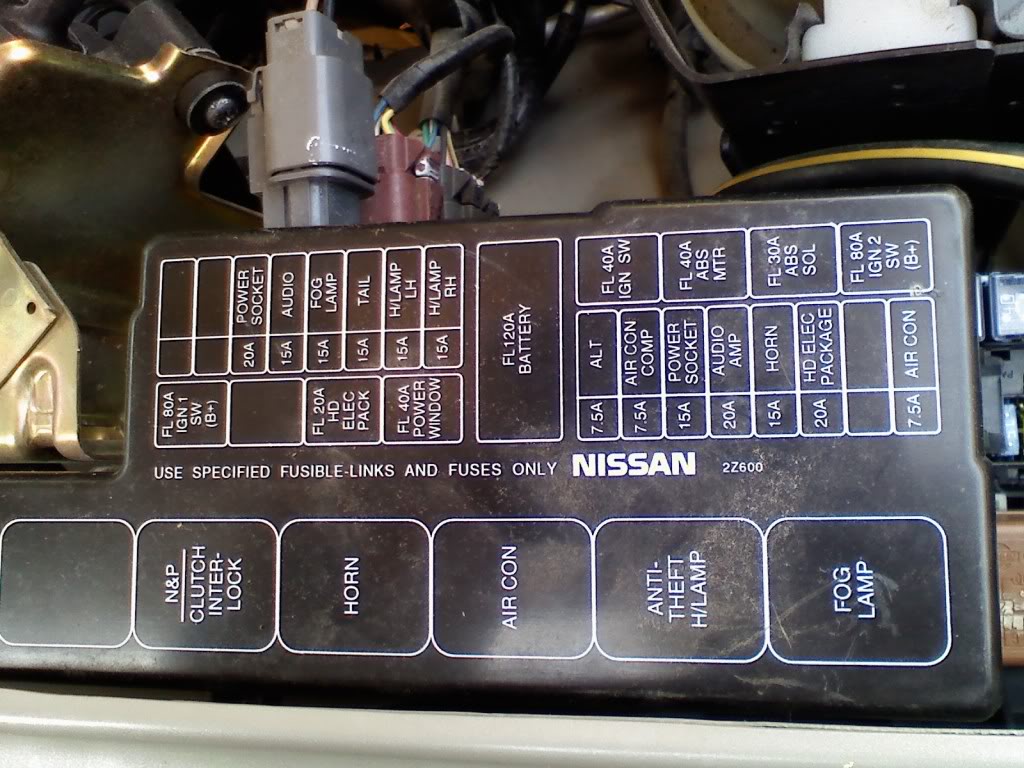
The 2006 Nissan Maxima typically has two main fuse boxes: one located inside the cabin (usually under the dashboard) and one under the hood, often near the battery. We're focusing on the under-hood fuse box, which handles high-current components and circuits vital for engine operation.
Key components housed within the under-hood fuse box include:
- Fuses: These are the sacrificial components designed to protect circuits from overcurrent. They contain a thin wire that melts and breaks the circuit if the current exceeds a specified amperage rating. Fuses are rated in Amps (A), such as 10A, 15A, 20A, etc.
- Relays: These are electrically operated switches that control high-current circuits using a low-current signal. Relays are used to switch on devices like headlights, the fuel pump, and the starter motor. They consist of a coil, a common terminal, a normally open (NO) terminal, and a normally closed (NC) terminal. When the coil is energized, the common terminal switches from NC to NO, completing the circuit.
- Fusible Links: These are larger, heavier-duty fuses designed to protect major electrical components like the alternator and the main power distribution system. They are often encased in a heat-resistant material.
- Connectors and Wiring Harnesses: These provide the physical connections between the fuse box and the various electrical components in the vehicle.
The physical layout of the fuse box varies slightly depending on the exact trim level and options of your 2006 Maxima. Therefore, always consult the specific diagram for *your* vehicle.
Understanding Fuse Box Diagram Symbols
The fuse box diagram uses a standardized set of symbols to represent different components and their connections. Here's a breakdown of common symbols:
- Fuses: Typically represented by a small rectangle with a wavy line inside. The amperage rating is usually printed next to the symbol.
- Relays: Often shown as a square or rectangle with internal symbols indicating the coil, common terminal, normally open (NO), and normally closed (NC) contacts.
- Fusible Links: Represented by a thicker line or a symbol similar to a fuse but with a different shape.
- Lines: Solid lines indicate wires connecting components. Dashed lines may indicate ground connections or control signals.
- Colors: Wire colors are often indicated on the diagram using abbreviations (e.g., BLU for blue, RED for red, GRN for green). These colors are important for tracing wires and identifying specific circuits.
- Icons: Specific icons represent the components that the fuse or relay protects, such as headlights, windshield wipers, power windows, etc. These icons vary, but are often intuitive (e.g., a lightbulb for headlights).
Understanding these symbols is crucial for accurately interpreting the diagram and identifying the correct fuse or relay for a specific circuit.
How the Fuse Box Works: A Simplified Explanation
The fuse box acts as a central distribution point and protection hub for the car's electrical system. Power from the battery flows into the fuse box, and from there, it's distributed to various circuits throughout the vehicle. Each circuit is protected by a fuse or fusible link with a specific amperage rating. If the current in a circuit exceeds the fuse's rating (due to a short circuit, a faulty component, or an overload), the fuse blows, interrupting the current flow and preventing damage to other components.
Relays act as electrically controlled switches. A low-current signal from a switch or control module activates the relay, which then closes a high-current circuit to power a device like the headlights or the starter motor. This allows the use of small, low-current switches to control powerful electrical components.
Real-World Use: Basic Troubleshooting Tips
Here's how to use the fuse box diagram for basic troubleshooting:
- Identify the Problem: Determine which electrical component isn't working correctly (e.g., the radio, headlights, power windows).
- Consult the Diagram: Locate the fuse box diagram for your 2006 Maxima (available for download below). Find the fuse or relay that corresponds to the malfunctioning component.
- Inspect the Fuse: Visually inspect the fuse. If the wire inside is broken or blackened, the fuse is blown. Use a fuse puller (usually included in the fuse box) to remove the fuse.
- Test the Fuse (Optional): Use a multimeter to test the fuse for continuity. A good fuse will have continuity (zero resistance). A blown fuse will have no continuity (infinite resistance).
- Replace the Fuse: Replace the blown fuse with a new fuse of the *exact same amperage rating*. Using a fuse with a higher amperage rating can overload the circuit and cause serious damage.
- Test the Component: After replacing the fuse, test the component to see if it's now working correctly. If the fuse blows again immediately, there's a more serious problem in the circuit that needs further investigation.
Safety Considerations
Working with automotive electrical systems can be dangerous. Here are some important safety precautions:
- Disconnect the Battery: Before working on the fuse box, disconnect the negative (-) terminal of the battery. This prevents accidental short circuits and electrical shocks.
- Use Insulated Tools: Always use insulated tools when working with electrical components.
- Never Replace a Fuse with a Higher Amperage Rating: Doing so can overload the circuit and cause a fire.
- Be Careful Around Fusible Links: Fusible links protect major electrical components and can carry high currents. Handle them with care.
- Consult a Professional: If you're not comfortable working with electrical systems, or if you're unable to diagnose the problem, consult a qualified mechanic. Especially if you suspect something more serious than a fuse, like a short to ground.
The Airbag System fuse is particularly critical. Never tamper with it unless you know what you're doing, as improper handling can deploy the airbags, causing serious injury.
We have a copy of the 2006 Nissan Maxima Under The Hood Fuse Box Diagram available for download. It provides detailed information about the location and function of each fuse and relay, making it an invaluable resource for troubleshooting and repair.