2006 Nissan Pathfinder Serpentine Belt Diagram
The serpentine belt, also known as the accessory drive belt, is a crucial component in your 2006 Nissan Pathfinder. It's responsible for powering several vital engine accessories. Understanding its routing and condition is essential for maintenance and repairs. This article provides a detailed guide to the 2006 Nissan Pathfinder serpentine belt diagram, explaining its purpose, components, function, and how to use it for troubleshooting.
Why This Diagram Matters
A serpentine belt diagram is invaluable for several reasons. Firstly, it’s essential when replacing a worn or broken belt. Incorrect routing can cause serious damage to your engine accessories. Secondly, it helps diagnose accessory drive problems. Knowing the belt's path and the components it drives allows you to isolate potential issues. Thirdly, it's a valuable learning tool for understanding how your engine's accessory systems function. The diagram saves time and reduces the risk of incorrect installations or diagnoses, potentially saving you hundreds of dollars in mechanic fees.
Key Specs and Main Parts
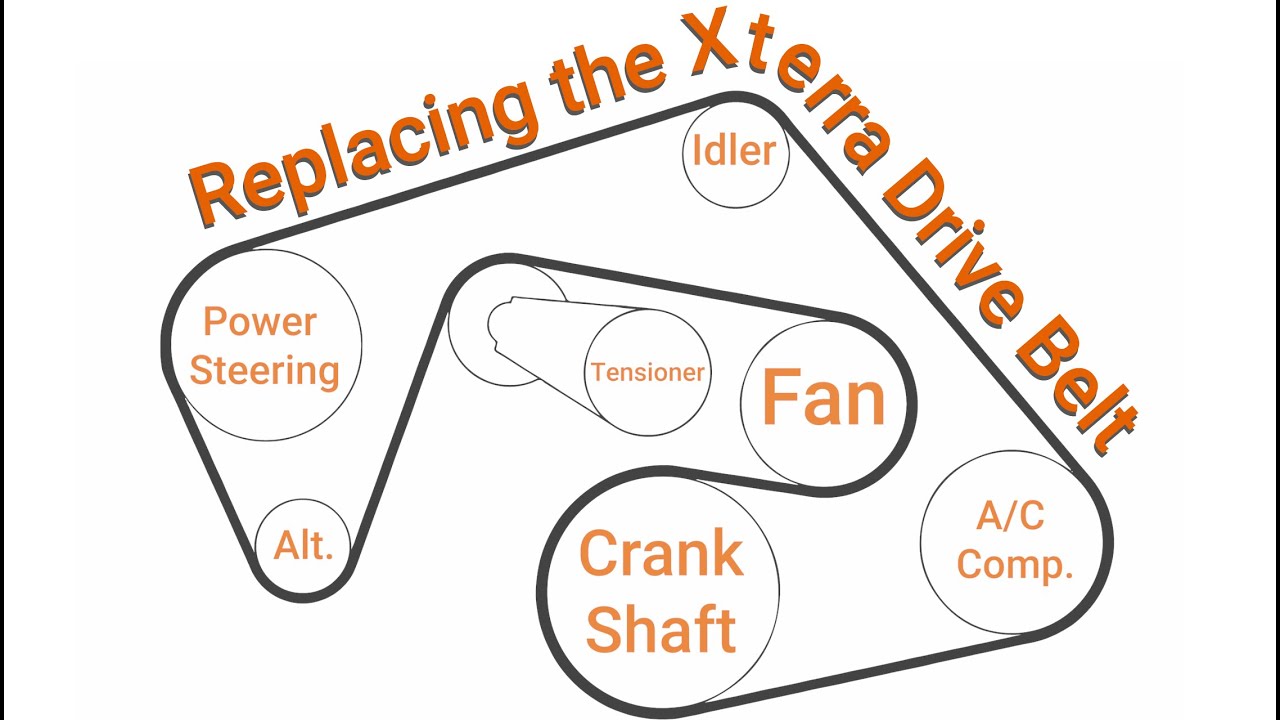
The 2006 Nissan Pathfinder used the VQ40DE 4.0L V6 engine. The serpentine belt system for this engine typically includes the following components:
- Crankshaft Pulley: Driven directly by the engine, it's the primary power source for the belt.
- Alternator: Generates electrical power for the vehicle.
- Power Steering Pump: Provides hydraulic pressure to assist steering.
- Air Conditioning Compressor: Compresses refrigerant for the A/C system.
- Water Pump: Circulates coolant through the engine to regulate temperature.
- Idler Pulley(s): Smooth pulleys used to guide the belt and maintain proper tension.
- Tensioner Pulley: An automatic spring-loaded mechanism that maintains the correct belt tension. Proper tension is critical for optimal performance and belt longevity.
The specific belt length will vary depending on the year and options installed on the vehicle (e.g., with or without towing package). Refer to your vehicle's owner's manual or a parts catalog to identify the correct belt part number (e.g., a Gates or Goodyear belt specifically designed for the VQ40DE engine). The diagram shows the specific routing around each of these components.
Understanding the Diagram's Symbols
Serpentine belt diagrams use a few standard symbols to represent the various components and the belt's routing. Here's a breakdown:
- Solid Lines: Represent the serpentine belt itself. The thickness of the line doesn't usually convey specific information.
- Arrows: Indicate the direction of belt travel around each pulley. This is critical for understanding the belt's path.
- Circles/Ovals: Represent the pulleys of the various components (crankshaft, alternator, etc.). Sometimes, the diagram will include a small icon within the circle to indicate the component type.
- Text Labels: Identify each component (e.g., "Alternator," "Power Steering Pump").
- Dotted Lines (Less Common): Might represent the relative position of components *behind* others in the diagram, helping to clarify the belt's path in three dimensions.
Color-coding is rarely used in these diagrams. The focus is on clarity through line placement and arrows indicating direction.
How It Works: The Serpentine Belt System
The crankshaft pulley is the driving force behind the entire system. As the engine rotates, the crankshaft pulley spins, transferring power to the serpentine belt. The belt, in turn, wraps around and drives the pulleys of the alternator, power steering pump, A/C compressor, and water pump. The tensioner pulley maintains optimal belt tension, preventing slippage and ensuring efficient power transfer. If the belt is too loose, accessories will not operate at full capacity and the belt might squeal. If it's too tight, it can place excessive stress on the accessory bearings, shortening their lifespan.
The serpentine belt's design is a "multi-V" or "ribbed" belt, maximizing surface contact with the pulleys. This design improves grip and reduces slippage compared to older, single-V belts.
Real-World Use: Basic Troubleshooting
Here are a few common problems and how the diagram can help with troubleshooting:
- Squealing Noise: Often indicates a loose or worn belt. Inspect the belt for cracks, glazing, or missing ribs. Use the diagram to ensure the belt is properly routed and that the tensioner is functioning correctly. A failing tensioner may not apply enough pressure.
- Accessory Malfunction (e.g., power steering failure, A/C not working): This could be due to a broken belt. Immediately check the belt's condition. If the belt is intact, the diagram can help you determine which accessories are on the same belt loop. If one accessory is failing but others are working, the issue is likely with the individual accessory, not the belt itself.
- Overheating: If the water pump is driven by the serpentine belt, a broken or slipping belt can cause the engine to overheat. Immediately stop the vehicle and inspect the belt.
- Battery Not Charging: A broken or slipping belt may prevent the alternator from properly charging the battery. Check the belt's condition and routing.
When troubleshooting, always start with a visual inspection. Compare the actual belt routing with the diagram to confirm it's correct. Check for wear, damage, and proper tension.
Safety Considerations
Working on the serpentine belt system involves several safety risks:
- Moving Parts: Never work on the serpentine belt while the engine is running. The belt and pulleys can cause serious injury.
- Hot Components: The engine and exhaust components can be extremely hot. Allow the engine to cool completely before working in the engine compartment.
- Tensioner Spring: The tensioner pulley is spring-loaded and can snap back forcefully if not handled correctly. Always use the appropriate tools to release the tensioner and secure it in the released position before removing the belt.
- Battery: Disconnect the negative battery terminal before working on any electrical components, including the alternator.
Always wear safety glasses and gloves when working on your vehicle. If you are not comfortable performing this type of work, consult a qualified mechanic.
We have a downloadable version of the 2006 Nissan Pathfinder Serpentine Belt Diagram available for you. This high-resolution diagram will provide a clearer visual reference for your repair and maintenance needs.