2006 Nissan Sentra Fuse Box Diagram
For the intermediate car owner, modder, or DIY mechanic, understanding your vehicle's electrical system is crucial. At the heart of that system is the fuse box. This article dives deep into the 2006 Nissan Sentra fuse box diagram, equipping you with the knowledge to diagnose and troubleshoot electrical issues with confidence. We'll cover the purpose, key specs, symbols, functionality, real-world use, and safety considerations. Plus, we have the full diagram available for download – stick around!
Purpose: Why Understand the Fuse Box?
The fuse box is the central distribution point for electrical power within your 2006 Nissan Sentra. It protects the car's electrical circuits from overcurrent, which can cause damage or even fires. Each fuse acts as a sacrificial link, designed to blow (interrupt the circuit) if the current exceeds a safe level. Understanding the fuse box diagram is essential for several reasons:
- Electrical Repairs: Identifying and replacing blown fuses is often the first step in diagnosing and fixing electrical problems.
- Adding Accessories: When installing aftermarket accessories (e.g., a new stereo, fog lights), knowing which fuses control which circuits is crucial for safe and reliable wiring.
- Learning Your Vehicle: Gaining a basic understanding of your car's electrical system empowers you to maintain it more effectively and potentially save money on professional repairs.
- Troubleshooting: A blown fuse can pinpoint the source of a problem quickly. For example, a consistently blowing fuse for the radio might indicate a short circuit in the radio wiring.
Key Specs and Main Parts
The 2006 Nissan Sentra typically has two fuse box locations:
- Interior Fuse Box: Located inside the cabin, usually under the dashboard on the driver's side. This fuse box primarily houses fuses for interior components like the radio, lights, and power windows.
- Engine Compartment Fuse Box: Situated in the engine bay, this box contains fuses and relays for critical engine components, such as the fuel pump, ignition system, and cooling fan.
Within each fuse box, you'll find:
- Fuses: These are the small, color-coded components that protect individual circuits. Each fuse has an amperage rating (e.g., 10A, 15A, 20A), indicating the maximum current it can handle before blowing.
- Relays: Relays are electromechanical switches that control high-current circuits using a low-current signal. They are used for components like headlights, the starter motor, and the air conditioning compressor.
- Fuse Puller: A small plastic tool (often included in the fuse box) used to safely remove fuses without damaging them.
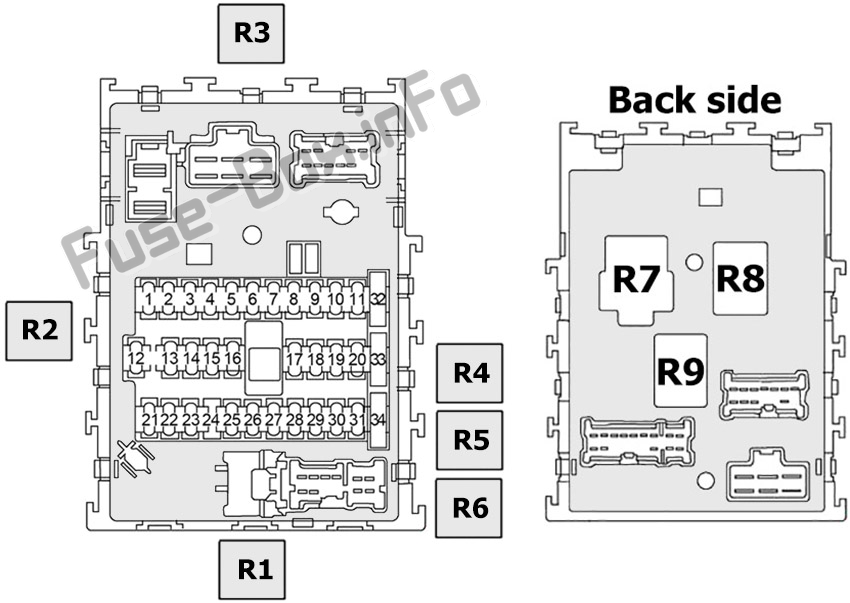
- Diagram/Label: A printed or embossed label inside the fuse box cover that identifies the function of each fuse and relay. This is the diagram we're discussing.
Symbols: Deciphering the Diagram
Fuse box diagrams use various symbols to represent different components and circuits. Understanding these symbols is key to interpreting the diagram correctly.
- Lines: Solid lines represent electrical wires connecting fuses, relays, and components. Dashed lines may indicate a shared ground or a connection point.
- Color Codes: While not always consistent across all diagrams, color-coded wires are often indicated. A legend may be provided to explain the color code. For example, red might represent a positive wire, while black might represent a ground wire.
- Icons: Icons represent the components powered by each fuse or relay. Common icons include:
- Headlight icon: Represents the headlight circuit.
- Radio icon: Represents the radio circuit.
- Window icon: Represents the power window circuit.
- Fuel pump icon: Represents the fuel pump circuit.
- Amperage Ratings: Each fuse is labeled with its amperage rating (e.g., 10A, 15A, 20A). This indicates the maximum current the fuse can handle. Never replace a fuse with a higher amperage rating, as this can overload the circuit and cause a fire.
- Relay Symbols: Relays are typically represented by a square or rectangular box with pins indicating the coil and contact connections.
How It Works: From Battery to Component
The 2006 Nissan Sentra's electrical system works by distributing power from the battery to various components through a network of wires, fuses, and relays. Here's a simplified overview:
- The battery provides the initial source of electrical power.
- The power travels through the main wiring harness to the fuse boxes.
- Each fuse protects a specific circuit. If the current in that circuit exceeds the fuse's amperage rating, the fuse blows, interrupting the flow of electricity and preventing damage to the component.
- Relays act as switches, allowing a low-current signal from the ignition switch or a control module to activate a high-current circuit, such as the headlights or the starter motor.
- From the fuse box, power flows to the individual components (e.g., lights, radio, sensors) via dedicated wiring.
Real-World Use: Basic Troubleshooting Tips
Using the fuse box diagram, you can troubleshoot basic electrical problems:
- Symptom Identification: Start by identifying the specific symptom (e.g., the radio doesn't work, the headlights are dim).
- Diagram Consultation: Consult the fuse box diagram to locate the fuse or relay associated with the affected component.
- Fuse Inspection: Visually inspect the fuse. A blown fuse will typically have a broken filament. You can also use a multimeter to test for continuity across the fuse terminals. If there is no continuity, the fuse is blown.
- Fuse Replacement: Replace the blown fuse with a new fuse of the same amperage rating.
- Testing: Turn on the affected component to see if it now functions correctly.
- Repeat Blowing: If the new fuse blows immediately or soon after replacement, there is likely a short circuit in the wiring or component. Further diagnosis by a qualified mechanic may be required.
Example: If your power windows stop working, check the fuse box diagram for the "Power Windows" fuse. If the fuse is blown, replace it with a new fuse of the same amperage rating. If the new fuse blows immediately, there's likely a short circuit in the window motor or wiring.
Safety: Highlighting Risky Components
Working with electrical systems can be dangerous. Here are some safety precautions:
- Disconnect the Battery: Before working on any electrical components, disconnect the negative terminal of the battery to prevent accidental shorts or shocks.
- Use Proper Tools: Use insulated tools designed for electrical work.
- Never Replace a Fuse with a Higher Amperage Rating: This can overload the circuit and cause a fire.
- Be Careful with Relays: Relays can contain high voltage. Avoid touching the terminals while the circuit is energized.
- When in doubt, Consult a Professional: If you're not comfortable working with electrical systems, seek help from a qualified mechanic.
- High-Current Fuses & Relays: Be particularly careful around the main fuses and relays in the engine compartment fuse box. These components handle high currents and can pose a significant electrical shock hazard. Examples include the main fuse protecting the charging system and the starter relay.
Important Note: Always refer to the 2006 Nissan Sentra's official service manual for the most accurate and up-to-date information on fuse box locations, fuse ratings, and wiring diagrams. The information provided here is for general guidance only.
We have the complete 2006 Nissan Sentra fuse box diagram file available for download. This detailed diagram will be an invaluable resource for your DIY repairs and modifications. With the diagram and the knowledge you gained from this article, you'll be well-equipped to tackle basic electrical troubleshooting and maintenance on your 2006 Nissan Sentra.