2006 Pontiac Grand Prix Belt Diagram
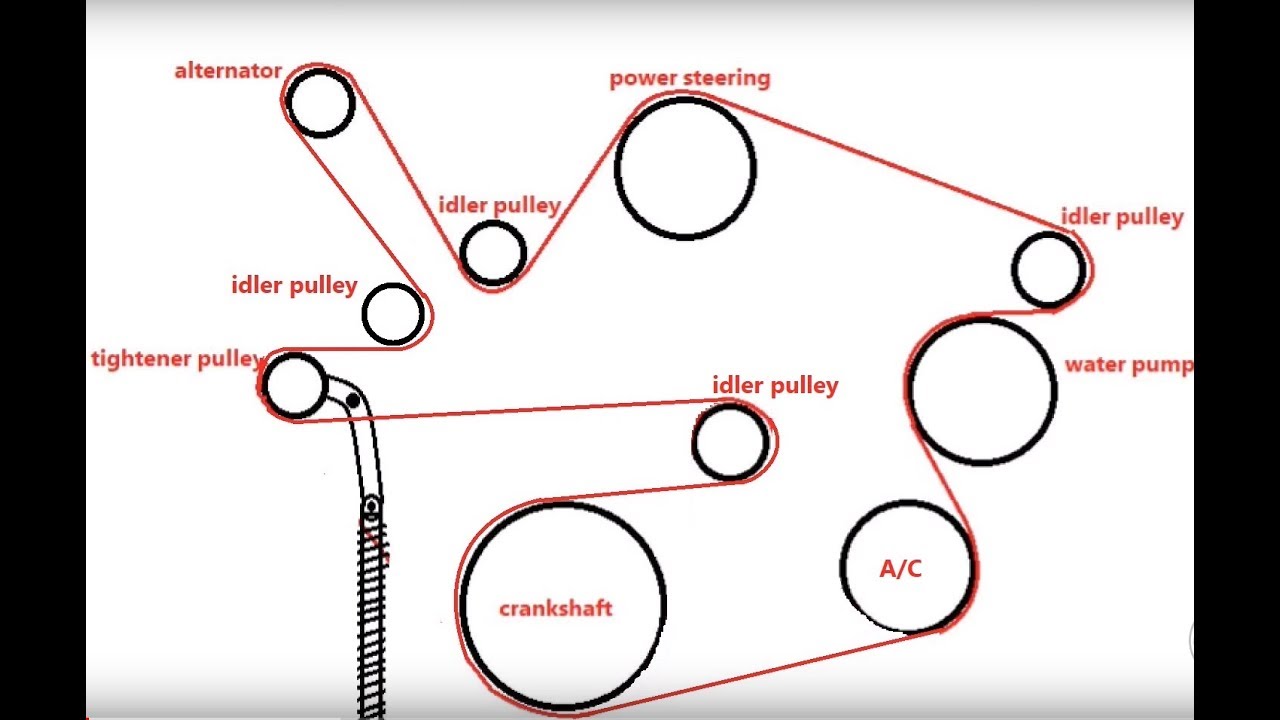
The serpentine belt on a 2006 Pontiac Grand Prix is a critical component responsible for powering various engine accessories. Understanding its routing and function is essential for preventative maintenance, diagnosing problems, and performing repairs. This article provides a comprehensive guide to the 2006 Grand Prix serpentine belt diagram, equipping you with the knowledge needed to tackle this aspect of your vehicle's upkeep. We also provide access to a downloadable diagram, allowing you to have this important resource on hand.
Purpose of the Serpentine Belt Diagram
The primary purpose of a serpentine belt diagram is to illustrate the precise routing of the belt around the various pulleys in the engine bay. This is vital for several reasons:
- Repair and Replacement: When replacing a worn or broken belt, the diagram ensures correct reinstallation. Incorrect routing can lead to component failure, reduced performance, and potential engine damage.
- Troubleshooting: The diagram aids in identifying the components driven by the belt, allowing for more efficient diagnosis of issues like power steering failure, AC problems, or charging system malfunctions.
- Preventative Maintenance: Familiarity with the belt's routing facilitates visual inspection for wear, cracks, or other damage, enabling timely replacement before catastrophic failure occurs.
- Understanding Vehicle Systems: Learning the belt routing provides a better understanding of how different engine accessories are interconnected and powered.
Key Specs and Main Parts
The 2006 Pontiac Grand Prix came equipped with two engine options, which affected the serpentine belt and its configuration. We'll primarily focus on the 3.8L V6 engine, as it was the more common option. The 3.6L V6 belt routing is similar, but it is important to consult the correct diagram for your engine.
Key Specs (3.8L V6)
- Belt Length: Approximately 101-102 inches (depending on specific accessory configuration - always verify with the correct part number for your VIN)
- Belt Type: Multi-rib serpentine belt
- Tensioner Type: Spring-loaded automatic tensioner
Main Parts Involved
- Crankshaft Pulley: The main driving pulley connected to the crankshaft. It transfers rotational power to the serpentine belt.
- Alternator Pulley: Driven by the belt to generate electricity, charging the battery and powering electrical systems.
- Power Steering Pump Pulley: Driven by the belt to provide hydraulic assistance for steering.
- Air Conditioning Compressor Pulley: Driven by the belt to compress refrigerant for the air conditioning system.
- Water Pump Pulley: Driven by the belt to circulate coolant throughout the engine, preventing overheating.
- Idler Pulley(s): Smooth pulleys used to guide the belt around other components and maintain proper tension and wrap angle.
- Belt Tensioner Pulley: An adjustable pulley that maintains the correct tension on the serpentine belt. This is typically spring-loaded and pivots to compensate for belt wear and stretch.
Serpentine Belt Diagram Symbols
Understanding the symbols used in the serpentine belt diagram is crucial for interpreting the routing information. Here's a breakdown of common symbols:
- Solid Lines: Represent the primary path of the serpentine belt.
- Dashed Lines: May indicate alternative belt routing options or the location of components behind other parts.
- Arrows: Indicate the direction of belt rotation around each pulley. This is essential for ensuring correct installation.
- Pulley Icons: Each pulley is represented by a circle. Some diagrams may label these circles with abbreviations for the specific component (e.g., ALT for alternator, PS for power steering).
- Text Labels: Diagrams typically include text labels identifying each component and providing other relevant information.
How It Works
The serpentine belt system works on the principle of friction. The crankshaft pulley, directly connected to the engine's crankshaft, spins as the engine runs. This rotational force is transferred to the serpentine belt, which wraps around various accessory pulleys. The friction between the belt and these pulleys causes them to rotate, driving the associated components (alternator, power steering pump, AC compressor, and water pump).
The belt tensioner plays a critical role in maintaining optimal belt tension. As the belt wears and stretches over time, the tensioner automatically adjusts to keep the belt tight against the pulleys. This ensures proper grip and prevents slippage, which can lead to reduced accessory performance and belt wear.
Real-World Use – Basic Troubleshooting Tips
Here are some common problems related to the serpentine belt and how the diagram can help in troubleshooting:
- Squealing Noise: A squealing noise, especially when the engine is first started or under load, often indicates a loose or worn serpentine belt. The diagram helps you identify the tensioner, which may be malfunctioning or requiring adjustment (though these tensioners are generally self-adjusting). Inspect the belt for cracks, glazing, or missing ribs. Belt dressing is generally not recommended, as it only provides a temporary fix and can attract dirt.
- Accessory Malfunction: If you experience a sudden loss of power steering, AC failure, or charging system problems, the serpentine belt may be broken or slipped off a pulley. Use the diagram to inspect the belt's condition and ensure it's properly routed. Check each pulley for free rotation, as a seized pulley can cause the belt to break.
- Belt Slippage: Evidenced by reduced accessory performance and potentially a burning rubber smell. The diagram helps you ensure the belt is properly routed and that the tensioner is functioning correctly.
- Visual Inspection: Regularly inspect the serpentine belt for wear and tear. Cracks, fraying, missing ribs, and glazing are all signs that the belt needs replacement. The diagram assists in quickly locating and inspecting the entire belt length and its contact points with the pulleys.
Safety Considerations
Working on the serpentine belt system involves potential hazards. Always disconnect the negative battery cable before working on any part of the engine. The engine must be cool before attempting any repairs. The following areas pose specific risks:
- Moving Parts: The serpentine belt and pulleys are rapidly rotating when the engine is running. Never attempt to adjust or inspect the belt while the engine is running.
- Tensioner Spring: The belt tensioner is under considerable spring tension. When releasing the tensioner to remove the belt, use a proper tool and exercise caution to avoid injury. The tensioner can snap back forcefully.
- Hot Surfaces: The engine components, particularly the exhaust manifold, can be extremely hot. Allow the engine to cool completely before working in the engine bay.
Always consult a repair manual or a qualified mechanic if you are unsure about any aspect of serpentine belt replacement or troubleshooting.
We have a downloadable PDF file containing the 2006 Pontiac Grand Prix serpentine belt diagram. This resource provides a visual aid that will be invaluable when working on your vehicle. You can download it here: [Link to Diagram - Placeholder].