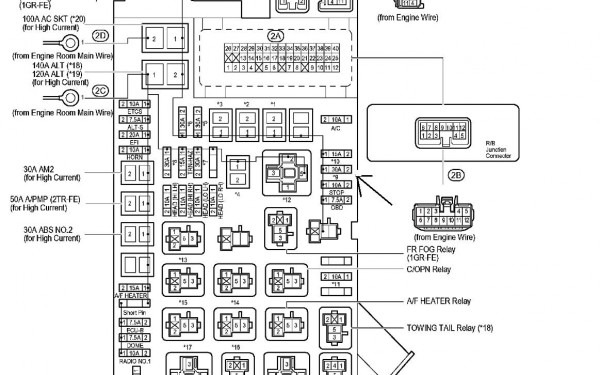
2006 Toyota Corolla Fuse Box Diagram
The 2006 Toyota Corolla is a reliable vehicle, but like any machine, it's prone to the occasional electrical hiccup. Understanding the fuse box diagram is absolutely crucial for diagnosing and resolving these issues yourself, saving you time and money. This article provides a detailed technical overview of the 2006 Corolla's fuse box diagram, empowering you to confidently tackle electrical troubleshooting.
Purpose of Understanding the Fuse Box Diagram
Why bother with a fuse box diagram? Several reasons make it indispensable. Primarily, it's your roadmap to the car's electrical system. Need to identify which fuse controls the power windows, the radio, or the headlights? The diagram gives you the answer. This is essential for:
- DIY Repairs: Fixing blown fuses is a common repair. Without the diagram, you're blindly guessing.
- Electrical Modifications: Adding aftermarket accessories (lights, stereos, alarms) requires tapping into the car's electrical system safely. The diagram helps you identify appropriate circuits and avoid overloading them.
- Troubleshooting: When an electrical component fails, the fuse box is often the first place to check. The diagram guides you to the right fuse for testing.
- Understanding Your Vehicle: Familiarizing yourself with the fuse layout provides a deeper understanding of how your Corolla's electrical system is designed and operated.
Key Specs and Main Parts
The 2006 Corolla typically has two fuse boxes: one located under the dashboard (usually on the driver's side, near the steering wheel) and another in the engine compartment, near the battery. Each fuse box contains a collection of fuses and relays, each protecting a specific circuit. Here's a breakdown of the key components and specifications:
- Fuses: These are sacrificial devices designed to break (or "blow") when the current exceeds a safe level. They are rated in Amperes (A), which indicates the maximum current they can handle. Common ratings include 5A, 7.5A, 10A, 15A, 20A, 25A, and 30A.
- Relays: Relays are electromechanical switches that use a small current to control a larger current. They are used to switch high-current circuits, such as headlights or the starter motor. They are typically identified by numbers (e.g., 90987-02027) and may have diagrams printed on their housings indicating their pin configurations.
- Fuse Box Housing: The plastic enclosure that holds the fuses and relays. The diagram is often printed on the inside of the cover or on a label affixed to the housing.
- Test Points: Some fuse boxes include test points, which are small metal contacts that allow you to easily measure the voltage at a specific fuse using a multimeter.
- Spare Fuses: Most Corollas have a few spare fuses of different ratings tucked away in the fuse box. These are invaluable for quickly replacing a blown fuse.
Decoding the Symbols: Lines, Colors, and Icons
The fuse box diagram uses various symbols and conventions to represent the electrical components and circuits. Understanding these symbols is essential for interpreting the diagram correctly.
- Lines: Lines represent wires or electrical connections. Thicker lines typically indicate higher-current circuits.
- Colors: Wire colors are often indicated on the diagram using abbreviations or color codes (e.g., "BLU" for Blue, "RED" for Red, "BLK" for Black). These codes can help you trace wires in the car's wiring harness.
- Icons: Icons represent the components protected by each fuse. Common icons include:
- Headlight: Indicates a fuse protecting the headlight circuit.
- Horn: Indicates a fuse protecting the horn circuit.
- Radio: Indicates a fuse protecting the radio circuit.
- Windshield Wiper: Indicates a fuse protecting the windshield wiper circuit.
- Cigar Lighter/Accessory Power Outlet: Indicates a fuse protecting the power outlet.
- Engine Control Unit (ECU): Indicates a fuse protecting the engine computer.
- ABS (Anti-lock Braking System): Indicates a fuse protecting the ABS system.
- Fuse Ratings (Amperes): The fuse rating is usually printed next to the fuse location on the diagram. It's crucial to replace a blown fuse with one of the same rating. Using a fuse with a higher rating can damage the circuit.
How It Works: From Battery to Component
The fuse box is essentially a distribution center for electrical power. Power from the battery flows through the main fuse(s) (often high-amperage fuses located near the battery) and then is distributed to various circuits via the fuses in the fuse boxes. Each fuse protects a specific component or group of components. For example, the power windows might be protected by a 20A fuse. If a short circuit or excessive current draw occurs in the power window circuit, the fuse will blow, interrupting the flow of current and preventing damage to the wiring and components. The relay controlled circuits work in a similar way, but rely on the relay to complete the path to the component needing power.
Understanding the flow of electricity from the battery, through the fuses and relays, and to the various components is key to effective troubleshooting.
Real-World Use: Basic Troubleshooting Tips
Here's how you can use the fuse box diagram to troubleshoot common electrical problems:
- Identify the Symptom: What's not working? Headlights, radio, power windows, etc.
- Locate the Relevant Fuse: Use the fuse box diagram to identify the fuse that corresponds to the malfunctioning component. Remember to check both fuse boxes.
- Inspect the Fuse: Visually inspect the fuse. A blown fuse will typically have a broken filament or a blackened appearance. Some fuses have a small window that allows you to see the filament without removing the fuse.
- Test the Fuse: Even if a fuse looks good, it's best to test it with a multimeter. Set the multimeter to the continuity setting (often indicated by a diode symbol or a beep) and touch the probes to the two terminals of the fuse. If the multimeter beeps or shows a reading of 0 ohms, the fuse is good. If it shows an open circuit (OL or infinite resistance), the fuse is blown.
- Replace the Fuse: If the fuse is blown, replace it with a new fuse of the same rating.
- Test the Component: After replacing the fuse, test the component to see if it's working.
- If the Fuse Blows Again: If the new fuse blows immediately or shortly after being replaced, there's likely a short circuit or overload in the circuit. This requires further investigation to identify and repair the cause. Don't keep replacing fuses with higher amperage ratings; this is a fire hazard.
Safety: Highlight Risky Components
Working with electrical systems can be dangerous. Always disconnect the negative battery cable before working on the fuse box or any other electrical component. Be especially cautious when working with circuits that control safety-related components, such as:
- Airbags: The airbag system contains explosive components. Mishandling can result in serious injury. Refer to the vehicle's service manual for proper procedures before working on any airbag-related circuits.
- Anti-lock Braking System (ABS): The ABS system is complex and requires specialized knowledge to diagnose and repair.
- Engine Control Unit (ECU): The ECU controls critical engine functions. Incorrect wiring or modifications can damage the ECU and cause serious engine problems.
Never bypass a fuse with a wire or other conductive material. This eliminates the protection provided by the fuse and can lead to overheating, fires, and damage to the vehicle. Also, be sure to only replace a blown fuse with a fuse with the exact same amperage. An under-rated fuse may blow unnecessarily, but an over-rated fuse will allow too much current to flow, potentially melting wires and causing a fire.
Remember: When in doubt, consult a qualified mechanic.
To help you get started, we have a PDF file with the 2006 Toyota Corolla Fuse Box Diagram. You can download it for a detailed view of all the fuse locations and their corresponding functions.