2006 Toyota Corolla Serpentine Belt Diagram
Let's dive into the serpentine belt system of the 2006 Toyota Corolla. This isn't just about replacing a worn-out belt; it's about understanding a crucial component that keeps your Corolla running smoothly. A serpentine belt diagram is your roadmap to understanding this system, making repairs easier, preventing future problems, and even deepening your overall automotive knowledge.
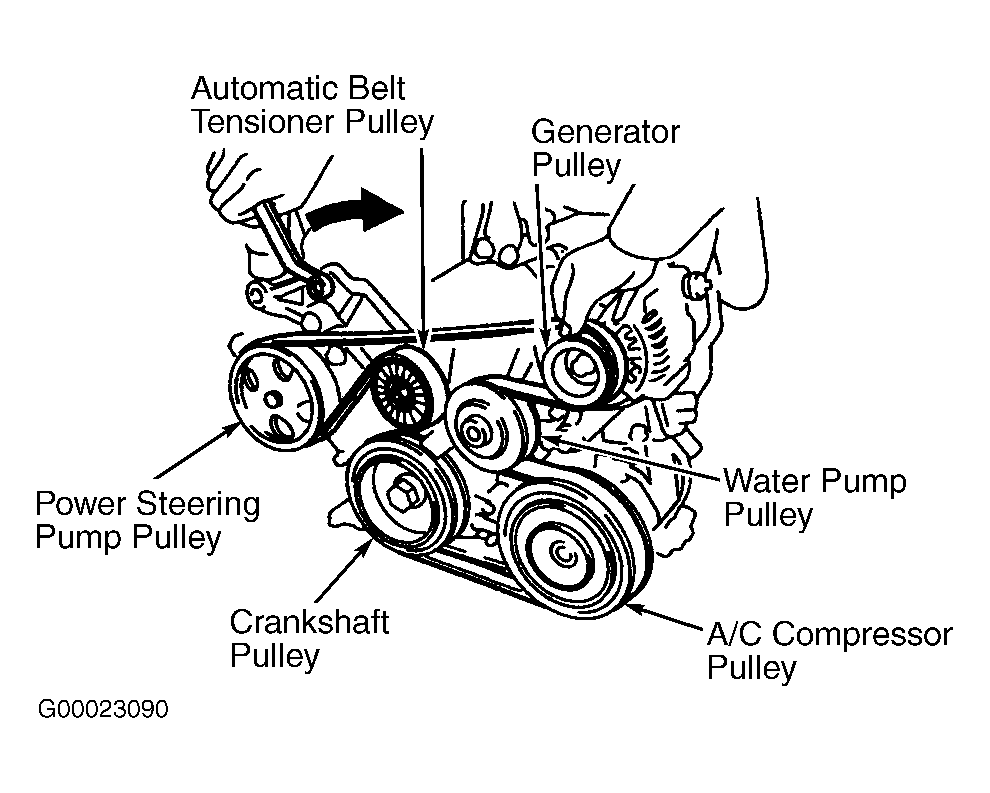
Purpose of the Serpentine Belt Diagram
Why bother with a diagram? Simple. The serpentine belt is a single, continuous belt that snakes around multiple engine components, powering them all. Without it, your alternator, power steering pump, air conditioning compressor, and sometimes even your water pump, won't function. That translates to no power steering, no cold air, a discharged battery, and potentially, an overheated engine. A diagram helps you:
- Identify Components: Quickly locate each pulley and the component it drives.
- Route the Belt Correctly: Essential for proper function. An incorrectly routed belt can slip, wear prematurely, or even damage components.
- Troubleshoot Issues: Understanding the belt's path helps diagnose problems like squealing noises or component failure.
- Perform Maintenance: Makes replacing the belt a straightforward task.
Key Specs and Main Parts
The 2006 Toyota Corolla typically uses a single serpentine belt to drive the following components, depending on the specific engine and options equipped:
- Crankshaft Pulley: This is the driving force of the entire system. It's connected directly to the engine's crankshaft.
- Alternator Pulley: The alternator generates electricity to charge the battery and power electrical components.
- Power Steering Pump Pulley: Powers the power steering system, making steering easier.
- Air Conditioning Compressor Pulley: Drives the A/C compressor, providing cool air.
- Water Pump Pulley: Circulates coolant through the engine to prevent overheating (not directly driven by the serpentine belt on *all* 2006 Corollas – some models use a timing chain). Always check your diagram to confirm.
- Tensioner Pulley: A spring-loaded pulley that maintains proper tension on the belt. This is crucial for preventing slippage and premature wear.
- Idler Pulley (if equipped): A smooth pulley used to guide the belt around other components, ensuring proper wrap angle.
The serpentine belt itself is typically made of a durable, reinforced rubber compound, designed to withstand high temperatures and constant flexing. Its length and width are critical for proper fit and function. Refer to your owner's manual or a reliable parts database for the correct belt size for your specific engine.
Symbols on the Serpentine Belt Diagram
Understanding the symbols on the diagram is key to interpreting it correctly. Here's a breakdown:
- Solid Lines: Represent the path of the serpentine belt. Pay close attention to how the line wraps around each pulley.
- Dashed Lines (sometimes): Might indicate the back side of the belt, where it contacts a pulley. Usually less common than solid lines.
- Arrows: Show the direction of belt rotation. This is extremely important for understanding how each component is driven.
- Pulley Symbols: Usually simple circles, sometimes with an indicator of what component they are connected to (e.g., "ALT" for alternator, "P/S" for power steering).
- Tensioner Symbol: Typically shows a pulley with an arrow indicating the direction of tension release. You'll need to move the tensioner in this direction to loosen the belt.
- Component Abbreviations: As mentioned above, common abbreviations are used to identify each component (e.g., "A/C" for air conditioning, "W/P" for water pump – but confirm on *your* specific diagram).
Color coding is less common on serpentine belt diagrams, but if present, it might differentiate between the front and back sides of the belt, or highlight specific sections of the system. Consult the legend provided with the diagram for clarification.
How It Works
The serpentine belt system is relatively simple in concept. The crankshaft pulley, driven by the engine, rotates and transfers its motion to the serpentine belt. The belt, in turn, wraps around and drives all the other pulleys connected to various engine accessories. The tensioner pulley is crucial; it maintains the correct amount of tension on the belt, preventing it from slipping or vibrating excessively. Too little tension leads to slippage, while too much tension can damage the belt and the bearings in the driven components.
The wrap angle, the amount of contact the belt has with each pulley, is also important. A larger wrap angle provides more grip and reduces the chance of slippage. Idler pulleys are sometimes used to increase the wrap angle on certain components, particularly those that require more power, like the power steering pump or A/C compressor.
Real-World Use and Basic Troubleshooting
Here are some common problems and how the diagram can help:
- Squealing Noise: Often indicates a loose or worn belt. Check the tensioner pulley's operation and inspect the belt for cracks, glazing, or missing ribs. The diagram confirms correct routing so you know where to inspect.
- Component Failure: If the alternator isn't charging, or the power steering isn't working, use the diagram to verify that the belt is properly routed and that the component's pulley is turning. If the pulley isn't turning, the belt may be broken or slipping.
- Belt Wear: Inspect the belt regularly for signs of wear. Cracks, fraying, or missing ribs indicate the belt needs to be replaced. The diagram helps you visually inspect the entire length of the belt and its contact with each pulley.
- Difficulty Replacing the Belt: The diagram is your guide. Follow the routing precisely. Take a picture *before* you remove the old belt to ensure you route the new one correctly.
Safety Considerations
Working on the serpentine belt system can be dangerous if precautions aren't taken. Here are some key safety points:
- Disconnect the Negative Battery Terminal: Prevents accidental starting of the engine while you're working near rotating components.
- Never Work on a Hot Engine: Allow the engine to cool completely before working on the serpentine belt system. Hot engine components can cause burns.
- Keep Hands and Fingers Clear: Rotating engine components can cause serious injury. Never put your hands or fingers near the belt or pulleys while the engine is running, even for a brief moment.
- Be Careful Around the Tensioner: The tensioner is under spring pressure. Use the correct tool to release the tension and control its movement. Releasing the tensioner incorrectly can cause it to snap back forcefully, causing injury.
- Wear Eye Protection: Protect your eyes from debris or accidental tool slippage.
The alternator is a critical component, and damage to it can strand you. Make sure your belt is properly tensioned to prevent the charging system from failing.
The water pump, if driven by the serpentine belt on your specific 2006 Corolla model (again, check the diagram!), is vital for engine cooling. A broken or slipping belt driving the water pump can lead to engine overheating and severe damage.
Finally, if the A/C Compressor seizes up, it can damage the belt and other pulleys. Address any A/C issues promptly.
We understand the value of having the 2006 Toyota Corolla Serpentine Belt Diagram at your fingertips. We have that file available for you to download. This will allow you to have a readily available visual aid during your repairs and maintenance tasks. Download the diagram, print it, and keep it in your toolbox for easy reference.