2006 Toyota Tacoma 2.7 Serpentine Belt Diagram
Alright, let's dive into the serpentine belt diagram for the 2006 Toyota Tacoma with the 2.7L engine. This isn't just some pretty picture; it's your roadmap for understanding, maintaining, and troubleshooting one of the most critical systems in your truck.
Purpose of the 2006 Toyota Tacoma 2.7L Serpentine Belt Diagram
Why bother with this diagram, you ask? Plenty of reasons. First and foremost, it's invaluable for replacing the serpentine belt itself. Whether it's cracked, frayed, squealing, or just plain worn out, knowing the exact routing is essential. Trying to guess can lead to incorrect installation, damaging the belt, and potentially disabling critical systems.
Beyond replacement, understanding the diagram aids in diagnosing accessory drive problems. If your power steering is weak, your AC isn't cold, or your alternator isn't charging correctly, the serpentine belt system is a prime suspect. The diagram helps you visualize the belt's path and identify which components are driven by it. It's also helpful for preventive maintenance and understanding the overall mechanical layout of your engine bay. You can download this diagram which we have prepared in detail to help you in your tasks.
Key Specs and Main Parts of the Serpentine Belt System
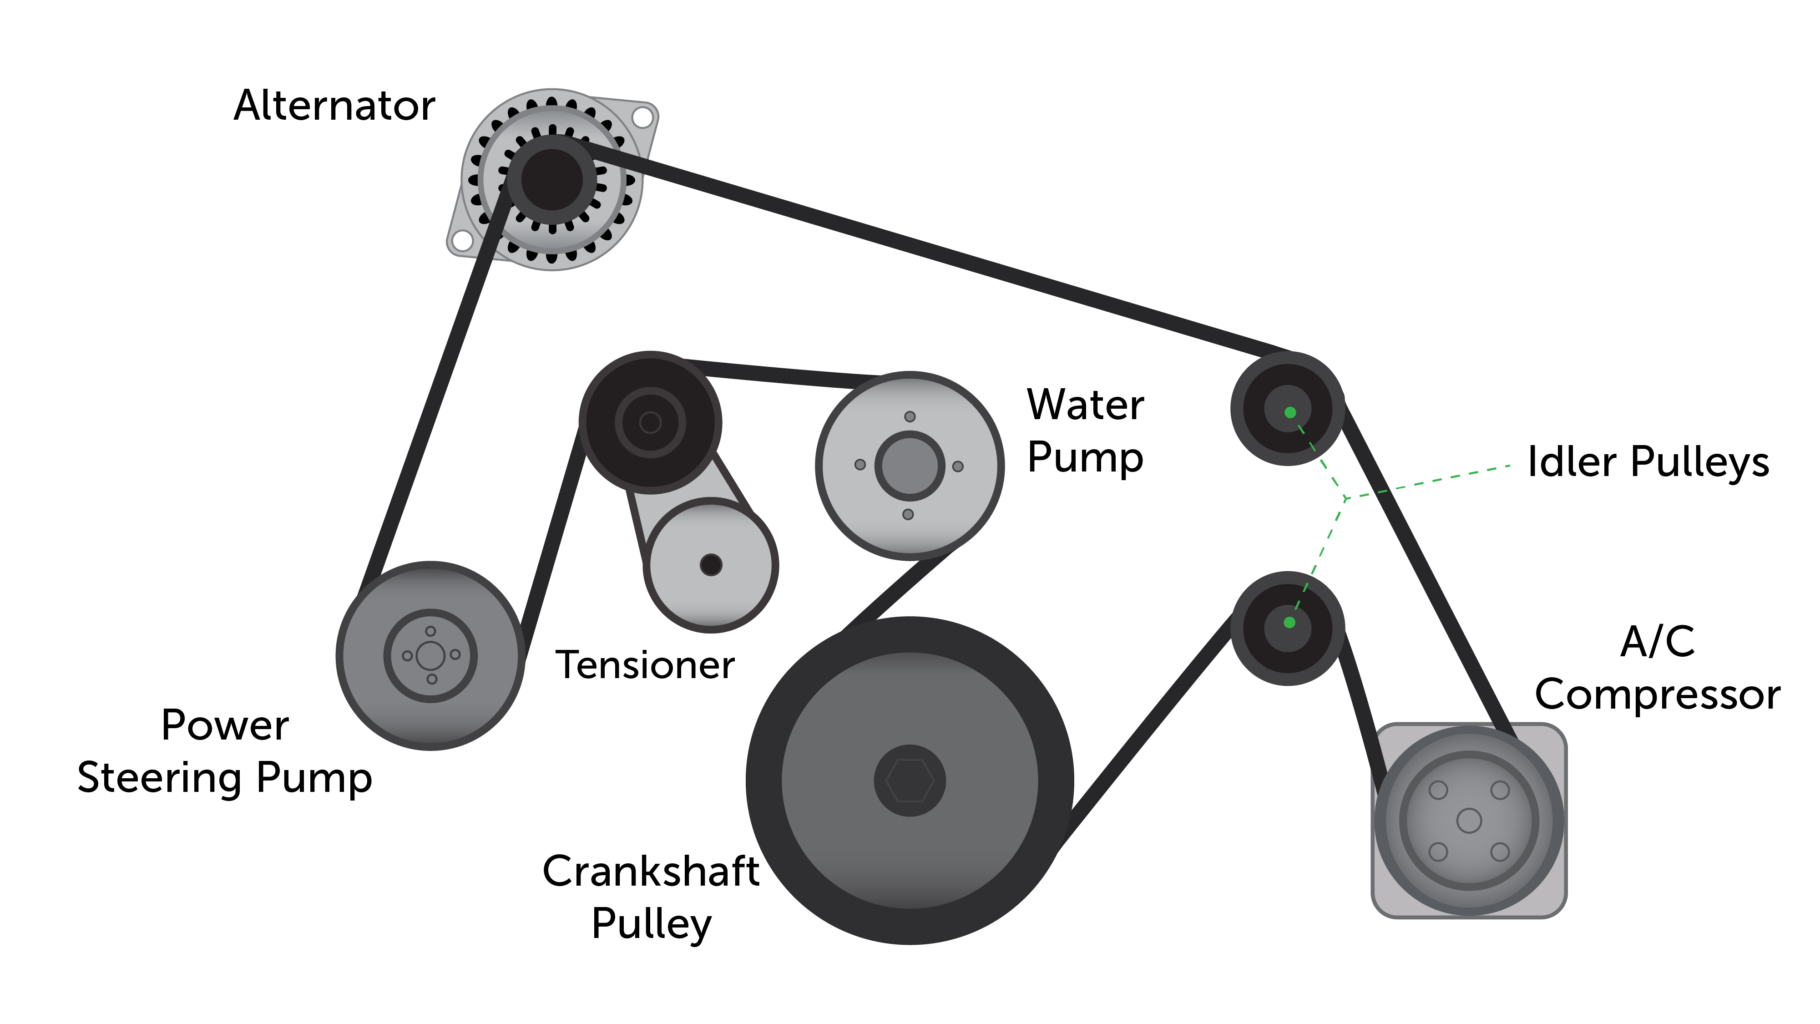
The serpentine belt system in your 2006 Tacoma 2.7L is a relatively straightforward setup. Here's a breakdown of the key components:
- Crankshaft Pulley: This is where the engine's rotational force is transferred to the belt. Think of it as the master pulley.
- Alternator Pulley: The alternator generates electricity to keep your battery charged and power your vehicle's electrical system.
- Power Steering Pump Pulley: This drives the power steering pump, which provides hydraulic assistance for steering.
- Air Conditioning Compressor Pulley: The A/C compressor compresses refrigerant to provide cooling.
- Idler Pulley(s): These smooth, bearing-mounted pulleys guide the belt and maintain proper tension. Your Tacoma might have one or more idler pulleys.
- Tensioner Pulley: This spring-loaded pulley maintains the correct tension on the serpentine belt. It's critical for proper operation. A worn tensioner can cause belt slippage and premature wear.
- Serpentine Belt: The heart of the system, this rubber belt transmits power from the crankshaft pulley to all the other components.
Belt Length: While the exact length varies slightly depending on options (like A/C), you'll generally be looking for a belt in the range of 85-87 inches. Always double-check the manufacturer's specification for your specific model. You can usually find this information listed on the old belt, or by consulting your owner's manual or a parts catalog.
Understanding the Symbols in the Diagram
A good serpentine belt diagram is more than just a picture. It uses symbols and conventions to convey information efficiently. Here's what to look for:
- Solid Lines: Indicate the path of the outside of the belt. This is the side you'll see exposed.
- Dashed Lines: Often represent the inside (grooved) surface of the belt making contact with a pulley.
- Arrows: Indicate the direction of rotation for each pulley. This is crucial for understanding how the system operates.
- Component Labels: Each pulley will be labeled with its corresponding component (e.g., ALT for alternator, P/S for power steering).
- Tensioner Indicator: The tensioner pulley often has a mark or indicator to show the acceptable range of belt tension. This is vital for proper belt function.
How the Serpentine Belt System Works
The system's operation is relatively straightforward. The crankshaft pulley, directly connected to the engine's crankshaft, spins whenever the engine is running. The serpentine belt wraps around this pulley, transferring the rotational force to all the other components in the system. The tensioner pulley applies constant pressure to the belt, ensuring it maintains a firm grip on all the pulleys. Without proper tension, the belt can slip, leading to reduced performance of the accessories and potential damage.
Think of it like a series of gears, but instead of meshing teeth, it's friction between the belt and the pulleys that transmits the power. The routing of the belt is carefully designed to ensure that each component receives the necessary amount of power and rotates in the correct direction.
Real-World Use: Basic Troubleshooting Tips
Here's how the diagram can help you in the real world:
- Squealing Belt: Often caused by a loose belt, a worn belt, or a misaligned pulley. Use the diagram to check the belt routing and tensioner operation. A worn tensioner might not be applying enough pressure.
- Accessory Malfunction: If your power steering is weak, your AC isn't cold, or your alternator isn't charging, check the belt's condition and routing. Make sure the belt is properly seated on the affected pulley. A slipping belt can cause these issues.
- Belt Breaks: If your belt snaps, the diagram is essential for reinstalling a new one. Make sure you follow the routing precisely.
- Tensioner Issues: If you notice the tensioner pulley bouncing excessively or making noise, it might be time to replace it. The diagram can help you locate and identify the tensioner.
When diagnosing issues, pay close attention to the belt's condition. Look for cracks, fraying, glazing (a shiny, hardened surface), and missing chunks. Any of these signs indicate that the belt needs to be replaced.
Safety Considerations
Working on the serpentine belt system can be dangerous if you're not careful. Here are some key safety points:
- Disconnect the Battery: Always disconnect the negative battery terminal before working on any electrical components. This prevents accidental short circuits.
- Hot Engine: Never work on the serpentine belt system while the engine is hot. Allow the engine to cool completely before starting any repairs.
- Moving Parts: The serpentine belt system contains many moving parts. Keep your hands, fingers, and clothing clear of the belt and pulleys when the engine is running.
- Tensioner Spring: The tensioner pulley is spring-loaded and can snap back forcefully when released. Use the correct tools and techniques to relieve the tension safely. Typically, this involves using a wrench or socket to rotate the tensioner arm against the spring's force.
- Eye Protection: Wear safety glasses to protect your eyes from debris.
The alternator is a particularly sensitive component. Avoid getting fluids on it, and be extra careful when working around its electrical connections.
By understanding the serpentine belt diagram for your 2006 Toyota Tacoma 2.7L, you'll be well-equipped to maintain, troubleshoot, and repair this critical system. Remember to consult your vehicle's service manual for specific instructions and torque specifications.
You are welcome to download the complete Serpentine Belt Diagram for the 2006 Toyota Tacoma 2.7L for your reference. Happy wrenching!