
2007 Acura Rdx Serpentine Belt Diagram
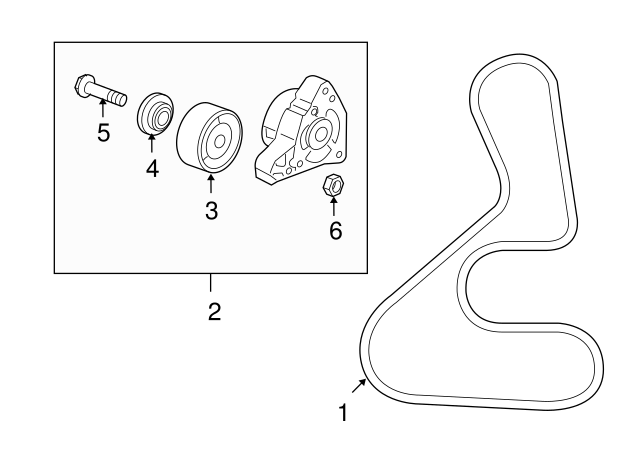
The serpentine belt diagram for the 2007 Acura RDX is an invaluable resource for anyone looking to perform maintenance, troubleshoot problems, or simply understand the engine's accessory drive system. Unlike older vehicles with multiple belts, the serpentine belt (also known as an accessory drive belt) drives several vital components using a single, continuous loop. This article will provide a detailed explanation of the diagram, its purpose, and how to use it effectively.
Purpose of the Serpentine Belt Diagram
The serpentine belt diagram is essential for several reasons:
- Belt Replacement: Accurately routing the new belt is critical. An incorrectly routed belt will not drive the accessories properly, leading to component failure and potential engine damage.
- Troubleshooting: The diagram allows you to identify which components are driven by the belt. If a particular accessory (like the power steering pump or alternator) malfunctions, the diagram helps you determine if the belt is the source of the problem (e.g., slipping, broken, or routed incorrectly).
- Maintenance: During routine maintenance, you can use the diagram to inspect the belt's condition and verify its proper routing.
- Learning: The diagram provides a visual representation of the engine's accessory drive system, facilitating a deeper understanding of how the components work together.
Key Specs and Main Parts
Before diving into the diagram itself, let's define the key components involved in the 2007 Acura RDX's serpentine belt system:
- Crankshaft Pulley (Crank Pulley): This pulley is connected directly to the crankshaft, the rotating shaft within the engine that converts the reciprocating motion of the pistons into rotational motion. It's the driving force for the serpentine belt.
- Alternator: The alternator converts mechanical energy from the engine into electrical energy to charge the battery and power the vehicle's electrical system.
- Power Steering Pump: This pump provides hydraulic pressure to assist with steering, making it easier to turn the wheel.
- Air Conditioning Compressor: Compresses the refrigerant used in the air conditioning system to cool the vehicle's cabin.
- Idler Pulley(s): Smooth, unpowered pulleys that provide tension and guide the belt along its path. They help to increase the belt's wrap angle on other pulleys, improving grip and preventing slippage.
- Tensioner Pulley: A spring-loaded pulley that automatically maintains the correct tension on the serpentine belt. Proper tension is crucial for optimal performance and belt longevity.
The 2007 RDX uses a relatively straightforward serpentine belt system. Knowing the locations of these components on the engine is important to correctly reading and using the serpentine belt diagram.
Symbols on the Serpentine Belt Diagram
Understanding the symbols used on the diagram is essential for proper interpretation. While specific diagram styles may vary slightly, common symbols include:
- Solid Lines: Represent the belt itself. The thickness of the line doesn't usually denote anything specific, but it clearly outlines the belt's path.
- Circles: Indicate pulleys. Larger circles typically represent the crankshaft pulley and driven accessory pulleys. Smaller circles usually represent idler pulleys or the tensioner pulley.
- Arrows: Indicate the direction of rotation of each pulley. It's critical to note the direction of rotation for each component when installing the new belt.
- Component Labels: Abbreviations or full names of each component (e.g., ALT for alternator, P/S for power steering, A/C for air conditioning).
- Tensioner Symbol: A unique symbol usually represents the tensioner, often including an arrow indicating the direction in which to relieve tension for belt removal and installation.
- Routing Indication: Some diagrams use numbers or letters at strategic points along the belt path. These correspond to instructions indicating the sequence in which the belt should be routed.
Colors are rarely used in serpentine belt diagrams but, if present, they could indicate variations in belt path for different engine options (although this is unlikely for a single model like the 2007 RDX). The most important aspect is understanding the relationship between the pulleys and the belt path.
How It Works
The serpentine belt system's functionality hinges on the transfer of rotational force from the crankshaft to the various accessories. The crankshaft pulley, driven by the engine, turns the serpentine belt. The belt, in turn, wraps around and drives the pulleys connected to the alternator, power steering pump, and air conditioning compressor. The tensioner pulley maintains the appropriate tension on the belt, preventing slippage and ensuring efficient power transfer. Idler pulleys strategically guide the belt, optimizing the wrap angle on the driven pulleys for maximum grip.
Without proper tension, the belt will slip, reducing the efficiency of the accessories and potentially causing them to fail. If the belt is too tight, it can put excessive stress on the bearings in the accessory components, leading to premature wear and failure. The diagram allows you to visually confirm the correct routing and ensure the tensioner is operating properly.
Real-World Use: Troubleshooting Tips
Here are some common issues and how the diagram can assist with troubleshooting:
- Squealing Noise: A common symptom of a worn or slipping serpentine belt. Use the diagram to inspect the belt for cracks, fraying, or glazing. Check the tensioner to ensure it's functioning correctly. A misaligned pulley (not evident from the diagram alone, but related to it) can also cause squealing.
- Accessory Malfunction (e.g., dim headlights, poor A/C performance): If an accessory isn't functioning properly, use the diagram to verify that the belt is correctly routed and properly tensioned. A loose or broken belt can prevent the accessory from spinning at the correct speed.
- Belt Jumping Off: Indicates a potential misalignment issue, a damaged pulley, or a faulty tensioner. The diagram allows you to confirm the correct routing and identify any pulleys that might be out of alignment.
When troubleshooting, always start with a visual inspection. Use the diagram to double-check the belt's routing. Remember, a properly routed and tensioned belt is essential for the proper operation of your vehicle's accessories.
Safety Considerations
Working on the serpentine belt system involves several safety risks:
- Hot Engine: Always allow the engine to cool completely before working on the serpentine belt.
- Moving Parts: The serpentine belt and pulleys are highly dangerous when the engine is running. Never attempt to work on the system while the engine is running.
- Spring-Loaded Tensioner: The tensioner pulley is spring-loaded and can snap back with considerable force if not handled carefully. Always use the correct tool to relieve the tension before removing the belt.
- Battery Disconnect: Although not directly related to the belt, disconnecting the negative battery terminal before working on any electrical components (like the alternator) is a good safety practice.
Always wear appropriate safety gear, including eye protection and gloves, when working on the serpentine belt system. Consult the vehicle's service manual for specific safety instructions.
We have a high-resolution, printable version of the 2007 Acura RDX serpentine belt diagram available for download. This diagram provides a clear and detailed illustration of the belt routing, making it an indispensable tool for any DIY mechanic working on this vehicle. Using this resource, coupled with the knowledge in this article, will give you confidence to tackle your repairs.