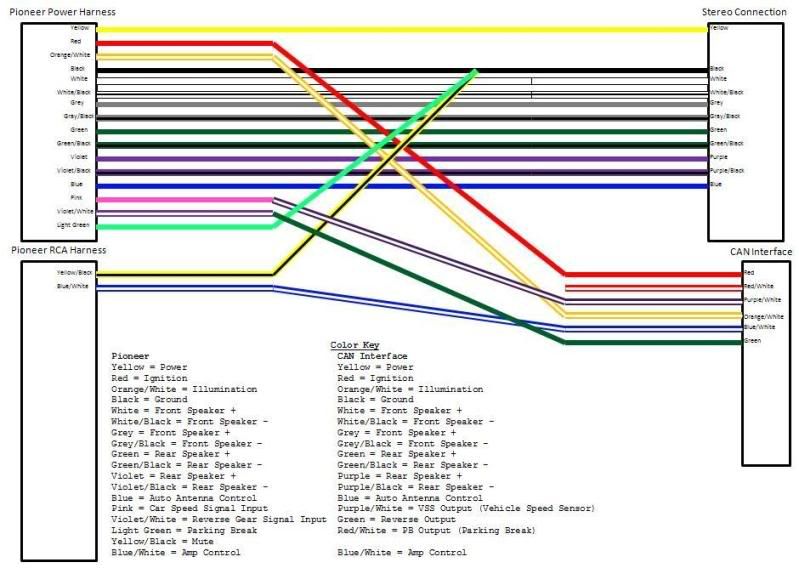
2007 Dodge Ram Stereo Wiring Harness Diagram
So, you're diving into the audio system of your 2007 Dodge Ram? Excellent! Whether you're upgrading the head unit, adding an amplifier, or just trying to diagnose a pesky wiring issue, understanding the stereo wiring harness is absolutely crucial. This article will walk you through a 2007 Dodge Ram stereo wiring harness diagram, breaking down the components, symbols, and practical applications so you can tackle your audio project with confidence. We have the wiring harness diagram available for download. It has been included as an offline resource for you!
Purpose of the Diagram
Why bother with a wiring diagram? Well, think of it as a roadmap for your car's audio system. It's the key to:
- Upgrading Your Head Unit: Want to swap out that factory radio for a shiny new one with Bluetooth and Android Auto? The diagram shows you exactly which wires need to be connected to the new unit's harness.
- Adding Amplifiers and Subwoofers: Boosting your sound requires tapping into the existing speaker wires. The diagram identifies these wires so you can connect your aftermarket amplifiers properly.
- Troubleshooting Audio Problems: Is a speaker not working? Is there a short somewhere? The diagram helps you trace the wiring to pinpoint the source of the problem.
- Repairing Damaged Wiring: Wires can get frayed, corroded, or even chewed on by rodents (yes, it happens!). The diagram shows you what each wire is supposed to connect to, so you can make proper repairs.
- Understanding Your System: Even if you are not doing anything, this can help you understand what each of the wires does.
Key Specs and Main Parts
Before we delve into the diagram itself, let's get familiar with the main components you'll encounter:
- Head Unit Connector (aka Radio Connector): This is the main connection point for the radio. It carries power, ground, speaker outputs, and accessory signals.
- Speaker Wires: These wires run from the head unit (or amplifier) to the individual speakers in your doors, dash, and rear deck. Each speaker has a positive (+) and negative (-) wire.
- Power Wire: Supplies the head unit with the necessary 12V DC power to operate. Usually red or orange.
- Ground Wire: Provides the return path for the electrical current. Usually black. Proper grounding is critical for audio quality and preventing noise.
- Accessory Wire (aka Switched Power): Turns the head unit on and off with the ignition switch. Often red or pink.
- Remote Turn-On Wire (aka Amplifier Turn-On): Signals external amplifiers to turn on when the head unit is powered on. Typically blue or blue/white striped.
- Illumination Wire: Dims the head unit display when the headlights are turned on.
- Antenna Wire: Connects to the vehicle's antenna.
- CAN Bus Wires (if applicable): In newer vehicles, the head unit may communicate with the car's computer (CAN bus) for features like steering wheel controls and vehicle information display. Your 2007 Ram *might* have some of these depending on the trim level, though it's less common.
Understanding the Symbols
Wiring diagrams use a standardized set of symbols to represent electrical components and connections. Here are some of the common symbols you'll see in your 2007 Dodge Ram stereo wiring harness diagram:
- Solid Lines: Represent wires. The thickness of the line may indicate the wire's gauge (thickness).
- Dotted Lines: Often indicate shielded wires or connections to external modules.
- Color Codes: Each wire is typically identified by a color code (e.g., BLU/RED for blue with a red stripe). Understanding these codes is essential for identifying the correct wires. The downloadable diagram specifies each color.
- GND: Indicates a ground connection. This is usually connected to the vehicle's chassis.
- +12V: Indicates a 12-volt power source.
- Speaker Symbol: Represents a speaker. Often labeled with its location (e.g., "Front Left").
- Connectors: Represented as small rectangles or circles, showing where wires plug into each other.
The color codes are extremely important. For example, if the diagram specifies "GRAY/YELLOW (LT FRONT +)", that means the positive wire for the left front speaker is gray with a yellow stripe. Always double-check the color codes before making any connections!
How It Works: A Simplified Explanation
The basic principle is simple: the head unit receives power and sends audio signals to the speakers. The power comes from the battery (via the power wire) and is switched on and off by the ignition (via the accessory wire). The head unit then processes audio from various sources (radio, CD, AUX, etc.) and sends amplified signals through the speaker wires to the speakers. The ground wire provides the return path for the electrical current, completing the circuit.
The wiring harness acts as a central hub, connecting all these components together. The diagram shows you exactly how each wire is routed and connected within the harness.
Real-World Use: Basic Troubleshooting Tips
Okay, so you've got the diagram. Now what? Here are a few basic troubleshooting scenarios:
- No Power to Head Unit: Check the power and ground wires. Use a multimeter to verify that you're getting 12V at the power wire with the ignition on. Also, ensure the ground wire is properly connected to a clean, bare metal surface. A bad ground is a very common problem.
- One Speaker Not Working: Check the speaker wires for that specific speaker. Make sure they're properly connected to the head unit or amplifier. You can also use a multimeter to test the continuity of the wire (i.e., to see if the wire is broken).
- Excessive Noise or Distortion: This could be caused by a bad ground, a loose connection, or a faulty component. Double-check all your connections and grounding points.
- Blown Fuse: Locate the fuse related to the stereo system (consult your owner's manual). If it's blown, replace it with the same amperage rating. If it keeps blowing, there's likely a short circuit somewhere in the wiring. The wiring diagram can help you trace the circuit to find the short.
Safety First!
Working with electrical systems can be dangerous if you're not careful. Here are some important safety precautions:
- Disconnect the Battery: Before working on any electrical components, disconnect the negative terminal of the battery. This will prevent accidental short circuits.
- Use Proper Tools: Use insulated tools designed for automotive electrical work.
- Don't Cut Corners: Use proper wiring connectors and crimping tools. Avoid using electrical tape for permanent connections, as it can dry out and become brittle over time.
- Be Aware of Airbag Wiring: Airbags are explosive devices and require caution. Never cut, splice, or modify any wiring that is part of the airbag system. These wires are often bright yellow or orange. If you are unsure about any wiring, consult a qualified technician.
Important note: The constant +12V wire will always have power, even when the car is off. This is to keep the radio's memory. Be extra careful when working with this wire, even with the battery disconnected.
By understanding the 2007 Dodge Ram stereo wiring harness diagram and following these safety precautions, you can confidently tackle your audio projects and enjoy enhanced sound in your ride. Remember, patience and attention to detail are key! We have the file ready for download, so happy wiring!