2007 Ford Escape 2.3 Serpentine Belt Diagram
Hey there, fellow wrench-turners! Today, we're diving deep into something seemingly simple but incredibly important for your 2007 Ford Escape with the 2.3L engine: the serpentine belt diagram. This guide isn't just a pretty picture; it's your roadmap to keeping your engine running smoothly, preventing breakdowns, and even saving some serious cash by tackling DIY repairs.
Purpose: Why Bother with the Serpentine Belt Diagram?
Let's be real, staring at a tangle of belts and pulleys under the hood can be intimidating. That's where the serpentine belt diagram comes in. It serves several crucial purposes:
- Repair Guidance: If your belt snaps, frays, or starts squealing, the diagram is your guide to proper replacement. Installing it incorrectly can lead to serious engine damage.
- Preventative Maintenance: Understanding the belt's routing allows you to inspect it properly for wear and tear, preventing unexpected breakdowns.
- Component Identification: The diagram helps you identify the various components driven by the belt, such as the alternator, power steering pump, and AC compressor.
- Troubleshooting: Knowing the belt's path can aid in diagnosing problems related to those components. For instance, a squealing belt only when the AC is on might indicate an issue with the AC compressor pulley.
- Educational Tool: Even if you're not currently facing a problem, studying the diagram helps you understand the fundamental workings of your engine's accessory drive system.
Key Specs and Main Parts of the Serpentine System
Before we dissect the diagram itself, let's get familiar with the key players in the 2007 Ford Escape 2.3L's serpentine system:
- Crankshaft Pulley (Harmonic Balancer): This is the main drive pulley, connected directly to the crankshaft and transferring engine power to the belt.
- Alternator Pulley: The alternator converts mechanical energy from the engine into electrical energy to power your car's electrical system and charge the battery.
- Power Steering Pump Pulley: This pulley drives the power steering pump, which provides hydraulic assistance for easier steering.
- Air Conditioning (AC) Compressor Pulley: Drives the AC compressor, which circulates refrigerant to cool the cabin.
- Idler Pulley(s): Smooth, non-driven pulleys that guide the belt and maintain proper tension, preventing slippage.
- Tensioner Pulley: A spring-loaded pulley that automatically adjusts the belt tension, compensating for wear and thermal expansion. This is a *critical* component.
- Serpentine Belt: The heart of the system, a single, long, multi-ribbed belt that snakes around all the pulleys, transmitting power from the crankshaft to the accessories.
Important Specification: The correct serpentine belt length is crucial. While the exact length can vary slightly depending on the manufacturer, using the correct part number for your 2007 Ford Escape 2.3L is essential. Consult your owner's manual or a reputable auto parts store to confirm the proper belt for your specific vehicle.
Decoding the Diagram: Symbols, Lines, and Icons
Serpentine belt diagrams use standardized symbols to represent the various components. Here's a breakdown:
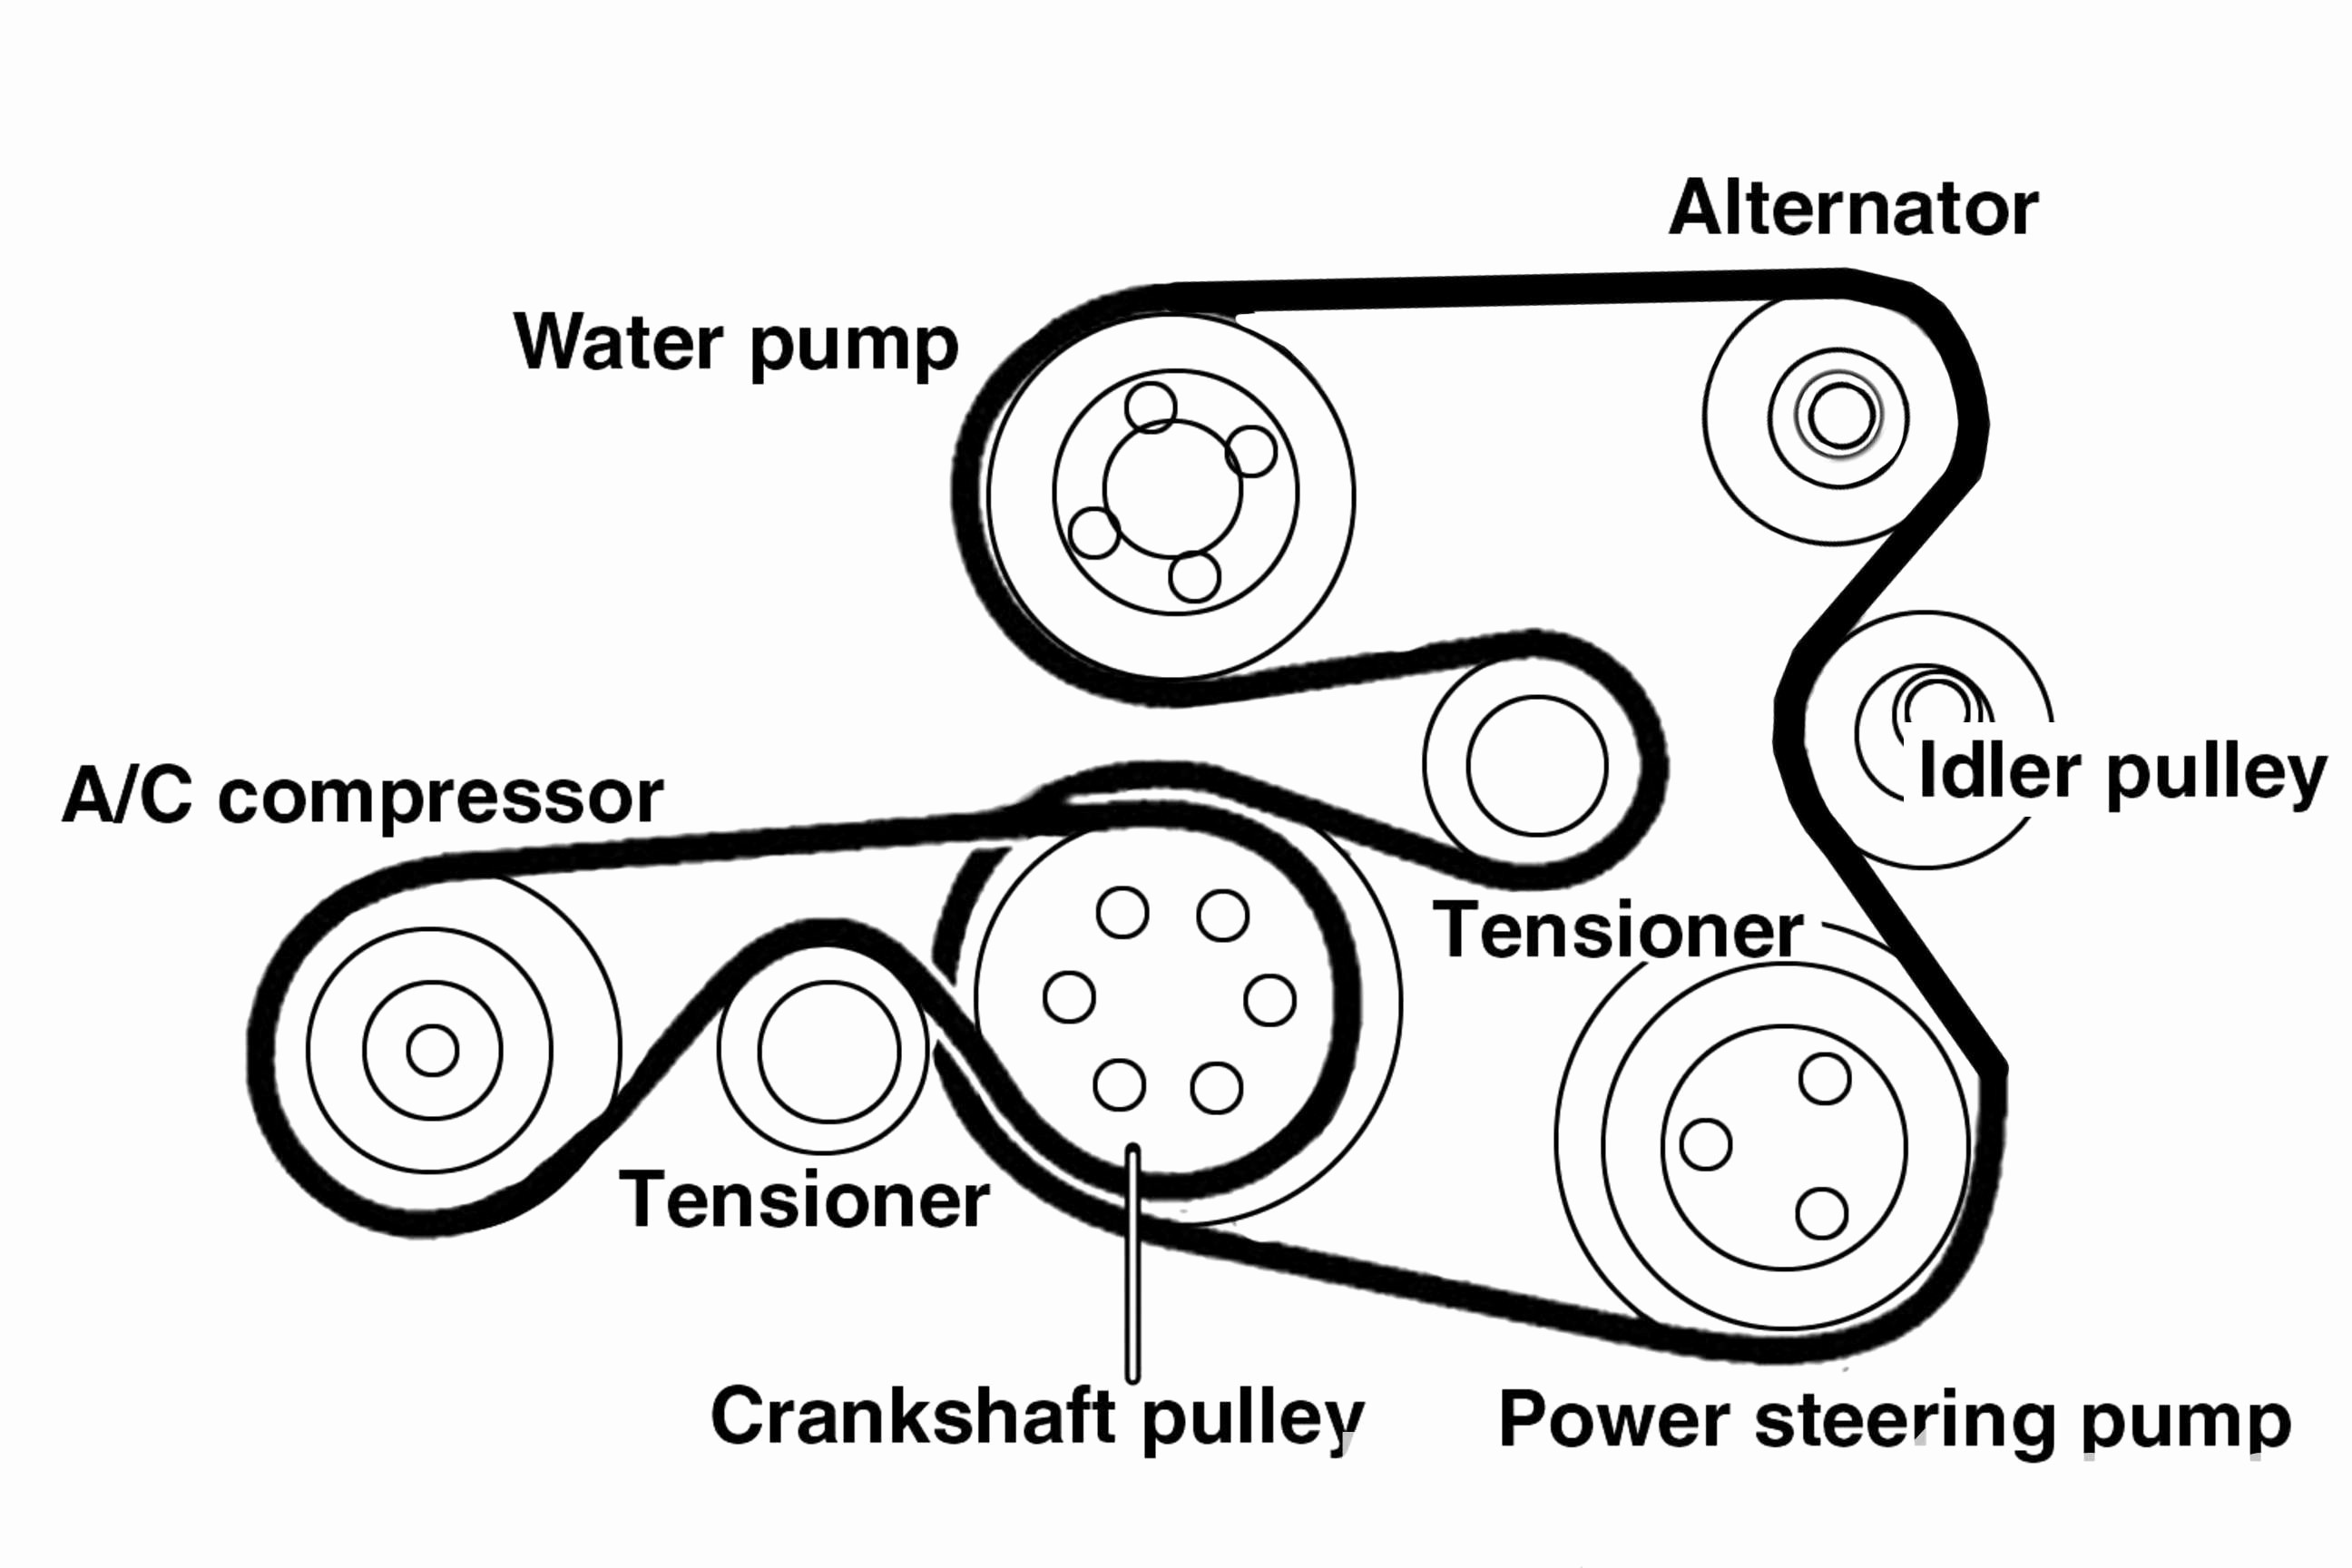
- Pulleys: Typically represented as circles. Some diagrams might label them with abbreviations like "ALT" for alternator, "P/S" for power steering, "A/C" for air conditioning, "CRANK" for crankshaft, "IDL" for idler, and "TENS" for tensioner.
- Serpentine Belt: A solid, thick line showing the belt's routing path. The diagram will clearly illustrate how the belt wraps around each pulley.
- Direction Arrows: Arrows indicate the direction of belt travel. This is crucial for ensuring correct installation.
- Tensioner Indicator: The tensioner is often depicted with a spring symbol or an arrow showing the direction of tension.
- Ribbed and Smooth Sides: Diagrams usually indicate which side of the belt (ribbed or smooth) makes contact with each pulley. Ribbed sides contact ribbed pulleys, while smooth sides contact smooth idler pulleys and the back of the tensioner pulley.
Most diagrams use a simple black-and-white representation, but some may employ colors to further clarify the routing. If colors are used, a key will explain what each color represents (e.g., blue for the belt's front side, red for the back side).
How It Works: The Mechanics of the Serpentine System
The system's operation is relatively straightforward. The crankshaft pulley, driven directly by the engine, spins the serpentine belt. This belt, in turn, drives all the accessory pulleys. The tensioner maintains consistent belt tension, preventing slippage and ensuring efficient power transfer. The belt's routing is designed so that the accessories receive the necessary rotational force to function correctly.
Think of it like a complex chain reaction. The engine's power initiates the movement, and the serpentine belt acts as the conduit, distributing that power to the various components that keep your car running smoothly.
Real-World Use: Troubleshooting with the Diagram
The serpentine belt diagram is an invaluable tool for troubleshooting common issues:
- Squealing Belt: A squealing belt can be caused by several factors: worn belt, loose tension, misaligned pulleys, or a faulty component (e.g., a seized alternator bearing). The diagram helps you visually inspect the belt for wear and tear (cracks, fraying). You can also check the tensioner's operation. A tensioner that's bouncing excessively or not maintaining proper tension is a prime suspect.
- Belt Slippage: Slippage, often accompanied by a burning rubber smell, can be caused by a worn belt, insufficient tension, or excessive load on one of the accessories. The diagram helps you isolate the potential culprit by examining the belt's contact points on each pulley.
- Accessory Malfunctions: If one of your accessories (alternator, power steering pump, AC compressor) isn't working correctly, the diagram can help you determine if the problem is related to the belt. For example, if the alternator isn't charging the battery, check the belt's tension and condition. If the belt is slipping on the alternator pulley, it might not be generating enough power.
- Visual Inspection: Before digging deep, always visually inspect the belt using the diagram as a reference. Look for cracks, frays, missing ribs, or any signs of damage. Also, check the alignment of the pulleys to ensure they're all in the same plane.
Pro Tip: Before replacing the serpentine belt, take a picture of the old belt's routing. This can be a lifesaver if you get confused during the installation process. Having the diagram and a photograph ensures a correct reinstallation.
Safety First: Handling with Care
Working on the serpentine system involves potential hazards. Here are some critical safety precautions:
- Disconnect the Battery: Always disconnect the negative battery cable before working on any electrical components. This prevents accidental shorts and potential electrocution.
- Engine Off and Cool: Never work on the serpentine system with the engine running or hot. The spinning belt and pulleys can cause serious injury. Wait for the engine to cool down completely before starting any repairs.
- Stay Clear of Moving Parts: Keep your hands, clothing, and tools away from the spinning belt and pulleys when the engine is running (if testing is necessary).
- Eye Protection: Wear safety glasses to protect your eyes from debris.
- Proper Tools: Use the correct tools for the job. Using the wrong tools can damage the components and increase the risk of injury. A serpentine belt tool set is highly recommended for removing and installing the belt, especially on vehicles with limited access.
- The Tensioner is Risky: The tensioner pulley is spring-loaded and can snap back with considerable force. Use caution when releasing the tensioner. Use the correct size wrench or socket to relieve the tension and avoid placing your hand directly in the path of the moving tensioner arm.
Remember: If you're not comfortable working on the serpentine system, it's best to take your vehicle to a qualified mechanic.
Get Your Hands on the Diagram
Now you're armed with the knowledge to understand and use the serpentine belt diagram for your 2007 Ford Escape 2.3L. And to make things even easier, we have a detailed, high-resolution diagram available for you to download. Having a readily accessible copy of the diagram ensures you're always prepared for repairs and maintenance.
With the right knowledge and tools, you can confidently tackle serpentine belt replacements and other related repairs, saving money and keeping your Escape running in top condition. Happy wrenching!