
2007 Ford Focus Rear Suspension Diagram
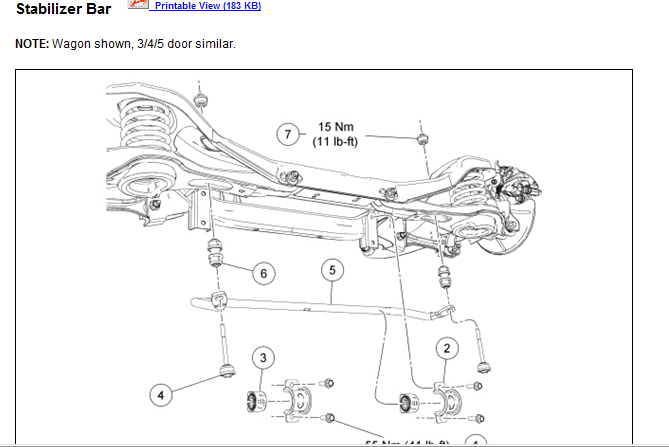
For the intermediate DIYer or seasoned car enthusiast tackling rear suspension work on a 2007 Ford Focus, having a clear understanding of the system is crucial. This article provides a detailed breakdown of the 2007 Ford Focus rear suspension diagram, covering its purpose, key components, operation, troubleshooting, and safety considerations. We have the actual diagram file available for download, but before you grab it, let's delve into the details to help you interpret it effectively.
Purpose of Understanding the Diagram
Why is understanding the rear suspension diagram so important? Primarily, it's your roadmap for:
- Repair and Maintenance: Identifying damaged or worn parts for replacement. Knowing the layout allows for faster, more accurate diagnosis and repair.
- Performance Upgrades: Planning modifications like lowering springs, performance shocks, or anti-roll bars. Understanding the geometry and attachment points is vital for safe and effective upgrades.
- General Understanding: Increasing your overall knowledge of your vehicle's mechanical systems. This empowers you to handle more complex repairs yourself and communicate more effectively with professional mechanics.
- Troubleshooting: Pinpointing the source of noises, vibrations, or handling issues related to the rear suspension.
Key Specs and Main Parts of the 2007 Ford Focus Rear Suspension
The 2007 Ford Focus utilizes a Control Blade Independent Rear Suspension (IRS). This design offers improved ride quality and handling compared to a simpler beam axle. Here's a breakdown of the key components:
- Control Blade (Trailing Arm): The primary suspension arm, often referred to as a trailing arm. It pivots on the chassis and supports the wheel hub. It controls fore and aft movement of the wheel. The control blade allows for some degree of independent wheel movement, hence the IRS designation.
- Lateral Link (E Links): Typically, two or three lateral links control lateral movement of the wheel hub and maintain proper wheel alignment. These links run perpendicular to the direction of travel.
- Shock Absorber (Damper): Controls the spring's oscillation. Critical for ride comfort and handling. A worn shock absorber will cause a bouncy ride and reduce tire contact with the road.
- Coil Spring: Provides the main suspension support and determines ride height. Supports the vehicle's weight and allows the suspension to compress and extend over bumps.
- Wheel Hub/Bearing Assembly: Houses the wheel bearing and provides a mounting point for the wheel.
- Anti-Roll Bar (Sway Bar): Connects the left and right sides of the suspension to reduce body roll during cornering. Increases handling stability. Often an optional item or part of a specific trim level.
- Brake Components: Includes the brake caliper, rotor, and brake lines. These are often integrated into the wheel hub assembly.
Key Specs: While the diagram won't provide explicit measurements, it's important to know basic specifications like:
- Torque Specifications: Critical for reassembling the suspension. Use a torque wrench and consult the service manual for the correct torque values for each bolt and nut.
- Alignment Specifications: Toe, camber, and caster angles. These angles determine how the tires contact the road and are essential for proper handling and tire wear. Requires specialized equipment to measure and adjust.
- Ride Height: The distance between the ground and a specific point on the chassis. This is useful for diagnosing sagging springs or verifying aftermarket suspension modifications.
Understanding Symbols on the Diagram
The diagram uses various symbols to represent different components and features. Here's a typical breakdown:
- Solid Lines: Generally represent physical components like suspension arms, shocks, and springs.
- Dashed Lines: Might indicate hidden components or the outline of the chassis.
- Arrows: Show direction of movement or force. For example, an arrow might indicate the direction of shock absorber compression or extension.
- Different Colors: Often used to differentiate between different types of lines, highlighting specific systems or connections. (The color assignments can vary by diagram, so always check the legend).
- Icons: Represent specific components like bolts, nuts, washers, and mounting points. These icons usually have a legend explaining what they represent.
- Abbreviations: Common abbreviations include "LH" (left-hand), "RH" (right-hand), "Tq" (torque), "Nm" (Newton-meters – a unit of torque), and component names like "STRUT" or "LINK".
Pay close attention to the legend or key provided with the diagram, as it will define the specific meaning of each symbol and color used.
How It Works: A Simplified Explanation
In essence, the 2007 Ford Focus rear suspension is designed to isolate the vehicle's body from road imperfections. When a wheel encounters a bump:
- The wheel moves upward, compressing the coil spring.
- The shock absorber dampens the spring's oscillation, preventing excessive bouncing.
- The control blade and lateral links allow the wheel to move up and down independently, minimizing the impact on the opposite wheel and maintaining stability.
- The anti-roll bar, if equipped, resists body roll by transferring force from one side of the suspension to the other during cornering.
The IRS design provides a smoother ride and better handling characteristics compared to a solid axle because each wheel can react to road conditions independently. This independent movement helps maintain tire contact with the road, improving traction and stability.
Real-World Use: Basic Troubleshooting
Here are some common rear suspension issues and how the diagram can help with diagnosis:
- Clunking Noise: Could indicate worn bushings in the control blade or lateral links, or a loose shock absorber mount. The diagram helps you locate these components and inspect them for damage.
- Bouncy Ride: Likely caused by worn shock absorbers. The diagram pinpoints the shock absorber location and its mounting points.
- Uneven Tire Wear: May indicate misalignment due to bent suspension components or worn bushings. The diagram shows the location of the lateral links, which are critical for alignment.
- Excessive Body Roll: Could be due to a broken or disconnected anti-roll bar (if equipped) or worn sway bar links. The diagram shows the anti-roll bar's location and attachment points.
When troubleshooting, always start with a visual inspection, comparing the components on both sides of the vehicle. Look for signs of damage, wear, or looseness.
Safety Considerations
Working on the suspension can be dangerous. Here are critical safety precautions:
- Spring Compression: Coil springs store a tremendous amount of energy and can cause serious injury if released improperly. Never attempt to compress or remove a coil spring without using a proper spring compressor.
- Vehicle Support: Always use jack stands to support the vehicle securely. Never rely solely on a jack.
- Brake Lines: Be extremely careful when working near brake lines. Damage to a brake line can result in complete brake failure. If you accidentally damage a brake line, replace it immediately.
- Torque Specifications: Always use a torque wrench and tighten fasteners to the correct torque specifications. Overtightening can damage components, while undertightening can lead to loosening and failure.
- Eye Protection: Always wear safety glasses to protect your eyes from debris.
The diagram helps you identify components that are under tension or pressure (like the springs and shocks) and allows you to plan your work accordingly, minimizing the risk of injury.
Understanding the 2007 Ford Focus rear suspension diagram is a valuable asset for anyone working on this system. By carefully studying the diagram, you can gain a deeper understanding of the components, their function, and how they interact. This knowledge will empower you to diagnose problems accurately, perform repairs effectively, and enhance your vehicle's performance safely. We have the diagram file available for you to download, use this information to help you understand the diagram.