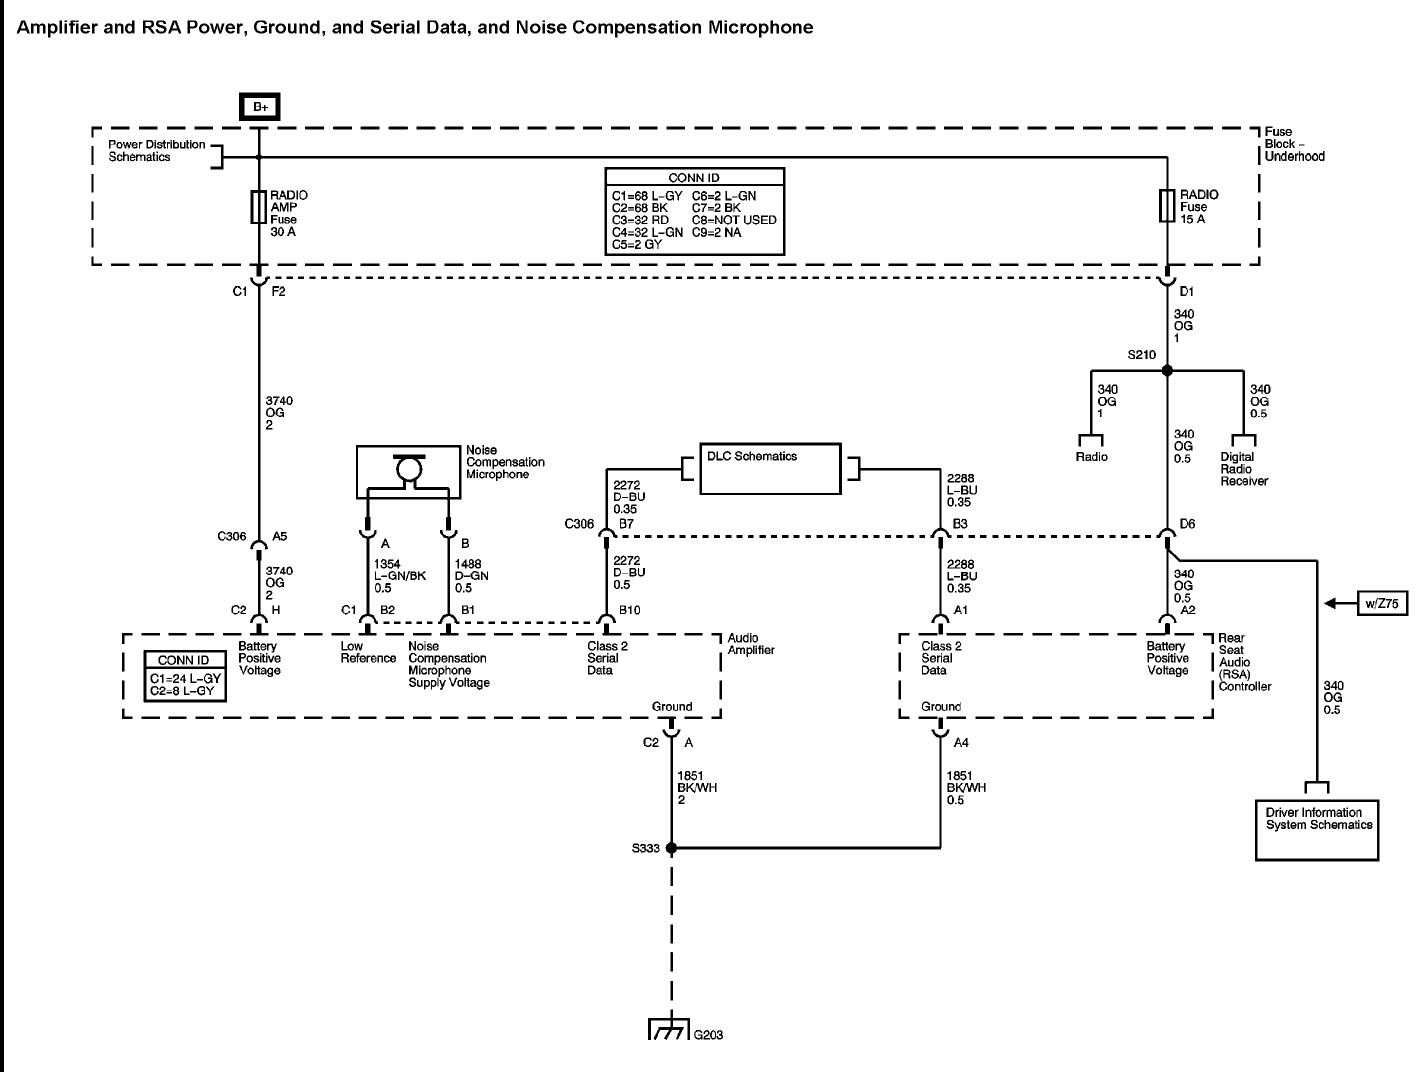
2007 Gmc Sierra Radio Wiring Diagram
Alright, let's dive into the radio wiring diagram for a 2007 GMC Sierra. Whether you're troubleshooting a faulty radio, upgrading your sound system, or just trying to understand the inner workings of your truck, this diagram is your best friend. We'll break it down step-by-step, so you can confidently tackle any radio-related project.
Purpose of the 2007 GMC Sierra Radio Wiring Diagram
Why bother with a wiring diagram in the first place? Well, several reasons:
- Troubleshooting: Diagnosing electrical problems can be a nightmare without a clear roadmap. The diagram shows you exactly where each wire goes, making it easier to pinpoint shorts, opens, or incorrect connections.
- Installation: Swapping out your factory radio for an aftermarket unit becomes significantly simpler. You'll know precisely which wires to tap into for power, ground, speakers, and other essential functions.
- Customization: Adding amplifiers, subwoofers, or other audio enhancements requires understanding the existing wiring. The diagram is crucial for integrating these components seamlessly.
- Learning: Even if you're not actively working on your radio, studying the diagram can deepen your understanding of automotive electrical systems.
Key Specs and Main Parts of the Radio System
Before we dissect the diagram, let's cover some essential components of the 2007 GMC Sierra radio system:
- Head Unit (Radio): This is the central control unit, handling audio processing, source selection (AM/FM, CD, etc.), and volume control.
- Speakers: Typically, a 2007 Sierra has four speakers – two in the front doors and two in the rear doors or pillars.
- Antenna: Receives radio signals (AM/FM).
- Amplifier (Optional): Some Sierras came with a factory amplifier, usually located under the center console or a seat. This amplifies the audio signal before it reaches the speakers. If you have the Bose system, you *definitely* have an amplifier.
- Wiring Harness: The bundle of wires connecting the radio to the vehicle's electrical system.
- Ground Connection: A crucial connection to the vehicle's chassis, providing a return path for electrical current. A poor ground is a common cause of radio problems.
- Data Bus (Typically CAN bus): Modern vehicles use a data bus system (like CAN – Controller Area Network) for communication between various modules, including the radio and the vehicle's computer. Some radio functions are controlled through the data bus.
Understanding the Wiring Diagram Symbols
Wiring diagrams use a standardized set of symbols to represent electrical components and connections. Here's a breakdown of the key elements you'll encounter in the 2007 GMC Sierra radio wiring diagram:
- Lines: These represent wires. A solid line indicates a direct wire connection, while a dashed line might represent a shielded wire or a connection within a module. Wire thickness is usually not represented on basic diagrams, but the *wire gauge* is *critical* for electrical work and should be consulted elsewhere.
- Colors: Wires are color-coded to aid in identification. The diagram will include a color key, such as "RD" for Red, "BK" for Black, "WH" for White, "GN" for Green, etc. Pay close attention to these colors; they're your best friend when tracing wires.
- Connectors: Represented by various shapes, usually circles, squares, or rectangles. These indicate where wires are joined together. The diagram should also specify the connector number and pin location.
- Ground Symbol: Typically three horizontal lines decreasing in length, connected to a wire. This indicates a connection to the vehicle's chassis, providing a ground path.
- Power Source: Represented by a battery symbol or a voltage source with a plus (+) and minus (-) sign. This indicates the power supply for the radio.
- Components: Each component (radio, speaker, amplifier) is represented by a specific symbol. The diagram will have a legend explaining these symbols.
- Splices: Represented by a dot where wires connect. This signifies that multiple wires are joined at a single point.
Important Note: Some diagrams might include component identification numbers. These numbers refer to the component's location in the vehicle's overall electrical system. Consulting a service manual or parts catalog can help you pinpoint the physical location of these components.
How the Radio Wiring Works
The 2007 GMC Sierra radio system is relatively straightforward. Here's a simplified overview of how it works:
- Power Supply: The radio receives power from the vehicle's battery through a dedicated fuse. This fuse protects the radio from overcurrent conditions.
- Ground: The radio is grounded to the vehicle's chassis, providing a return path for the electrical current.
- Ignition Switch: The ignition switch provides a signal to the radio, turning it on when the key is in the "ACC" or "ON" position. Some radios also have a constant power connection to retain memory settings (preset stations, etc.).
- Antenna Signal: The antenna receives radio signals and transmits them to the radio.
- Audio Processing: The radio processes the audio signal from the selected source (AM/FM, CD, etc.).
- Amplification: The radio's internal amplifier (or an external amplifier, if equipped) amplifies the audio signal.
- Speaker Output: The amplified audio signal is sent to the speakers, which convert the electrical signal into sound.
- Data Bus Communication: The radio communicates with other vehicle modules via the data bus. This allows for features like steering wheel controls and integration with the vehicle's information display.
Real-World Use: Basic Troubleshooting Tips
Here are some common radio problems and how the wiring diagram can help you diagnose them:
- No Power: Check the radio fuse first. Use the diagram to locate the fuse's position in the fuse box. If the fuse is blown, replace it with a fuse of the same amperage. If the fuse keeps blowing, there's likely a short circuit in the wiring. Trace the power wire using the diagram to find the short.
- No Sound: Verify the speaker connections. Use the diagram to identify the speaker wires and check for loose connections or damaged wires. If you have an amplifier, check its power and ground connections.
- Poor Reception: Check the antenna connection. Make sure the antenna wire is securely connected to the radio. If the antenna is damaged, replace it.
- Intermittent Problems: These can be the trickiest to diagnose. Check all the wiring connections for corrosion or looseness. Use the diagram to trace the wiring and look for any signs of damage. Sometimes, simply reseating the connectors can resolve intermittent issues.
- Steering Wheel Controls Not Working: This often indicates a problem with the data bus communication. Check the wiring connections to the radio and the vehicle's computer. Use a diagnostic scanner to check for any error codes related to the radio or the data bus.
Safety Considerations
Working with automotive electrical systems can be dangerous. Here are some safety precautions to keep in mind:
- Disconnect the Battery: Always disconnect the negative terminal of the battery before working on any electrical components. This prevents accidental shorts and electrical shocks.
- Use Proper Tools: Use insulated tools to prevent electrical shocks.
- Be Careful with Wiring: Avoid cutting or splicing wires unnecessarily. If you must cut a wire, use proper splicing techniques and protect the connection with heat shrink tubing.
- Identify Components Carefully: Use the wiring diagram to identify components correctly. Incorrectly connecting wires can damage the radio or other vehicle systems.
- Airbags: Be extremely cautious when working near airbags. Accidental activation of an airbag can cause serious injury. If you're unsure about how to work around airbags, consult a professional.
Working on the radio systems involves dealing with vehicle's electrical system. Be aware of the risk and consider professional support if you are not confident.
We have the complete 2007 GMC Sierra Radio Wiring Diagram available for download. This detailed diagram will provide you with all the information you need to troubleshoot, repair, or upgrade your radio system. With this diagram and a bit of patience, you'll be able to tackle most radio-related projects with confidence.