2007 Honda Accord 2.4 Serpentine Belt Diagram
The serpentine belt in your 2007 Honda Accord with the 2.4L engine is a critical component. It's responsible for powering several essential accessories that keep your car running smoothly and comfortably. Knowing the serpentine belt diagram is invaluable for anyone tackling DIY maintenance or troubleshooting accessory issues. Whether you're replacing a worn belt, diagnosing a squealing noise, or simply gaining a deeper understanding of your vehicle, this guide will provide the necessary knowledge. We'll cover everything from the purpose of the diagram to real-world troubleshooting, ensuring you're well-equipped to handle serpentine belt-related tasks.
Purpose of the Serpentine Belt Diagram
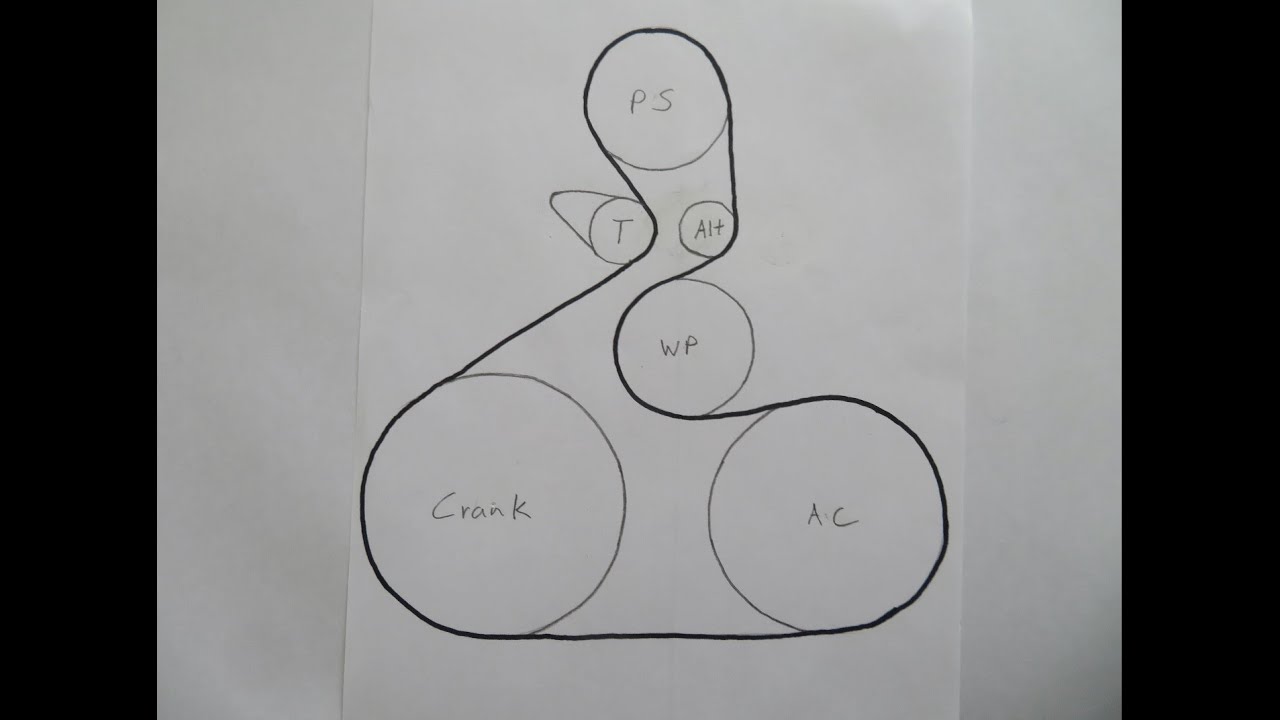
The serpentine belt diagram is a visual representation of the belt's routing around various pulleys in your engine bay. Its primary purposes are:
- Replacement Guidance: When replacing a worn or damaged belt, the diagram ensures you route the new belt correctly. Incorrect routing can lead to accessory malfunction and potential engine damage.
- Troubleshooting: The diagram helps identify which accessories are driven by the belt, aiding in diagnosing issues like a non-functional air conditioner or power steering.
- Understanding System Operation: Familiarizing yourself with the diagram provides a comprehensive view of how the accessories are powered, fostering a deeper understanding of your vehicle's mechanics.
In essence, the diagram serves as a roadmap for navigating the serpentine belt system, preventing errors and promoting informed decision-making during maintenance and repairs.
Key Specs and Main Parts (2007 Honda Accord 2.4L)
Before diving into the diagram itself, let's define some key specs and identify the major components involved:
- Engine: 2.4L Inline-4 (K24A Engine Family)
- Belt Type: Typically a multi-ribbed, reinforced rubber belt. The exact belt length and number of ribs will be specified by the manufacturer (e.g., Gates, Dayco, Continental). Always verify the correct part number for your specific model year and engine.
- Tensioner: A spring-loaded or hydraulic device that maintains proper belt tension. A faulty tensioner is a common cause of belt squeal and premature wear.
The main parts you'll encounter in the diagram include:
- Crankshaft Pulley (or Harmonic Balancer): This pulley is driven directly by the engine and provides the rotational force for the belt.
- Alternator Pulley: Powers the alternator, which charges the battery and provides electrical power to the vehicle.
- Power Steering Pump Pulley: Powers the power steering pump, which assists with steering.
- Air Conditioning Compressor Pulley: Powers the A/C compressor, responsible for cooling the cabin air.
- Idler Pulley(s): Smooth pulleys that guide the belt's path and prevent it from contacting other engine components.
- Tensioner Pulley: The pulley attached to the tensioner arm.
Understanding these components is crucial for interpreting the diagram and tracing the belt's path.
Symbols and Notation in the Diagram
Serpentine belt diagrams often use specific symbols and notations to convey information efficiently. Here's a breakdown of common elements:
- Solid Lines: Indicate the path of the *outer* (ribbed) surface of the belt.
- Dashed Lines: May indicate the path of the *inner* (smooth) surface of the belt. However, more commonly dashed lines can be used to indicate the positioning of the belt relative to a component, or how it wraps around a pulley. Look for a legend or key on the diagram for definitive interpretation.
- Arrows: Indicate the direction of belt rotation around each pulley. This is essential for correct routing.
- Component Labels: Abbreviations or symbols identify each pulley (e.g., ALT for Alternator, P/S for Power Steering, A/C for Air Conditioning).
- Tensioner Indicator: A marker or arrow on the tensioner indicates the acceptable range of belt tension. When installing a new belt, ensure the tensioner falls within this range.
While most diagrams are straightforward, always consult the specific diagram for your 2007 Honda Accord 2.4L. Variations may exist depending on the source (e.g., Haynes manual, factory service manual).
How It Works: Powering the Accessories
The serpentine belt's operation is based on a simple principle: transferring rotational force from the engine's crankshaft to various accessories. The crankshaft pulley, driven by the engine, rotates the serpentine belt. As the belt travels around each pulley, it imparts rotational force to the corresponding accessory. The tensioner maintains adequate belt tension, ensuring consistent power transfer and preventing slippage.
When the engine starts, the crankshaft pulley begins to spin. This causes the serpentine belt to rotate around all the accessory pulleys. The rotation of the alternator pulley spins the alternator, generating electricity to charge the battery and power the car's electrical system. The rotation of the power steering pump pulley drives the power steering pump, providing hydraulic pressure to assist with steering. Similarly, the rotation of the A/C compressor pulley drives the A/C compressor, which circulates refrigerant and cools the air. The idler pulleys simply guide the belt and maintain its path.
The tensioner pulley, which is part of the tensioner assembly, plays a vital role in maintaining the correct tension on the serpentine belt. As the belt wears or stretches over time, the tensioner automatically adjusts to compensate, ensuring that the belt remains tight and does not slip.
Real-World Use: Basic Troubleshooting Tips
Knowing the serpentine belt diagram can significantly aid in troubleshooting common problems:
- Squealing Noise: A squealing noise, especially during startup or acceleration, often indicates a slipping belt. Check the belt for wear, cracks, or glazing. Also, inspect the tensioner to ensure it's functioning correctly. The diagram can help you identify which pulley might be the source of the problem.
- Accessory Malfunction: If an accessory (e.g., A/C, power steering) stops working, the serpentine belt is a prime suspect. Verify the belt is intact and properly routed. If the belt is intact, check the individual accessory and its associated pulley. The diagram will show you which pulley drives the accessory in question.
- Belt Wear: Regularly inspect the serpentine belt for signs of wear, such as cracks, fraying, or missing ribs. Use the diagram to trace the belt's path and identify areas prone to wear (e.g., tight bends around small pulleys).
- Visual Inspection: Use the diagram as a reference when visually inspecting the serpentine belt. Make sure the belt is routed correctly, and that it is in good condition. If you notice any deviations from the diagram, or if you see any signs of damage to the belt, it may be time to replace it.
Important Note: Before performing any work on the serpentine belt, disconnect the negative battery terminal to prevent accidental electrical shock.
Safety Considerations
Working on the serpentine belt system can be hazardous if proper precautions aren't taken:
- Rotating Parts: The serpentine belt and pulleys are dangerous rotating parts. Never work on the system while the engine is running.
- Hot Engine: Allow the engine to cool completely before working on the belt. Exhaust manifolds and other engine components can be extremely hot.
- Tensioner Spring: The tensioner spring is under significant tension. Use the correct tools to relieve the tension and prevent injury.
- Protective Gear: Wear safety glasses and gloves to protect yourself from debris and potential chemical exposure.
Exercise caution and follow manufacturer's instructions to minimize the risk of injury.
Conclusion
Understanding the 2007 Honda Accord 2.4L serpentine belt diagram empowers you to perform maintenance, diagnose problems, and gain a deeper understanding of your vehicle's operation. By familiarizing yourself with the components, symbols, and troubleshooting tips outlined in this guide, you'll be well-equipped to handle serpentine belt-related tasks with confidence and safety. Remember to always prioritize safety and consult reputable resources for specific repair procedures.
We have the diagram file readily available. Understanding and correctly utilizing the serpentine belt diagram ensures the longevity and performance of your Honda Accord's accessories. With the right knowledge and tools, you can confidently tackle serpentine belt maintenance and repairs, saving time and money while deepening your understanding of automotive mechanics.