2007 Honda Accord V6 Serpentine Belt Diagram
Alright, let's dive into the serpentine belt system on the 2007 Honda Accord V6. Understanding this system is crucial for maintaining your car's essential functions. Whether you're tackling a repair, replacing a worn belt, or simply want to deepen your automotive knowledge, a clear understanding of the serpentine belt diagram is your best friend.
Why This Diagram Matters
The serpentine belt diagram is more than just a pretty picture. It's an indispensable tool for several reasons:
- Belt Replacement: The most obvious use. When your belt shows signs of wear (cracks, fraying, squealing), the diagram shows you the correct routing for the new one. Getting this wrong can lead to serious problems.
- Component Diagnosis: If an accessory isn't working (power steering, A/C, charging system), the diagram helps you trace the belt path to that component, aiding in troubleshooting.
- Preventive Maintenance: Familiarizing yourself with the belt's routing and tensioner location allows for easier inspection during routine maintenance. Early detection of issues prevents costly breakdowns.
- General Understanding: Knowing how the system works empowers you to better understand your vehicle and make informed decisions about its upkeep.
Key Specs and Main Parts
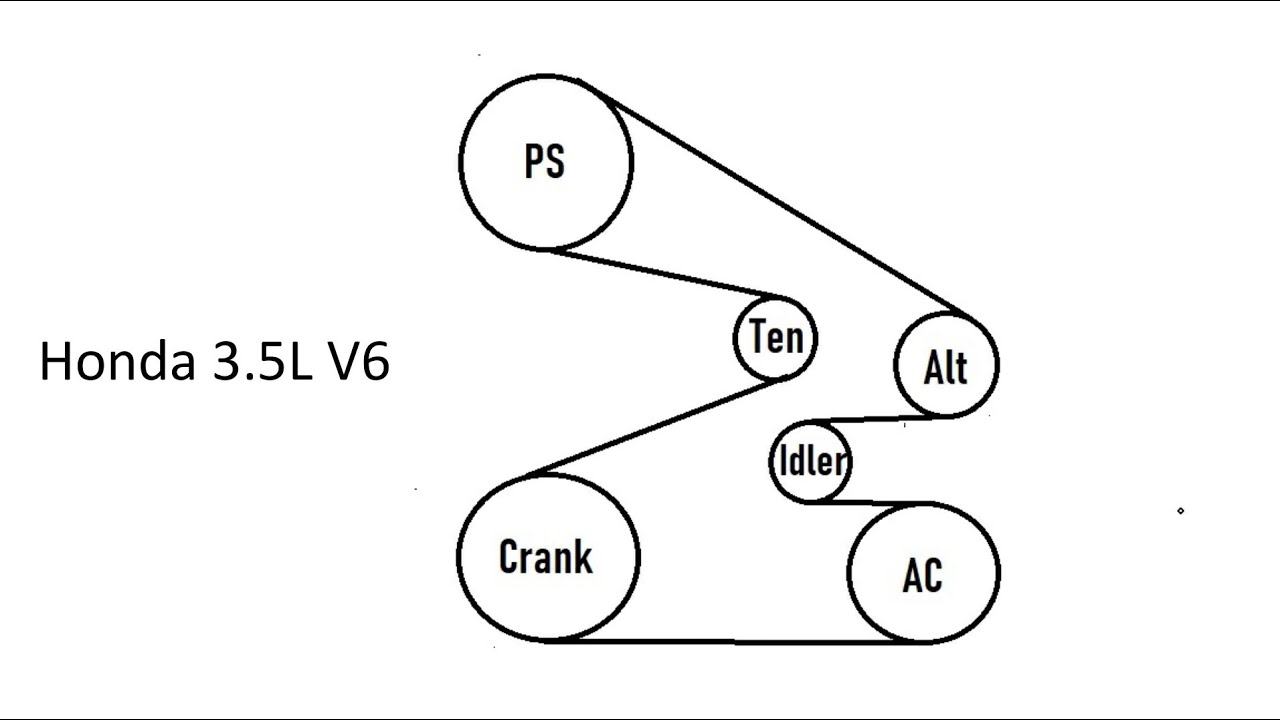
The 2007 Honda Accord V6 (specifically models with the J35A6 or J35A7 engine) uses a single serpentine belt to drive multiple engine accessories. Here's a breakdown of the key components:
- Serpentine Belt: This is the star of the show – a long, continuous belt made of reinforced rubber. It transmits power from the crankshaft to the various accessories. The OEM belt size is typically around 87 inches, but always double-check the part number for your specific engine configuration.
- Crankshaft Pulley (Damper): Located at the bottom of the engine, this pulley is directly connected to the crankshaft. It's the driving force behind the entire serpentine belt system. Note that this pulley also acts as a harmonic balancer, dampening torsional vibrations from the engine.
- Alternator Pulley: The alternator, responsible for charging the battery, is driven by the serpentine belt.
- Power Steering Pump Pulley: This pulley drives the power steering pump, which provides hydraulic assistance for steering.
- Air Conditioning (A/C) Compressor Pulley: The A/C compressor, responsible for cooling the cabin, is also driven by the serpentine belt.
- Idler Pulley(s): These smooth, bearing-mounted pulleys provide routing and tension for the belt. They don't drive any specific components, but are essential for proper belt alignment and tension.
- Tensioner Pulley (Automatic Tensioner): This spring-loaded pulley maintains the correct tension on the serpentine belt. It's crucial for preventing slippage and ensuring optimal accessory performance. A key spec here is the tensioner's range of motion. If the tensioner is nearing the end of its travel, it's a sign that the belt may be stretched or that the tensioner itself is failing.
Diagram Symbols Explained
Understanding the symbols in a serpentine belt diagram is key to interpreting it correctly. Here's a breakdown of common symbols:
- Solid Lines: These represent the path of the serpentine belt itself. Follow them closely to understand the routing.
- Dotted Lines: Sometimes used to indicate the backside of the belt (the smooth side) contacting a pulley. This helps visualize how the belt wraps around the components.
- Arrows: Indicate the direction of belt travel. This is important for ensuring proper belt installation.
- Component Icons: Simple drawings represent each component, such as the alternator, power steering pump, A/C compressor, etc. These are usually labeled with abbreviations (ALT, P/S, A/C).
- Tensioner Symbol: Usually depicted as a pulley with a spring or arrow indicating the direction of tension. Sometimes a "T" is used to label the tensioner.
- Routing Labels: Some diagrams include labels indicating the routing sequence (e.g., "From Crankshaft to Alternator").
How It Works
The serpentine belt system is a relatively simple but effective way to transfer power from the engine to various accessories. Here's the basic principle:
- The engine's crankshaft rotates, turning the crankshaft pulley.
- The serpentine belt, wrapped tightly around the crankshaft pulley, is driven by its rotation.
- As the serpentine belt moves, it drives the pulleys of the alternator, power steering pump, A/C compressor, and any idler pulleys in the system.
- The automatic tensioner maintains the correct tension on the belt, ensuring that it doesn't slip or become loose.
The automatic tensioner is a critical component. Its spring-loaded mechanism constantly adjusts to compensate for belt stretch and temperature changes, keeping the belt tension within the optimal range. Without a properly functioning tensioner, the belt can slip, causing reduced accessory performance and potentially leading to belt damage or failure.
Real-World Use: Basic Troubleshooting
Here are a few common problems and how the serpentine belt diagram can help with troubleshooting:
- Squealing Noise: A squealing noise, especially when starting the engine or turning the steering wheel, often indicates a slipping serpentine belt. The diagram helps you visually inspect the belt for wear, cracks, or glazing. Also, check the tensioner to see if it's functioning correctly. A loose or seized tensioner can cause belt slippage.
- Accessory Failure: If your power steering suddenly stops working, or the A/C blows warm air, the serpentine belt is a prime suspect. The diagram shows you the belt's routing to the affected component. Check if the belt is broken, loose, or if the pulley is seized.
- Battery Not Charging: If the alternator isn't charging the battery, the serpentine belt could be the culprit. The diagram shows you how the belt drives the alternator. Ensure the belt is properly tensioned and that the alternator pulley is rotating freely.
- Visual Inspection: Regularly inspect the belt for signs of wear and tear such as cracking, fraying, or missing chunks. The diagram will show you how the belt should be aligned on each pulley, ensuring it hasn't jumped a groove.
Safety First!
Working on the serpentine belt system can be dangerous if you're not careful. Here are some important safety precautions:
- Disconnect the Battery: Always disconnect the negative battery terminal before working on the serpentine belt system. This prevents accidental starting of the engine and potential electrical shocks.
- Hot Engine: Never work on the serpentine belt system when the engine is hot. Allow the engine to cool down completely before starting any repairs.
- Moving Parts: Be extremely cautious around moving parts. Keep your hands, clothing, and tools clear of the serpentine belt and pulleys when the engine is running.
- Tensioner Safety: The automatic tensioner is spring-loaded and can snap back forcefully when released. Use the correct tool (usually a wrench or socket) to relieve the tension and prevent injury.
The crankshaft pulley is of particular concern, since this connects directly to the engine's moving parts. Be sure the car is properly secured and the ignition is off before working near this area.
By using this information and the serpentine belt diagram, you can effectively diagnose and repair issues with your 2007 Honda Accord V6's serpentine belt system.
We have the file containing the complete serpentine belt diagram available for you to download.