
2007 Honda Pilot Serpentine Belt Diagram
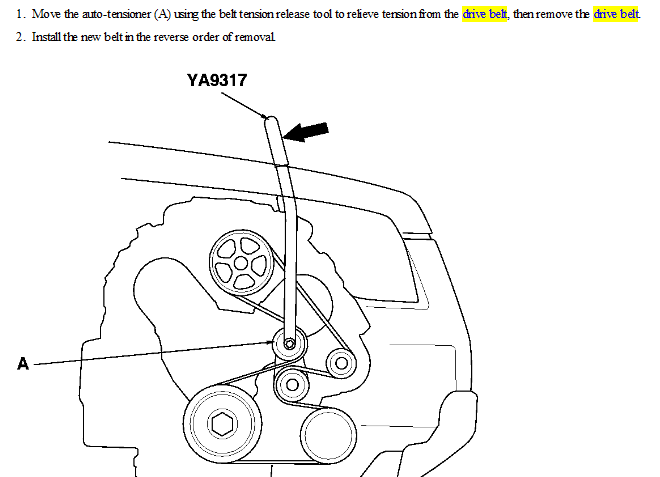
For the seasoned DIYer tackling a 2007 Honda Pilot, understanding the serpentine belt diagram is absolutely crucial. Whether you're preemptively replacing a worn belt, diagnosing a squealing sound, or just deepening your understanding of your vehicle, this guide will provide the technical know-how you need.
Purpose of the Serpentine Belt Diagram
The serpentine belt diagram is your roadmap to the accessory drive system. It illustrates the correct path for the serpentine belt as it winds around various engine components. This diagram is vital for:
- Replacement: Ensures you install the new belt correctly. An improperly installed belt can lead to immediate failure and damage other components.
- Troubleshooting: Helps identify which accessory is causing a problem (e.g., squealing from the power steering pump because the belt is slipping).
- General Maintenance: Aids in visually inspecting the belt and pulleys for wear, damage, or misalignment.
- Learning: Provides a clear understanding of how the engine accessories are driven and their relationship to each other.
Key Specs and Main Parts of the 2007 Honda Pilot Serpentine Belt System
The 2007 Honda Pilot (specifically the 3.5L V6 engine – J35A9) uses a single serpentine belt to drive multiple accessories. Understanding these components and their roles is essential:
- Crankshaft Pulley (Harmonic Balancer): The engine's crankshaft drives this pulley, which in turn powers the serpentine belt.
- Alternator: Provides electrical power to the vehicle and charges the battery.
- Power Steering Pump: Provides hydraulic assistance to the steering system, making it easier to turn the wheel.
- Air Conditioning Compressor: Compresses refrigerant to cool the cabin.
- Idler Pulley(s): Smooth, non-driven pulleys that guide the belt and maintain proper tension. They're critical for routing and preventing belt flutter.
- Tensioner Pulley: Spring-loaded pulley that maintains the correct tension on the serpentine belt. This is crucial for preventing slippage and ensuring proper operation of the accessories. A faulty tensioner is a common cause of serpentine belt issues.
- Serpentine Belt: A long, multi-ribbed belt made of rubber or synthetic materials that transmits power from the crankshaft to the various accessories.
The specific length and rib count of the serpentine belt are critical. Refer to your vehicle's owner's manual or a reputable auto parts store for the correct part number. Using the wrong belt can lead to improper tension, slippage, and damage.
Understanding Serpentine Belt Diagram Symbols
Serpentine belt diagrams use various symbols to represent different components and belt routing. Here's a breakdown of common symbols:
- Solid Lines: Represent the path of the outside of the serpentine belt.
- Dotted Lines: May indicate the path of the inside of the belt (where the ribs make contact with the pulleys). Sometimes these are used to clarify the belt path behind other components.
- Arrows: Show the direction of belt travel. This is crucial for ensuring the belt is installed correctly.
- Pulley Icons: Typically, pulleys are represented by circles. Some diagrams might shade or label the circles to indicate the specific component (e.g., "ALT" for Alternator, "P/S" for Power Steering).
- Tensioner Symbol: The tensioner pulley is often depicted with an arrow indicating the direction of its spring-loaded movement. This helps you understand how to relieve tension when removing or installing the belt.
Color-coding is rarely used on these diagrams, but if present, a key should always be provided to explain its meaning. More commonly, abbreviations are used directly on the diagram next to the relevant component.
How the Serpentine Belt System Works
The serpentine belt system operates on a simple principle: rotational force. The engine's crankshaft turns the crankshaft pulley. This pulley, in turn, drives the serpentine belt, which wraps around all the other accessory pulleys. As the crankshaft pulley rotates, it transfers power to each accessory, enabling them to function.
The tensioner pulley plays a crucial role in maintaining the correct belt tension. It's spring-loaded and automatically adjusts to compensate for belt wear and stretching. Proper tension is essential for preventing belt slippage and ensuring efficient operation of all accessories. If the belt is too loose, it will slip, causing reduced performance of the alternator, power steering pump, and AC compressor. If the belt is too tight, it can put excessive stress on the bearings of these components, leading to premature failure.
Real-World Use and Basic Troubleshooting
Here are some common scenarios where you'll need to consult the serpentine belt diagram:
- Squealing Noise: A squealing noise, especially when starting the engine or turning the steering wheel, often indicates a slipping serpentine belt. Check the belt for cracks, glazing, or wear. Also, inspect the tensioner pulley to ensure it's functioning properly and maintaining adequate tension. If the tensioner is weak, it may need replacing.
- Battery Light On: If the alternator isn't being driven properly due to a slipping or broken belt, the battery may not charge, and the battery warning light on the dashboard will illuminate.
- Power Steering Failure: If the power steering pump isn't receiving power from the belt, the steering will become difficult, especially at low speeds.
- Air Conditioning Issues: A malfunctioning AC compressor due to belt slippage can result in poor or no cooling.
Visual Inspection: Regularly inspect the serpentine belt for cracks, fraying, glazing (a shiny, hardened surface), and missing chunks. Also, check the pulleys for damage or misalignment. A misaligned pulley can cause the belt to wear unevenly and prematurely fail. Using a straight edge can help determine pulley alignment.
Tensioner Check: With the engine off, use a wrench to rotate the tensioner pulley and relieve tension on the belt. The tensioner should move smoothly and return to its original position with a strong spring force. If it feels loose, binding, or doesn't return properly, it needs to be replaced.
Safety Precautions
Working on the serpentine belt system involves potential hazards:
- Hot Engine: Always allow the engine to cool completely before working on the serpentine belt system. Contact with hot engine components can cause severe burns.
- Moving Parts: Never work on the serpentine belt system with the engine running. The belt and pulleys are rapidly rotating and can cause serious injury.
- Battery Disconnect: Disconnect the negative battery cable before starting any work on the electrical system, including the alternator. This prevents accidental short circuits.
- Tensioner Spring: The tensioner pulley is spring-loaded and can snap back forcefully when released. Use caution when relieving tension on the belt.
- Eye Protection: Wear safety glasses to protect your eyes from debris and potential hazards.
The alternator carries a significant electrical charge even with the engine off. Exercise caution when working around it.
Remember, if you are not comfortable performing these tasks yourself, it's always best to consult a qualified mechanic.
We have a high-resolution, printable PDF of the 2007 Honda Pilot Serpentine Belt Diagram available for download. This diagram provides a clear and detailed illustration of the belt routing and component locations. Having this resource on hand can be invaluable when working on your vehicle.