2007 Hyundai Sonata Serpentine Belt Diagram
Alright, let's dive into the serpentine belt system on your 2007 Hyundai Sonata. This article will serve as a comprehensive guide to understanding the serpentine belt diagram for your vehicle. Whether you're performing routine maintenance, diagnosing a squealing noise, or just want to understand how your engine accessories are driven, knowing how to read and interpret this diagram is crucial. And guess what? We have the complete diagram ready for you to download at the end of this article!
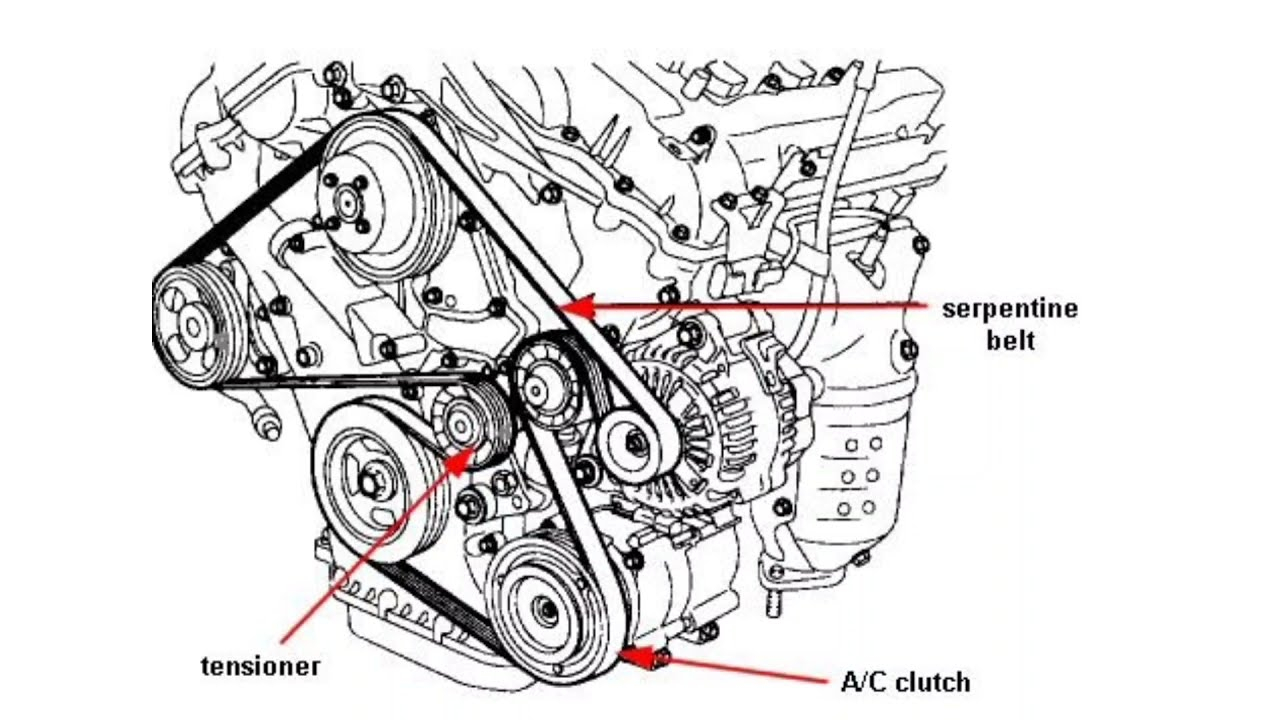
Purpose of the Serpentine Belt Diagram
The serpentine belt diagram is essentially a roadmap for your engine's accessory drive system. It illustrates the path the serpentine belt takes around various pulleys, showing you which components are powered by it. This is invaluable for several reasons:
- Replacement: If your belt snaps or shows signs of wear, the diagram ensures you route the new belt correctly. An incorrectly routed belt won't power the accessories properly, leading to malfunctions.
- Diagnosis: If an accessory, like the power steering or air conditioning, isn't working, the diagram helps you isolate whether the belt is the problem. A slipped or broken belt is a common culprit.
- Understanding System Operation: Even if everything is working fine, studying the diagram gives you a better understanding of how your engine's accessories function in relation to each other.
- Maintenance: The diagram, along with knowing the belt's tensioner location, is key to properly inspecting and maintaining the belt's condition, minimizing the chance of unexpected breakdowns.
Key Specs and Main Parts
Before we get into the diagram itself, let's identify the major components involved in the serpentine belt system on a 2007 Sonata. While there might be slight variations depending on the specific engine (2.4L inline-4 or 3.3L V6), the fundamental principles remain the same.
- Crankshaft Pulley (Crank Pulley): This is the driving force of the entire system. It's connected directly to the crankshaft and provides the rotational power to the belt.
- Alternator Pulley: The alternator generates electricity to charge the battery and power the electrical systems.
- Power Steering Pump Pulley: The power steering pump provides hydraulic assistance to make steering easier.
- Air Conditioning Compressor Pulley: The A/C compressor circulates refrigerant to cool the cabin.
- Idler Pulley(s): These pulleys provide a smooth path for the belt and can help increase the belt's contact area with other pulleys. They don't drive any specific accessory.
- Tensioner Pulley: This spring-loaded pulley maintains the correct tension on the serpentine belt. It's crucial for proper operation and prevents the belt from slipping. The tensioner is extremely important and should be checked regularly for proper operation. A failing tensioner is a common cause of belt noise and premature failure.
- Serpentine Belt: The continuous belt that connects all the pulleys. It's usually made of a durable rubber compound.
The exact belt length is critical for proper tension and accessory performance. Always use the correct belt specified for your 2007 Sonata. This information can be found in your owner's manual or a reputable auto parts store.
Understanding the Symbols in the Diagram
Serpentine belt diagrams aren't always standardized, but the underlying principles are consistent. Here's a breakdown of what you'll typically find:
- Solid Lines: These lines represent the path of the serpentine belt itself. Follow them carefully to see how the belt wraps around each pulley.
- Arrows: Arrows indicate the direction of rotation for each pulley. Pay attention to these, as they show you how the belt drives each accessory.
- Pulley Symbols: Pulleys are usually represented by circles. Sometimes, the circles will be labeled with abbreviations like "ALT" for Alternator, "P/S" for Power Steering, "A/C" for Air Conditioning, "CRANK" for Crankshaft, "IDLER" for Idler pulley, and "TENSIONER".
- Tensioner Symbol: The tensioner pulley is often depicted with a spring or a symbol indicating a spring-loaded mechanism. This visually highlights its role in maintaining belt tension.
Occasionally, you might find dashed lines indicating the *backside* of the belt contacting a pulley. The diagram will show the path of the belt, paying attention to which side of the belt engages with each pulley.
How It Works: The Serpentine Belt System
The serpentine belt system is a relatively simple, yet effective, mechanism. The crankshaft pulley, driven directly by the engine, transmits rotational power to the serpentine belt. The belt, in turn, wraps around and drives all the accessory pulleys (alternator, power steering pump, A/C compressor, etc.). The tensioner pulley maintains constant pressure on the belt, preventing slippage and ensuring efficient power transfer. The *tensioner's spring* provides this constant pressure, and it's important to note that the tensioner arm moves slightly during engine operation to compensate for belt stretch and vibration.
The serpentine belt system is designed to operate quietly and efficiently. A properly tensioned belt, running on clean pulleys, will provide years of reliable service.
Real-World Use: Basic Troubleshooting Tips
Here's how you can use the serpentine belt diagram to troubleshoot common problems:
- Squealing Noise: A squealing noise, especially when the engine is first started or under heavy load (like turning the steering wheel at low speeds), often indicates a slipping belt. Check the belt for cracks, glazing (shiny appearance), or missing chunks. Also, inspect the tensioner to ensure it's applying sufficient pressure. Compare the location of the tensioner to the diagram.
- Accessory Malfunction: If an accessory isn't working, such as the power steering or A/C, use the diagram to verify that the belt is properly routed around that accessory's pulley. A slipped or broken belt will prevent the pulley from rotating.
- Belt Wear: Regularly inspect the belt for signs of wear, such as cracks, fraying, or missing ribs. If you see significant wear, replace the belt *immediately*. Use the diagram to make sure the new belt is installed correctly.
- Incorrect Routing After Replacement: If you've recently replaced the belt and are experiencing problems, double-check the routing using the diagram. Incorrect routing is a common mistake that can lead to serious damage.
A visual inspection of the alignment of the pulleys is also a good practice. If a pulley is bent or misaligned, it can cause the belt to wear prematurely or even jump off the pulley.
Safety Considerations
Working on the serpentine belt system can be dangerous if you're not careful. Here are some important safety precautions:
- Disconnect the Battery: Always disconnect the negative battery cable before working on any electrical components.
- Engine Off and Cool: Never work on the serpentine belt system while the engine is running or hot. The belt and pulleys can move suddenly, causing serious injury.
- Keep Fingers Clear: Keep your fingers clear of the belt and pulleys when the engine is running.
- Eye Protection: Wear safety glasses to protect your eyes from debris.
- Hot Components: Be mindful of hot components, especially the exhaust manifold, when reaching around the engine.
The tensioner stores a significant amount of spring force. When releasing the tensioner to remove or install the belt, be sure to use the correct tool and follow the manufacturer's instructions to avoid injury.
Now that you have a solid understanding of the 2007 Hyundai Sonata serpentine belt diagram, you're well-equipped to perform maintenance and troubleshoot common issues. Remember to prioritize safety and double-check your work. Happy wrenching!
Download Your Diagram
Ready to get your hands on the actual diagram? We've got you covered! You can download the complete 2007 Hyundai Sonata Serpentine Belt Diagram by clicking HERE. This will provide you with a visual reference that you can use while working on your vehicle. You can print it out for use in the garage, or save it on your device for future reference.