2007 Jeep Grand Cherokee Serpentine Belt Diagram
The serpentine belt in your 2007 Jeep Grand Cherokee is a critical component, responsible for driving numerous engine accessories. Access to a clear and accurate serpentine belt diagram is invaluable whether you're performing routine maintenance, diagnosing a problem, or tackling a more complex repair. This article provides a detailed breakdown of the 2007 Jeep Grand Cherokee serpentine belt diagram, focusing on practical application and understanding for the experienced DIYer.
Purpose of the Serpentine Belt Diagram
A serpentine belt diagram serves several crucial purposes:
- Correct Belt Routing: The most fundamental purpose is to illustrate the correct path the serpentine belt must follow around the various pulleys. Incorrect routing can lead to accessory malfunction, belt slippage, and premature wear or failure.
- Troubleshooting: The diagram helps identify potential problems. For example, noticing a specific accessory isn't working can be cross-referenced with the diagram to see if the belt routing to that accessory is the issue.
- Replacement Guidance: When replacing a worn or damaged belt, the diagram acts as a visual guide to ensure the new belt is installed correctly.
- Accessory Identification: The diagram clearly labels each accessory driven by the belt, which is useful for general engine familiarization and maintenance.
- Preventative Maintenance: Understanding the belt's path can aid in inspecting the belt and associated pulleys for signs of wear or damage as part of your preventative maintenance schedule.
Key Specs and Main Parts
The 2007 Jeep Grand Cherokee came with several engine options, each with its own serpentine belt configuration. The most common engines were:
- 3.7L V6: This engine typically used a serpentine belt routing that drives the alternator, power steering pump, air conditioning compressor, and water pump.
- 4.7L V8: Similar to the V6, this engine's serpentine belt drives the alternator, power steering pump, air conditioning compressor, and water pump. However, the routing and belt length will differ from the V6.
- 5.7L HEMI V8: The HEMI engine generally incorporates a slightly more complex serpentine belt routing, potentially with different pulley arrangements.
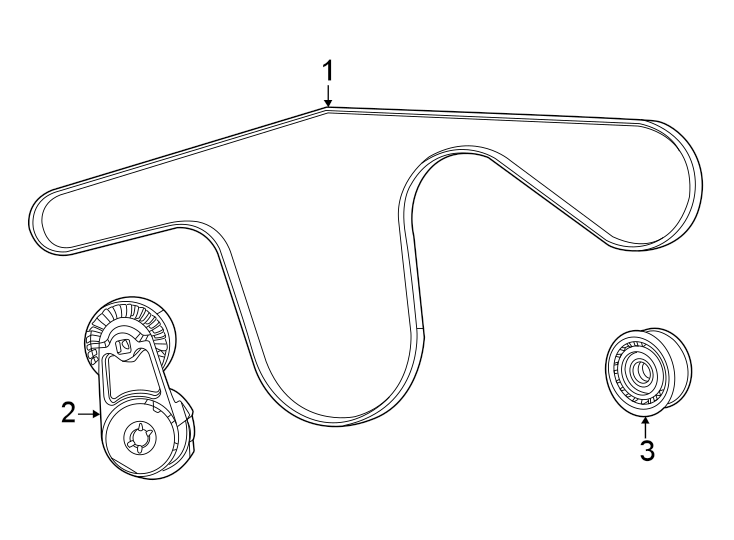
Key components shown in the serpentine belt diagram include:
- Crankshaft Pulley (Harmonic Balancer): The main driving force of the serpentine belt system. It's connected directly to the crankshaft and provides the rotational energy.
- Alternator Pulley: Powers the electrical system of the vehicle.
- Power Steering Pump Pulley: Provides hydraulic pressure for power-assisted steering.
- Air Conditioning Compressor Pulley: Drives the compressor that cools the cabin.
- Water Pump Pulley: Circulates coolant throughout the engine to prevent overheating.
- Idler Pulley(s): Smooth, ungrooved pulleys used to guide the belt and maintain optimal tension.
- Tensioner Pulley: A spring-loaded pulley that automatically adjusts the belt tension, keeping it within the specified range. It's a critical component for proper belt operation.
Belt Length: The specific belt length required varies depending on the engine and whether or not the vehicle has air conditioning. Always consult the correct diagram for your specific Grand Cherokee model and engine.
Diagram Symbols
Understanding the symbols used in the serpentine belt diagram is crucial for accurate interpretation:
- Solid Lines: Represent the path of the serpentine belt. The thickness of the line usually doesn't have specific meaning but is there for clarity.
- Arrows: Indicate the direction of belt rotation. Pay close attention to these to ensure correct routing.
- Pulleys: Represented as circles. Some diagrams might differentiate between grooved pulleys (those that drive accessories) and smooth idler pulleys.
- Labels: Abbreviations or full names of the accessories (e.g., ALT for alternator, P/S for power steering).
- Tensioner Indicator: A small indicator, often an arrow or pointer, on the tensioner assembly showing the acceptable tension range. This is used when installing a new belt to verify correct tension.
While colors aren't generally used in typical black-and-white diagrams, some enhanced diagrams might use colors to differentiate sections of the belt path or to highlight specific components. Always refer to the diagram's legend if colors are present.
How It Works
The serpentine belt system operates on a simple principle: the crankshaft pulley, driven by the engine, transfers rotational force to the other accessories via the serpentine belt. The belt wraps around each accessory pulley, causing it to rotate and perform its function. The tensioner pulley maintains the proper belt tension, preventing slippage and ensuring efficient power transfer.
The proper routing ensures that each accessory receives the necessary power. The tensioner plays a vital role; a worn or malfunctioning tensioner can lead to belt slippage, noise, and ultimately, accessory failure. The diagram helps visualize this entire process and pinpoint any potential issues with the routing or individual components.
Real-World Use: Basic Troubleshooting Tips
Here are some common troubleshooting scenarios where the serpentine belt diagram is invaluable:
- Squealing Noise: Often indicates a loose belt or a worn pulley. Use the diagram to inspect the belt's routing and tension. Check the tensioner indicator to see if the tension is within the acceptable range.
- Accessory Malfunction (e.g., no power steering): Use the diagram to verify that the belt is correctly routed to the affected accessory. Inspect the belt for damage or slippage around that pulley.
- Visible Belt Damage: Inspect the belt for cracks, fraying, or missing chunks. If damage is present, replace the belt immediately, ensuring the new belt is routed correctly using the diagram. Also check for pulley misalignment, which can cause premature belt wear.
- Belt Slippage: If the belt is slipping, it might be loose, worn, or contaminated with oil or coolant. Check the tensioner and inspect the belt for signs of contamination. The diagram will help you identify potential sources of leaks that could be affecting the belt.
A simple test for belt slippage is to spray a small amount of belt dressing on the belt while the engine is running (exercise extreme caution near moving parts!). If the noise temporarily disappears, it confirms belt slippage is the issue.
Safety Considerations
Working around a running engine and the serpentine belt system presents several potential hazards. Always exercise extreme caution:
- Never work on the serpentine belt system with the engine running unless absolutely necessary for diagnosis. If you must, keep your hands and tools well clear of the moving belt and pulleys.
- Disconnect the negative battery terminal before performing any repairs to prevent accidental starting of the engine.
- Be aware of hot engine components. The engine block, exhaust manifolds, and radiator can be extremely hot, even after the engine has been turned off for a while.
- Use appropriate tools. Use a serpentine belt tool to release tension on the tensioner pulley when removing or installing the belt. Do not try to pry the belt off the pulleys, as this can damage them.
- Wear safety glasses to protect your eyes from debris.
The tensioner pulley stores a significant amount of spring force. Always use the correct tools and procedures to release the tension safely. Improper handling can result in serious injury.
Conclusion
Understanding your 2007 Jeep Grand Cherokee's serpentine belt system and having access to a reliable diagram are essential for proper maintenance and troubleshooting. By familiarizing yourself with the components, routing, and potential problems, you can confidently tackle a variety of repairs and keep your Jeep running smoothly.
We have the high-resolution serpentine belt diagram file specifically for the 2007 Jeep Grand Cherokee. Contact us to download the diagram.