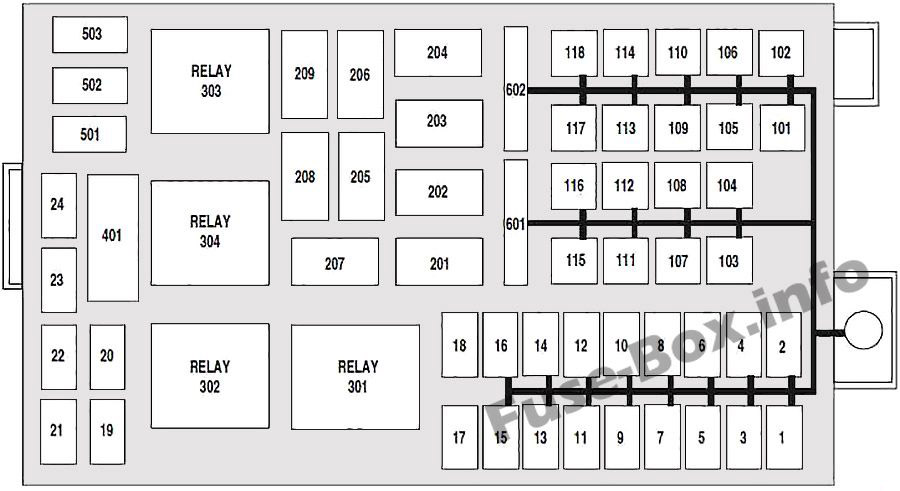
2007 Mercury Grand Marquis Fuse Box Diagram
For the seasoned DIY mechanic or the ambitious car owner, understanding your vehicle's electrical system is paramount. The fuse box, often an unsung hero, plays a critical role in protecting your car's vital components from electrical overloads. This article provides a detailed look at the 2007 Mercury Grand Marquis fuse box diagram, explaining its purpose, key components, how it works, and how you can use it for effective troubleshooting.
Purpose and Importance of the Fuse Box Diagram
Why bother understanding a fuse box diagram? Simply put, it's your roadmap to your car's electrical health. The fuse box diagram serves several crucial purposes:
- Diagnosis and Repair: When an electrical component fails (e.g., a headlight, radio, or windshield wiper), the first step is often to check the corresponding fuse. The diagram tells you exactly which fuse to inspect.
- Learning and Understanding: Studying the diagram provides valuable insight into how different electrical systems are interconnected within your vehicle.
- Modifications and Upgrades: If you're adding aftermarket accessories (e.g., amplifiers, lights), knowing the fuse box layout helps you safely tap into the electrical system without overloading circuits.
- Preventative Maintenance: Periodic inspections of fuses can identify potential issues before they escalate into major problems.
Without the diagram, you're essentially working in the dark, potentially causing more harm than good. It acts as a quick-reference guide to pinpoint and address electrical issues swiftly and safely.
Key Specifications and Main Parts
The 2007 Mercury Grand Marquis typically has two main fuse box locations:
- Under-Hood Fuse Box: Located in the engine compartment, this box houses fuses and relays for high-current components like the starter motor, alternator, cooling fan, and headlights.
- Interior Fuse Box: Usually situated under the dashboard (often on the driver's side), this box protects lower-current circuits such as the radio, interior lights, power windows, and door locks.
Key parts within these fuse boxes include:
- Fuses: These are the sacrificial elements that protect circuits from overcurrent. They contain a thin wire that melts and breaks the circuit when the current exceeds a certain limit. Fuses are rated in Amperes (Amps or A), indicating the maximum current they can handle.
- Relays: Relays are electrically operated switches that control high-current circuits using a low-current signal. They are used to activate components like the starter motor, fuel pump, and air conditioning compressor.
- Circuit Breakers: Similar to fuses, circuit breakers protect circuits from overcurrent. However, instead of melting, they trip and can be reset after the fault is resolved. Circuit breakers are less common in standard automotive fuse boxes, often used for heavier duty systems.
- Fuse Puller: A small tool used to safely remove and install fuses without damaging them or yourself.
Understanding Fuse Box Symbols and Diagram Conventions
Fuse box diagrams aren't just a random collection of numbers and lines. They use a standardized system of symbols and conventions to convey information clearly. Here's a breakdown:
- Lines: Lines represent electrical circuits connecting fuses to the components they protect.
- Numbers: Each fuse is assigned a number, which corresponds to the number listed on the diagram. This number is crucial for identifying the correct fuse for a particular circuit.
- Color Coding: Fuses are typically color-coded based on their Ampere rating. For example:
- Yellow: 20A
- Blue: 15A
- Red: 10A
- Brown: 7.5A
- Icons/Symbols: Diagrams often use icons or symbols to represent the components protected by each fuse. Common examples include:
- Headlight icon: Headlights
- Radio icon: Radio
- Window icon: Power windows
- Horn icon: Horn
- Abbreviations: Many diagrams use abbreviations to save space. Familiarize yourself with common abbreviations such as "ACC" (accessory), "IGN" (ignition), and "PWR" (power).
Carefully studying the legend or key accompanying the diagram is essential for accurately interpreting the symbols and abbreviations used.
How the Fuse Box Works
The fuse box operates on a simple but crucial principle: circuit protection. Here's how it works:
- Power Distribution: The car's battery provides electrical power to the fuse box.
- Circuit Routing: From the fuse box, power is routed to various electrical components through individual circuits.
- Fuse Protection: Each circuit contains a fuse that is specifically rated for the expected current draw of the component it protects.
- Overcurrent Protection: If a fault occurs in a circuit, causing excessive current flow (e.g., a short circuit), the fuse's thin wire will melt, breaking the circuit and preventing damage to the component and the wiring.
- Relay Operation: For components requiring high current, a relay is used. A low-current signal from the ignition switch or another control module activates the relay, which then closes the high-current circuit to power the component.
In essence, the fuse acts as a weak link in the circuit, sacrificing itself to protect more valuable and sensitive components.
Real-World Use: Basic Troubleshooting Tips
Here's how you can use the fuse box diagram to troubleshoot common electrical issues:
- Identify the Problem: Determine which electrical component is not working.
- Consult the Diagram: Use the fuse box diagram to locate the fuse associated with the malfunctioning component. Refer to the diagram's legend for correct interpretation.
- Inspect the Fuse: Visually inspect the fuse. A blown fuse will typically have a broken or blackened filament inside. You can also use a multimeter to check for continuity across the fuse terminals. A reading of 0 ohms indicates a good fuse.
- Replace the Fuse: If the fuse is blown, replace it with a fuse of the exact same Ampere rating. Never use a fuse with a higher rating, as this could damage the circuit.
- Test the Component: After replacing the fuse, test the component to see if it now functions correctly.
- Investigate Further if Blown Fuse Recurs: If the new fuse blows immediately or shortly after replacement, there is likely a more serious underlying problem in the circuit, such as a short circuit or faulty component. Further diagnosis and repair by a qualified mechanic may be necessary.
A blown fuse is a symptom, not the disease. Finding and fixing the underlying cause of the blown fuse is critical.
Safety Precautions
Working with automotive electrical systems can be dangerous if proper precautions are not taken. Here are some important safety tips:
- Disconnect the Battery: Before working on the fuse box, disconnect the negative terminal of the battery to prevent accidental short circuits.
- Use Proper Tools: Use a fuse puller to remove and install fuses. Avoid using metal objects like screwdrivers, as they can cause short circuits.
- Never Replace a Fuse with a Higher Rating: This is extremely important! Using a fuse with a higher rating can overload the circuit and cause a fire.
- Be Careful Around Relays: Relays can sometimes be hot to the touch after prolonged use. Allow them to cool down before handling.
- Work in a Well-Lit Area: Adequate lighting is essential for clear visibility and safe working conditions.
High-current components like the starter motor and alternator circuits can be particularly risky. Exercise extreme caution when working around these areas.
Understanding the 2007 Mercury Grand Marquis fuse box diagram empowers you to diagnose and resolve common electrical issues with confidence. Remember to always prioritize safety and consult a qualified mechanic if you're unsure about any aspect of the repair process.
We have a high-resolution PDF file of the 2007 Mercury Grand Marquis Fuse Box Diagram available for download. It provides a clear and detailed view of both the under-hood and interior fuse box layouts, making it an invaluable resource for your DIY projects and troubleshooting needs.