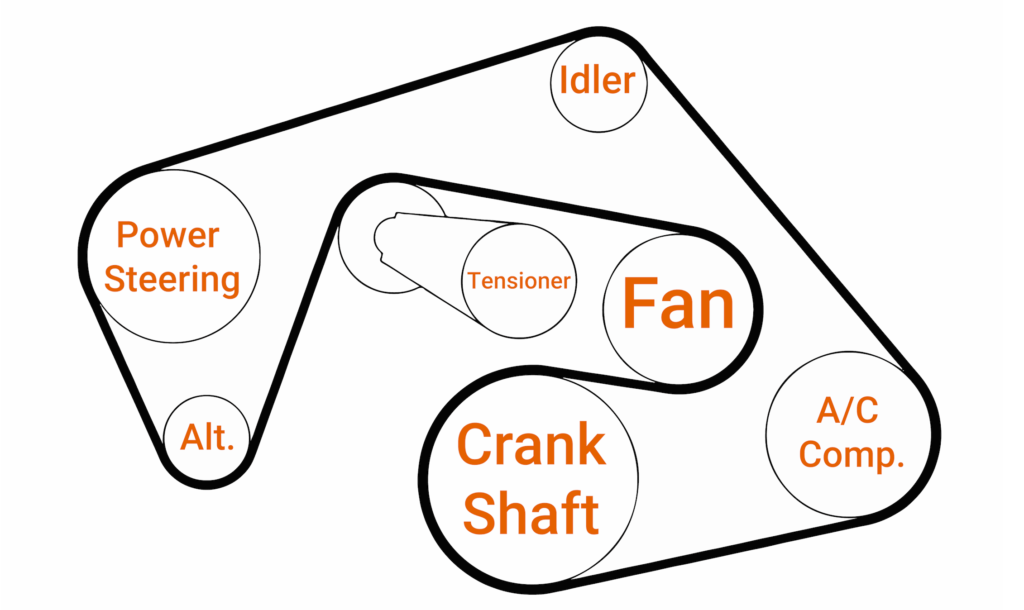
2007 Nissan Frontier Serpentine Belt Diagram
The serpentine belt in your 2007 Nissan Frontier is a critical component, responsible for driving several vital accessories that keep your truck running smoothly. Understanding its layout, function, and proper maintenance is essential for any DIY mechanic or seasoned car enthusiast. This article breaks down the serpentine belt diagram for the 2007 Frontier, providing you with the knowledge to diagnose issues, perform replacements, and keep your truck on the road.
Purpose of the Serpentine Belt Diagram
Why does this diagram matter? Several reasons:
- Belt Replacement: Knowing the exact routing is paramount when replacing a worn or broken serpentine belt. Incorrect routing can lead to improper accessory function and even belt failure.
- Troubleshooting: The diagram helps you identify which accessories are driven by the belt. If, for example, your air conditioning suddenly stops working, the diagram will help you determine if a broken or slipping belt could be the culprit.
- Learning and Understanding: For those who enjoy tinkering with their vehicles, the diagram offers a visual representation of how the engine's rotational force is distributed to the accessories. This knowledge is valuable for general automotive understanding.
- Component Identification: The diagram clearly shows the location of components like the tensioner and idler pulleys, assisting in their inspection or replacement.
Key Specs and Main Parts
Before diving into the diagram, let's cover the key components and specifications you'll need to be aware of.
- Belt Length: While variable based on engine and A/C options, the serpentine belt length for the 2007 Nissan Frontier usually falls within the range of 85 to 90 inches. Always consult your owner's manual or a reputable parts supplier (like NAPA, AutoZone or O’Reilly’s) for the exact specification for your specific vehicle.
- Belt Type: Typically a multi-ribbed belt, designed for high-power transfer and flexibility.
The primary components illustrated on the diagram include:
- Crankshaft Pulley (Harmonic Balancer): This is the main driver. It's connected directly to the engine's crankshaft and provides the rotational force that powers the entire serpentine belt system.
- Alternator Pulley: The alternator generates the electrical power needed to charge the battery and run the vehicle's electrical systems.
- Power Steering Pump Pulley: The power steering pump provides hydraulic assistance to make steering easier.
- Air Conditioning Compressor Pulley: The A/C compressor circulates refrigerant, providing cooling for the cabin. Note: some models may not have A/C.
- Water Pump Pulley: The water pump circulates coolant throughout the engine to prevent overheating. Sometimes, the water pump is driven by a separate belt, but on the Frontier, it's generally part of the serpentine belt system.
- Tensioner Pulley: This spring-loaded pulley maintains the correct tension on the serpentine belt. Proper tension is crucial for preventing slippage and ensuring the accessories operate correctly. A failing tensioner is a common cause of serpentine belt issues.
- Idler Pulley(s): These pulleys provide a smooth path for the belt to follow around the various accessories. They don't drive any specific component.
Understanding the Serpentine Belt Diagram's Symbols
The diagram itself is a visual representation of the belt's path. Here's a breakdown of common symbols you'll encounter:
- Solid Lines: Indicate the path of the serpentine belt. The thickness of the line doesn't usually signify anything beyond visual clarity.
- Arrows: Indicate the direction of belt travel. Always pay attention to the arrows to ensure you route the belt correctly.
- Pulley Symbols: Circles represent the pulleys. Sometimes, the pulleys will be labeled with abbreviations (e.g., "ALT" for alternator, "P/S" for power steering).
- Component Icons: Simple drawings or icons might represent the various accessories (e.g., a radiator fan for the water pump, a lightning bolt for the alternator).
- Routing Indicators: Some diagrams include dashed lines or shaded areas to clarify how the belt wraps around specific pulleys. This is particularly helpful where the belt path is complex or partially obscured.
- Tensioner Indicator: The tensioner pulley may be accompanied by an arrow indicating the direction in which it moves to tension the belt.
Color-coding isn't typically used in serpentine belt diagrams, as the focus is on the physical routing. However, some enhanced diagrams might use color to highlight specific sections or components.
How the Serpentine Belt System Works
The serpentine belt system is relatively straightforward. The crankshaft pulley, driven by the engine, rotates the serpentine belt. This belt, in turn, wraps around and drives the pulleys of the various accessories (alternator, power steering pump, A/C compressor, and water pump). The tensioner pulley keeps the belt taut, preventing slippage and ensuring efficient power transfer.
The key to understanding the system is to visualize the belt as a continuous loop. A break in that loop (a broken belt) or a significant loss of tension will immediately halt the operation of all driven accessories.
Real-World Use: Basic Troubleshooting Tips
Here are some practical troubleshooting tips using the diagram:
- Squealing Noise: A common symptom of a slipping serpentine belt. Check the belt tension. If the tension is correct, inspect the belt for wear, cracks, or glazing. The diagram helps you identify the tensioner and its adjustment mechanism.
- Accessory Failure: If a specific accessory stops working (e.g., no power steering), use the diagram to confirm that the serpentine belt drives it. If the belt is intact and properly routed, the issue likely lies within the accessory itself.
- Belt Wear: Inspect the belt regularly for signs of wear and tear. Cracks, fraying, and missing ribs indicate a need for replacement. Use the diagram to verify the correct belt routing after installing a new belt.
- Misalignment: Observe the belt as it runs. If it appears to be "walking" off a pulley, it could indicate a misaligned pulley. The diagram helps you identify the relative positions of the pulleys, which can aid in diagnosing misalignment issues.
Safety Considerations
Working on the serpentine belt system can be dangerous if proper precautions are not taken. Here are some critical safety points:
- Engine Off: Always ensure the engine is off and the ignition key is removed before working on the serpentine belt. Accidental engine starting could result in severe injury.
- Cool Engine: Allow the engine to cool completely before working on the belt. Exhaust manifolds and other engine components can be extremely hot and cause burns.
- Battery Disconnect: Consider disconnecting the negative battery cable to prevent accidental electrical shorts, especially when working near the alternator.
- Moving Parts: Keep hands and clothing clear of the serpentine belt and pulleys when the engine is running, even for diagnostic purposes. The rotating components can cause serious injury.
- Tensioner Spring: Be extremely careful when releasing the tension on the serpentine belt tensioner. The spring is under considerable pressure and can snap back forcefully if not handled properly. Use the correct tools and follow the manufacturer's instructions.
The alternator and A/C compressor also contain potentially harmful refrigerants and electrical components, respectively. If you suspect a problem with these components, consult a qualified technician.
We have a downloadable version of the 2007 Nissan Frontier serpentine belt diagram available for your convenience. This diagram provides a clear and concise visual aid for performing maintenance and repairs on your vehicle.