2007 Nissan Sentra Fuse Box Diagram
Alright, let's dive into the fuse box diagram for the 2007 Nissan Sentra. Whether you're chasing down a parasitic draw, installing aftermarket accessories, or just trying to understand your car's electrical system better, a good understanding of the fuse box is absolutely crucial. This guide will break down the key aspects of the diagram, how to interpret it, and how to use it safely and effectively.
Purpose of the Fuse Box Diagram
Why bother with a fuse box diagram? The answer is multi-faceted. Primarily, it's your roadmap to the car's electrical protection system. Fuses are designed to be the weakest link, sacrificing themselves to protect more expensive components like the ECU (Engine Control Unit), lights, relays, and wiring harnesses. The diagram serves several critical purposes:
- Troubleshooting Electrical Issues: Quickly identify which fuse corresponds to a malfunctioning circuit, saving you time and frustration.
- Preventing Further Damage: Understanding fuse ratings helps you avoid replacing a blown fuse with one that's too strong, which could overload the circuit and cause significant damage.
- Installing Aftermarket Accessories: Safely tap into existing circuits for things like aftermarket lights, stereos, or alarms. Knowledge of the fuse box enables clean, professional, and most importantly, safe installations.
- General Understanding: Gain a better understanding of how your car's electrical system is laid out and protected.
Key Specs and Main Parts of the 2007 Sentra Fuse Box
The 2007 Nissan Sentra typically has two main fuse boxes:
- Interior Fuse Box: Located inside the vehicle, usually under the dashboard on the driver's side. This fuse box primarily protects circuits for interior components like lights, power windows, radio, and instrument panel.
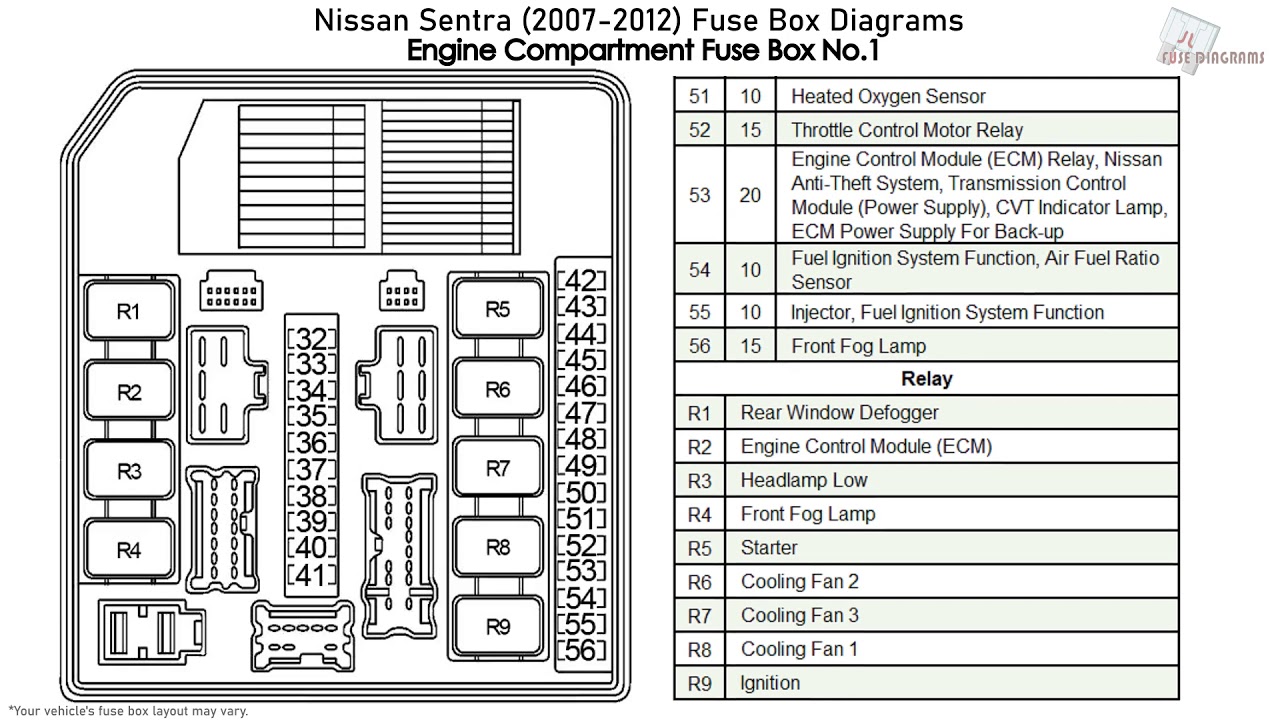
- Engine Compartment Fuse Box: Found under the hood, usually near the battery. This fuse box houses fuses for critical engine components like the fuel pump, ignition system, starter motor, and cooling fans.
Each fuse box contains a variety of fuses and relays. The fuse box diagram is essential for identifying the purpose and amperage rating of each fuse. Key specifications you'll find on the diagram include:
- Fuse Number/ID: A numerical or alphanumeric identifier assigned to each fuse location.
- Circuit Description: A brief description of the component or system that the fuse protects (e.g., "Headlight (Right)," "Fuel Pump," "Power Windows").
- Amperage Rating: The maximum current (measured in Amperes, or Amps) that the fuse can handle before blowing. Common ratings include 5A, 7.5A, 10A, 15A, 20A, 25A, 30A. This is usually indicated by a number printed on the fuse itself.
- Relay Locations (and descriptions): Some diagrams will also indicate the location and function of relays within the fuse box. Relays act as electrical switches, allowing a low-current circuit to control a high-current circuit.
Decoding the Symbols: Lines, Colors, and Icons
Fuse box diagrams aren't always visually intuitive, but understanding the symbols makes them much easier to navigate.
- Lines: Solid lines typically represent the electrical circuits themselves. Thicker lines might indicate circuits carrying higher currents.
- Colors: Color-coding is sometimes used to differentiate between circuits or indicate voltage levels. However, the 2007 Sentra diagram may or may not use extensive color-coding. Consult the specific diagram you are using for clarification.
- Icons: Various icons represent the components being protected. Common icons include:
- Light Bulb: Indicates a lighting circuit (headlights, taillights, interior lights).
- Fan: Represents a cooling fan circuit (radiator fan, A/C condenser fan).
- Motor: Indicates a motor circuit (power windows, power locks, windshield wipers).
- Coil/Transformer: Represents a relay or solenoid.
- Rectangular Box: Can represent various electronic control modules (ECMs).
It's important to note that the exact symbology can vary slightly depending on the specific source of the diagram (e.g., the factory service manual versus a third-party repair manual). Always refer to the legend or key provided with the diagram for accurate interpretation.
How It Works: Electrical Flow and Fuse Protection
To truly understand the fuse box diagram, it's essential to grasp the basic principles of electrical flow and fuse protection. The electrical system in your Sentra operates on a 12-volt DC (Direct Current) system. Power flows from the battery, through various circuits, and back to the battery, completing the circuit.
Each circuit is designed to power a specific component or system. A fuse is placed in series within that circuit. This means that all the current flowing to that component must pass through the fuse. The fuse contains a thin strip of metal designed to melt and break the circuit if the current exceeds the fuse's amperage rating. This "blowing" of the fuse prevents excessive current from damaging the wiring or the component itself.
For example, let's say the circuit for your right headlight is protected by a 10A fuse. If a short circuit occurs in the headlight wiring, causing the current to spike to 15A, the 10A fuse will blow, cutting off the power supply to the headlight and preventing a potential fire or damage to the electrical system.
Real-World Use: Basic Troubleshooting Tips
Here's how to put your newfound knowledge to practical use:
- Identify the Problem: Determine which component or system is malfunctioning.
- Consult the Diagram: Locate the fuse associated with that component on the fuse box diagram.
- Check the Fuse: Visually inspect the fuse. A blown fuse will typically have a broken filament visible through the clear plastic housing. A fuse puller (often found in the fuse box itself) can be helpful.
- Test the Fuse: For a more accurate assessment, use a multimeter in continuity mode. A good fuse will show continuity (close to 0 ohms), while a blown fuse will show no continuity (infinite resistance).
- Replace the Fuse: If the fuse is blown, replace it with a fuse of the same amperage rating. Never use a fuse with a higher amperage rating, as this could damage the circuit.
- Investigate the Cause: If the replacement fuse blows immediately, there's likely a short circuit or other underlying problem in the circuit that needs further investigation. This might involve checking the wiring, connectors, and the component itself.
Safety First: Risky Components and Precautions
Working with automotive electrical systems can be dangerous if proper precautions are not taken. Here are some critical safety considerations:
- Disconnect the Battery: Before working on any electrical components, disconnect the negative terminal of the battery. This prevents accidental shorts and electrical shocks.
- Avoid High-Voltage Components: Be especially cautious around components related to the ignition system (ignition coil, spark plugs). These components can carry high voltages even with the battery disconnected.
- Proper Tools: Use insulated tools designed for automotive electrical work.
- Don't Bypass Fuses: Never bypass a fuse with a wire or other conductive material. This eliminates the circuit protection and can lead to serious damage or fire.
- Understand Wire Colors: If tracing wires, be aware of the standard wire color codes. However, always verify the circuit with a multimeter to be sure.
- Work in a Well-Ventilated Area: When working under the hood, ensure adequate ventilation to avoid inhaling fumes.
Important Note: Some circuits, even with the key off, remain powered. These are typically related to memory functions for the ECU or other electronic modules. Be mindful of this when disconnecting components to avoid data loss.
With a clear understanding of the fuse box diagram and safe working practices, you'll be well-equipped to tackle a wide range of electrical repairs and modifications on your 2007 Nissan Sentra.
We have the full 2007 Nissan Sentra fuse box diagram file ready for you. You can download it here.