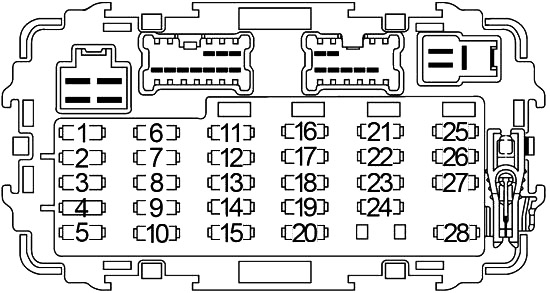
2007 Nissan Xterra Fuse Box Diagram
Understanding the fuse box in your 2007 Nissan Xterra is crucial for maintaining your vehicle, performing repairs, and even undertaking some modifications. This article will walk you through the specifics of the fuse box diagram, its components, and how to use it effectively. Think of this as a detailed walkthrough with a seasoned mechanic.
Purpose: Why the Fuse Box Diagram Matters
The fuse box diagram is your roadmap to the electrical system of your Xterra. It allows you to quickly identify which fuse protects which circuit. This is invaluable for several reasons:
- Troubleshooting Electrical Problems: When a component stops working (e.g., a headlight, the radio, or the air conditioning), the first step is often to check the corresponding fuse. A blown fuse indicates an overload in that circuit.
- Performing Repairs: Knowing which fuse relates to which system is essential for diagnosing and fixing electrical issues. You'll need to disconnect the power to a component safely before working on it.
- Adding Accessories: If you're installing aftermarket accessories like auxiliary lights, a new stereo, or a trailer brake controller, you’ll likely need to tap into the Xterra's electrical system. The fuse box diagram helps you identify suitable circuits to tap into and choose appropriately sized fuses.
- Learning About Your Vehicle: Even if you're not currently experiencing problems, understanding the fuse box layout helps you familiarize yourself with the electrical architecture of your Xterra.
Key Specs and Main Parts
The 2007 Nissan Xterra typically has two main fuse box locations:
- Interior Fuse Box: Located inside the cabin, usually under the dashboard on the driver's side. It protects circuits related to interior components, such as the radio, power windows, lights, and other accessories.
- Engine Compartment Fuse Box: Located in the engine bay, often near the battery. This box protects circuits for critical engine components, headlights, ABS, and other vital systems.
Within each fuse box, you'll find:
- Fuses: These are the sacrificial links in the electrical system. They contain a thin wire that melts and breaks the circuit when excessive current flows through it, protecting more expensive components from damage. Fuses are rated in amperes (amps or A), indicating the maximum current they can handle before blowing.
- Relays: These are electromechanical switches that use a small current to control a larger current. They are commonly used to switch on high-power devices like headlights, the starter motor, and the air conditioning compressor.
- Fuse Puller: Usually a small plastic tool included in the fuse box to help remove fuses without damaging them.
- Spare Fuses: Most fuse boxes contain a few spare fuses of different amperage ratings.
Symbols: Deciphering the Diagram
The fuse box diagram is a schematic representation of the electrical circuits protected by each fuse and relay. Here’s how to interpret it:
- Lines: Lines represent electrical wires connecting components.
- Boxes: Rectangular boxes typically represent fuses or relays.
- Numbers: Each fuse and relay is labeled with a number. This number corresponds to the listing on the diagram.
- Amperage Ratings: Next to each fuse listing, you'll find the amperage rating (e.g., 10A, 15A, 20A). This indicates the fuse's capacity. Never replace a fuse with one of a higher amperage rating, as this can overload the circuit and potentially cause a fire.
- Icons: Some diagrams use icons to represent the component protected by the fuse (e.g., a headlight icon, a radio icon, a windshield wiper icon).
- Colors (Rare): In some diagrams, different colors may be used to distinguish between different types of circuits or voltage levels. However, most diagrams are black and white.
A typical entry on the diagram might look like this: "Fuse #12: 15A - Radio." This means that fuse number 12, rated at 15 amps, protects the radio circuit.
How It Works: Fuses and Circuit Protection
The fundamental principle is simple: electrical current flows through the fuse. If the current exceeds the fuse's amperage rating, the thin wire inside the fuse melts, breaking the circuit. This prevents excessive current from reaching the protected component, preventing damage from overload or short circuit.
Relays act as remote switches. They're used when you need to control a high-current circuit with a low-current signal. For instance, the headlight switch in your cabin sends a low-current signal to a relay in the engine compartment. The relay then closes the circuit, allowing high current to flow to the headlights. This protects the headlight switch from damage caused by high current.
Real-World Use: Basic Troubleshooting Tips
Here’s a step-by-step guide to troubleshooting electrical problems using the fuse box diagram:
- Identify the Problem: Determine which component is malfunctioning (e.g., the cigarette lighter, the power windows, or the headlights).
- Consult the Diagram: Locate the fuse box diagram for your 2007 Xterra. Usually found in the owner’s manual or online.
- Locate the Fuse: Using the diagram, identify the fuse that protects the circuit for the malfunctioning component. Note the fuse number and amperage rating.
- Inspect the Fuse: Carefully remove the fuse using the fuse puller. Hold it up to the light and examine the thin wire inside. If the wire is broken or blackened, the fuse is blown.
- Replace the Fuse: Replace the blown fuse with a new fuse of the same amperage rating. Do not use a fuse with a higher amperage rating.
- Test the Component: Turn on the component to see if it now works.
- If the Fuse Blows Again: If the new fuse immediately blows, there's a short circuit in the circuit. This requires further investigation by a qualified mechanic. Do not keep replacing fuses; you could cause further damage.
Safety: Highlighting Risky Components
Working with electrical systems can be dangerous. Always follow these safety precautions:
- Disconnect the Battery: Before working on any electrical components, disconnect the negative (-) terminal of the battery. This will prevent accidental short circuits.
- Use the Correct Fuse: Always replace a blown fuse with a fuse of the same amperage rating. Using a higher amperage fuse can overload the circuit and cause a fire.
- Avoid Working on Wet Surfaces: Never work on electrical components in wet or damp conditions.
- Seek Professional Help: If you're uncomfortable working with electrical systems, or if you suspect a more serious problem, seek professional help from a qualified mechanic. Certain circuits, like those controlling the airbags or ABS, are best left to professionals. Mishandling those systems can lead to serious injuries.
- Be Aware of High-Current Circuits: Circuits related to the starter motor, alternator, and ABS system carry high currents. Exercise extreme caution when working with these circuits.
Working on a car's electrical system is always a risky job, especially if you are near risky components, such as the ECU or anti-lock braking system. For the ECU, a mistake in any step will lead to disastrous consequences. For the anti-lock braking system, the fuse is wired to the hydraulic pump and controls the stopping of the vehicles. For those circuits, consult with a professional.
We have a detailed 2007 Nissan Xterra fuse box diagram file available for download. This diagram provides a comprehensive overview of all fuses and relays, including their locations, amperage ratings, and protected circuits. With this resource, you'll be well-equipped to tackle any electrical troubleshooting or repair project on your Xterra.