
2007 Pontiac G6 Serpentine Belt Diagram
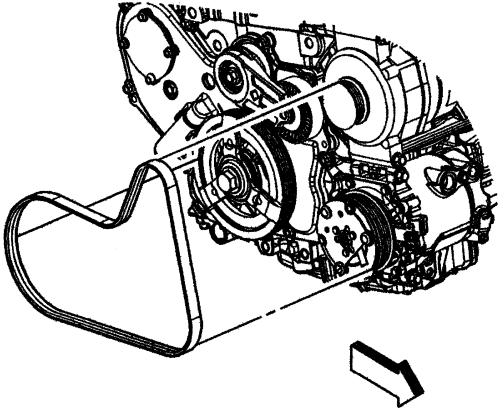
Alright, let's dive into the serpentine belt diagram for a 2007 Pontiac G6. Whether you're tackling a replacement, diagnosing a squealing noise, or just expanding your automotive knowledge, understanding this diagram is crucial. This isn’t just about slapping a belt on; it's about understanding the system that powers critical components of your car.
Purpose of the Serpentine Belt Diagram
The serpentine belt diagram is your roadmap for belt routing. Its primary purpose is to show you the correct path the serpentine belt takes around various engine components. Why is this important? A misrouted belt can lead to:
- Component failure: If the belt isn't properly driving a component, like the alternator, it won't function correctly.
- Belt slippage: Improper tension or routing can cause the belt to slip, leading to reduced performance and overheating.
- Premature wear: Incorrect alignment can cause the belt to wear out much faster than it should.
- Complete engine failure: In extreme cases, a snapped or misrouted belt can cause catastrophic engine damage if it interferes with other moving parts.
Beyond repairs, the diagram also serves as a valuable learning tool, allowing you to visualize how different engine accessories are interconnected and powered.
Key Specs and Main Parts (2007 Pontiac G6)
Let's get specific. For the 2007 Pontiac G6, there are a few engine variations, and the serpentine belt routing can differ slightly. The most common engines are:
- 2.4L Ecotec I4: This engine has a specific belt routing different from the V6 models.
- 3.5L V6: The 3.5L V6 has its own specific routing.
- 3.9L V6: The 3.9L V6 routing is similar to the 3.5L but always verify.
Always confirm your exact engine size before attempting any work. Check the VIN plate on your dashboard or the engine sticker under the hood.
The main components involved in the serpentine belt system are:
- Crankshaft Pulley (Harmonic Balancer): The driving force behind the entire system. This pulley, connected directly to the crankshaft, transmits rotational energy to the belt.
- Alternator Pulley: Powers the electrical system. The alternator converts mechanical energy from the engine into electrical energy to charge the battery and power the car's electrical components.
- Power Steering Pump Pulley: Provides hydraulic pressure for power steering. This pump, driven by the belt, assists in steering, making it easier to turn the wheel.
- Air Conditioning Compressor Pulley: Compresses refrigerant for the A/C system. The compressor circulates refrigerant, cooling the air blown into the cabin.
- Idler Pulley(s): Smooth, unpowered pulleys that guide the belt and maintain proper wrap around other pulleys. They provide proper belt alignment and prevent excessive belt flex.
- Tensioner Pulley: Spring-loaded pulley that maintains proper belt tension. This pulley automatically adjusts to compensate for belt wear and stretching, ensuring optimal performance. A failed tensioner is a common cause of squealing belts.
Symbols and Diagram Conventions
Understanding the symbols used in the diagram is key to interpreting it correctly. Here's a breakdown:
- Solid Lines: Represent the path of the outer surface of the serpentine belt.
- Dotted Lines: May represent the path of the inner surface of the serpentine belt, especially when illustrating how the belt engages with the pulleys (grooved side). Often used to indicate the belt path behind other components in a simplified diagram.
- Arrows: Indicate the direction of belt travel and pulley rotation. These are crucial for understanding how the belt is oriented.
- Component Icons: Simplified drawings of each component (alternator, power steering pump, etc.) are labeled with abbreviations (ALT, P/S, A/C, etc.).
- Routing Notes: Text notes providing specific instructions or warnings (e.g., "Ensure belt is properly seated in all grooves," "Route belt under tensioner arm").
Diagrams may vary slightly in style, but the fundamental symbols remain consistent.
How It Works: The Serpentine Belt System in Action
The serpentine belt system is elegantly simple in concept. The crankshaft pulley, driven by the engine, rotates the serpentine belt. This belt, in turn, drives all the accessory pulleys. The tensioner pulley maintains the correct amount of tension on the belt, preventing slippage and ensuring efficient power transfer.
Think of it like a chain reaction. The crankshaft starts the process, and the belt transmits that motion to each component in the system. Each accessory then performs its specific function: the alternator charges the battery, the power steering pump provides steering assistance, and the A/C compressor cools the cabin.
The tensioner is a particularly important part. It's spring-loaded, allowing it to automatically adjust for belt wear and stretching. A worn or failing tensioner will cause the belt to slip, leading to reduced accessory performance and often a characteristic squealing noise.
Real-World Use: Troubleshooting and Repair Tips
Here are some practical tips for using the serpentine belt diagram in real-world scenarios:
- Squealing Noise: A common symptom of a slipping belt. Check belt tension, condition, and alignment. A glazed or cracked belt needs replacement. Also, inspect the tensioner pulley for smooth operation and proper spring tension.
- Battery Not Charging: Could indicate a faulty alternator, but first verify that the serpentine belt is properly driving the alternator pulley. A loose or broken belt will prevent the alternator from charging the battery.
- Power Steering Issues: Difficulty steering can be caused by a slipping belt on the power steering pump. Inspect the belt and pump pulley for wear or damage.
- A/C Not Working: A slipping belt on the A/C compressor can prevent it from working correctly. Check the belt and compressor pulley.
- Belt Replacement: Always refer to the diagram when replacing the belt to ensure correct routing. Take a picture of the old belt's path before removing it as a backup.
When replacing the belt, consider replacing the tensioner and idler pulleys as well. These components wear out over time, and replacing them simultaneously can save you time and hassle in the long run.
Safety Precautions
Working on the serpentine belt system involves certain risks. Here are some crucial safety precautions:
- Disconnect the Negative Battery Terminal: This prevents accidental electrical shock.
- Work with a Cool Engine: Avoid burns by allowing the engine to cool completely before working on the system.
- Keep Fingers Clear of Moving Parts: The serpentine belt system contains many moving parts that can cause serious injury. Always keep your fingers and hands clear of the belt and pulleys when the engine is running.
- Be Mindful of the Radiator Fan: The radiator fan can turn on automatically, even with the engine off. Disconnect the fan's electrical connector for extra safety.
- Use the Correct Tools: Using the wrong tools can damage components and increase the risk of injury. Use a serpentine belt tool to relieve tension on the tensioner pulley when removing and installing the belt.
The crankshaft pulley is of particular concern. Do NOT attempt to stop the crankshaft pulley with your hands or any other object while the engine is running. This can result in serious injury.
By understanding the diagram and following these safety guidelines, you can confidently tackle serpentine belt-related tasks on your 2007 Pontiac G6.
We have a downloadable PDF file of the serpentine belt diagram available. Contact us, and we can send it to you directly.