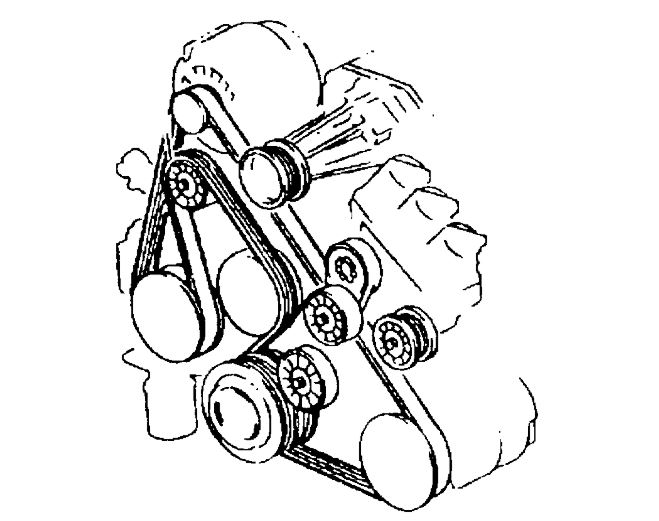
2007 Pontiac Grand Prix Serpentine Belt Diagram
Alright, let's talk about the serpentine belt on your 2007 Pontiac Grand Prix. This unassuming rubber belt is a critical component, and understanding its routing – the serpentine belt diagram – is essential for everything from basic maintenance to more complex repairs. This guide will break down the diagram, its components, and how to use it effectively.
Purpose of the Serpentine Belt Diagram
The serpentine belt diagram for your Grand Prix isn't just a pretty picture. It's a roadmap for ensuring proper engine function. Without it, replacing a worn or broken belt becomes a guessing game. The diagram serves several crucial purposes:
- Belt Replacement: The most obvious use is for correctly routing a new serpentine belt. A misrouted belt can lead to component failure, reduced performance, or even engine damage.
- Troubleshooting: The diagram allows you to quickly identify which components are driven by the belt. This is invaluable for diagnosing problems like squealing noises or failing accessories.
- Preventative Maintenance: Knowing the belt's routing allows you to inspect it thoroughly for wear, cracks, or fraying. Early detection can prevent a breakdown.
- Component Identification: For the DIYer embarking on more complex projects, the diagram clarifies the location and function of various engine accessories.
Key Specs and Main Parts
The 2007 Grand Prix (depending on the engine) typically uses a single serpentine belt to drive multiple engine accessories. There can be slight variations based on whether you have the 3.8L V6 or the supercharged 3.8L V6 (if equipped).
Core Components Driven by the Serpentine Belt:
- Crankshaft Pulley: This is the main driver. Connected directly to the engine's crankshaft, it's the source of power for the entire system.
- Alternator: The alternator generates electrical power to keep the battery charged and run the vehicle's electrical system.
- Power Steering Pump: Provides hydraulic assistance for steering, making it easier to turn the wheel.
- Air Conditioning Compressor: Compresses refrigerant to provide cool air to the cabin.
- Water Pump: Circulates coolant through the engine to prevent overheating.
- Idler Pulley(s): Smooth, non-powered pulleys that guide the belt and maintain proper tension.
- Tensioner Pulley: A spring-loaded pulley that automatically adjusts to maintain consistent belt tension. This is critical for belt life and accessory performance.
Belt Length: The correct belt length is crucial. Using the wrong length belt can lead to improper tension, premature wear, and accessory failure. Consult your vehicle's owner's manual or a parts catalog for the correct belt specification for your engine. Belt lengths are usually specified in inches (e.g., 93.5 inches). A parts store can help you find the correct part by VIN.
Understanding the Serpentine Belt Diagram: Symbols and Markings
Serpentine belt diagrams might seem complex at first, but the symbols and markings are quite straightforward once you understand them. Here's a breakdown:
- Solid Lines: Indicate the path of the belt on the front of the pulley. The solid line touches the outside perimeter of each circle (pulley).
- Dashed Lines: Usually indicate the path of the belt on the back of the pulley. Where the belt is riding on the back, smooth side of the pulley.
- Arrows: Indicate the direction of belt rotation. Pay close attention to these to ensure proper routing.
- Pulley Icons: Each pulley is represented by a circle. The diagram may label each pulley (e.g., ALT for alternator, P/S for power steering, etc.). Sometimes these are abbreviated or may use an icon.
- Tensioner Indicator: The tensioner pulley is often indicated with a spring symbol or a note about its spring-loaded function.
Colors are typically not used to represent different functions, but they might be used to highlight the belt path itself. The most important thing is to understand the solid/dashed line convention and the arrow direction.
How It Works: The Mechanics of the System
The serpentine belt system is elegantly simple in its operation. The engine's crankshaft pulley, powered by combustion, drives the serpentine belt. The belt, in turn, wraps around the various accessory pulleys, transferring rotational force to each component. The tensioner pulley maintains the correct amount of tension on the belt to prevent slippage and ensure efficient power transfer.
A properly functioning tensioner is essential. Too little tension, and the belt will slip, causing noise, reduced accessory performance (dim headlights, poor AC), and premature wear. Too much tension, and you risk damaging the accessory bearings and shortening belt life.
Real-World Use: Troubleshooting and Maintenance Tips
Here are some practical tips for using the serpentine belt diagram in real-world situations:
- Squealing Noise: A squealing noise, especially on a cold start or when accelerating, is often a sign of a slipping serpentine belt. Use the diagram to check belt tension and condition. A worn or glazed belt, or a failing tensioner, are common culprits.
- Accessory Failure: If you notice a specific accessory isn't working properly (e.g., weak AC, hard steering), use the diagram to verify the belt is properly routed and has adequate tension. If the belt is fine, the accessory itself may be faulty.
- Belt Inspection: Regularly inspect the serpentine belt for signs of wear. Look for cracks, fraying, missing chunks, or glazing (a shiny, smooth surface). Any of these indicate the belt needs to be replaced. Also inspect the pulleys for signs of damage.
- Tensioner Check: Visually inspect the tensioner pulley. It should move smoothly and freely. If it's stiff, noisy, or visibly damaged, replace it. The tensioner arm should also be within its operating range - there are usually marks on the tensioner body to indicate if it is over extended or under extended.
Basic Troubleshooting Example: You hear a squealing noise and the alternator isn't charging the battery properly. Consult the diagram. See that the belt goes around the alternator. Check the belt tension. If the tension is good, carefully inspect the belt where it contacts the alternator pulley. Look for glazing or wear. If the belt seems OK, the alternator itself may be the problem.
Safety Considerations
Working around a running engine involves inherent risks. Always disconnect the negative battery cable before working on the serpentine belt system.
Rotating Parts: The serpentine belt system contains numerous rotating parts that can cause serious injury. Never put your hands, tools, or clothing near a running serpentine belt. Even with the engine off, be careful of the spring-loaded tensioner; it can snap back forcefully.
Hot Components: The engine components, including the pulleys, can get very hot. Allow the engine to cool completely before working on the serpentine belt system.
Proper Tools: Use the correct tools for the job. A serpentine belt tool can make it easier to release the tension on the tensioner pulley for belt removal and installation. Using improper tools can damage the components and increase the risk of injury.
Belt Tension: Use a belt tension gauge to verify proper belt tension after installing a new belt. Over-tensioning can damage components, while under-tensioning can lead to slippage.
Understanding the serpentine belt diagram is the first step in effectively diagnosing and repairing issues with your 2007 Pontiac Grand Prix's accessory drive system. It empowers you to perform routine maintenance, troubleshoot problems, and potentially save money on costly repairs.
We have the high-resolution serpentine belt diagram specific to your 2007 Pontiac Grand Prix (with various engine options) available for download. This resource will provide you with a clear and detailed visual aid for your repairs and maintenance. Please reach out to our support team to request the file. Good luck, and happy wrenching!