2007 Saturn Aura 3.6 Serpentine Belt Diagram
The serpentine belt in your 2007 Saturn Aura with the 3.6L engine is a critical component responsible for powering several essential accessories. Understanding its routing, tension, and overall health is crucial for maintaining your vehicle's reliability. This article serves as a comprehensive guide to the serpentine belt diagram, empowering you with the knowledge to diagnose problems, perform replacements, and ensure optimal accessory function. Knowing how to read and interpret this diagram can save you time, money, and potential roadside headaches.
Purpose of the Serpentine Belt Diagram
The serpentine belt diagram is essentially a roadmap for the belt's proper installation. Its primary purposes include:
- Replacement Guidance: The diagram illustrates the precise path the serpentine belt must follow around all pulleys. Without it, correctly routing a new belt after removing the old one can be challenging, leading to incorrect installation and potential damage.
- Troubleshooting Aid: By comparing the diagram to the actual belt routing on your vehicle, you can quickly identify if the belt has been incorrectly installed previously, or if a pulley has shifted or been replaced with an incorrect type.
- Preventative Maintenance: Understanding the belt's path and the components it drives allows for informed inspection. You can identify signs of wear, misalignment, or pulley issues before they lead to a complete belt failure.
- Educational Resource: The diagram helps you understand the relationship between the engine and its accessories, improving your overall automotive knowledge.
Key Specs and Main Parts
For the 2007 Saturn Aura 3.6L, the serpentine belt typically has the following characteristics (though always verify with your vehicle's specific information):
- Belt Length: Approximately 90-93 inches (This can vary slightly based on specific vehicle options. Always consult the manufacturer's specs or a parts database for the correct length.)
- Belt Type: Multi-ribbed (typically 6-rib or 7-rib, depending on the manufacturer)
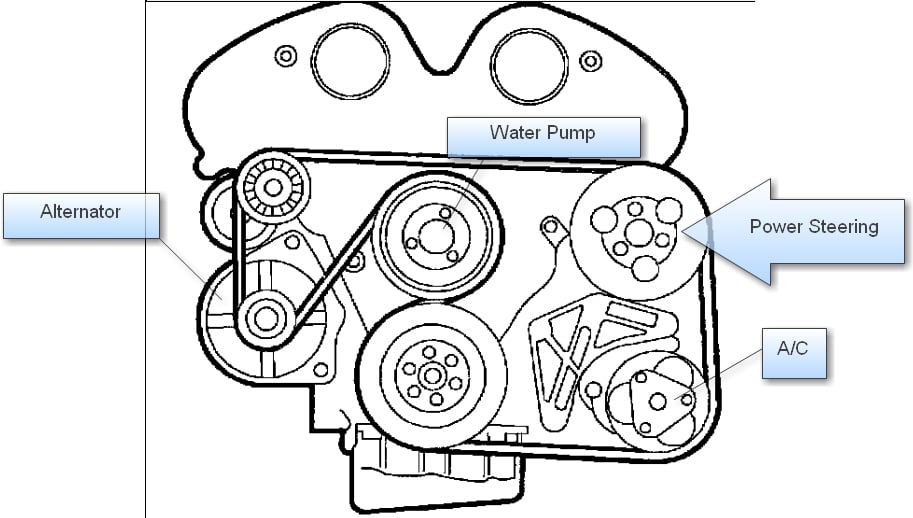
The main components illustrated in the diagram and driven by the serpentine belt include:
- Crankshaft Pulley (Harmonic Balancer): The driving pulley attached to the crankshaft, transferring engine power to the belt.
- Alternator Pulley: Powers the vehicle's electrical system and charges the battery.
- Power Steering Pump Pulley: Provides hydraulic assistance for steering.
- Air Conditioning Compressor Pulley: Compresses refrigerant for the air conditioning system.
- Idler Pulley(s): Smooth pulleys that guide the belt and provide optimal wrap around other pulleys.
- Tensioner Pulley: Spring-loaded pulley that maintains proper belt tension. This is crucial for proper operation.
Symbols in the Serpentine Belt Diagram
Understanding the symbols in the diagram is essential for its correct interpretation. While variations exist, common symbols include:
- Solid Lines: Typically represent the path of the outside (ribbed) surface of the belt.
- Dashed Lines: Indicate the path of the inside (smooth) surface of the belt against a pulley.
- Arrows: Show the direction of belt rotation. This is vital for ensuring the belt is routed correctly.
- Pulley Symbols: Each pulley is usually represented by a circle. Some diagrams may include labels indicating the pulley's function (e.g., ALT for alternator, P/S for power steering).
- Tensioner Indicator: The tensioner pulley may have an arrow or a marker indicating the acceptable tension range.
Color coding is not always present, but if used, it might differentiate between different belt paths or pulley types. Always refer to the diagram's legend for clarification.
How It Works
The serpentine belt system is a relatively straightforward power transmission system. The crankshaft pulley, driven directly by the engine, acts as the power source. The rotation of the crankshaft pulley is transferred to the serpentine belt. This rotating belt then drives all the other pulleys connected to it. The order and configuration of the pulleys are carefully engineered to distribute power efficiently to all accessories. The tensioner pulley plays a vital role in maintaining the correct belt tension. Too little tension results in belt slippage and reduced accessory performance (e.g., weak power steering, poor air conditioning, inadequate battery charging). Too much tension can overload the bearings in the accessory components, leading to premature failure.
Real-World Use – Basic Troubleshooting Tips
Here are some practical troubleshooting tips using the serpentine belt diagram:
- Squealing Noise: A common symptom of a worn, glazed, or loose belt. Check the belt for cracks, fraying, or glazing. Also, inspect the tensioner pulley for proper movement and tension. Refer to the diagram to ensure the belt is correctly routed and the tensioner is within its specified range.
- Accessory Malfunction: If you experience issues with the alternator, power steering, or air conditioning, verify the belt is properly routed and has adequate tension. Use the diagram to confirm the belt is driving the malfunctioning accessory's pulley.
- Belt Slippage: Indicated by a burning rubber smell or visible signs of rubber debris near the pulleys. Check for misaligned pulleys or a seized accessory. The diagram helps you identify the correct pulley alignment.
- Visual Inspection: Regularly inspect the belt for wear and tear. Compare the belt's condition to the recommended replacement interval. Note any unusual wear patterns, which may indicate pulley misalignment or other issues.
Safety Precautions
Working on the serpentine belt system involves inherent risks. Always observe the following safety precautions:
- Disconnect the Battery: Before working on any part of the engine, disconnect the negative battery cable to prevent accidental electrical shocks.
- Engine Coolant: Be aware of potential hot engine coolant. Ensure the engine is cool before removing any components that could disturb the cooling system.
- Moving Parts: Never place your hands near the serpentine belt or pulleys while the engine is running. The rotating components can cause severe injuries.
- Proper Tools: Use the correct tools for the job. A serpentine belt tool is essential for releasing tension on the tensioner pulley.
- Eye Protection: Always wear safety glasses to protect your eyes from debris.
The tensioner pulley stores significant spring energy. Improperly releasing the tension can cause the tool to slip and potentially cause injury. Be sure you have a secure grip on the tool and follow the manufacturer's instructions carefully.
In conclusion, the serpentine belt diagram is an invaluable resource for maintaining the 2007 Saturn Aura 3.6L engine. By understanding the diagram and following the troubleshooting tips outlined above, you can confidently diagnose and resolve serpentine belt-related issues, ensuring the reliable operation of your vehicle's essential accessories.
We have the serpentine belt diagram for the 2007 Saturn Aura 3.6L engine readily available for download. This detailed diagram will provide you with the visual aid necessary for proper belt installation and troubleshooting.