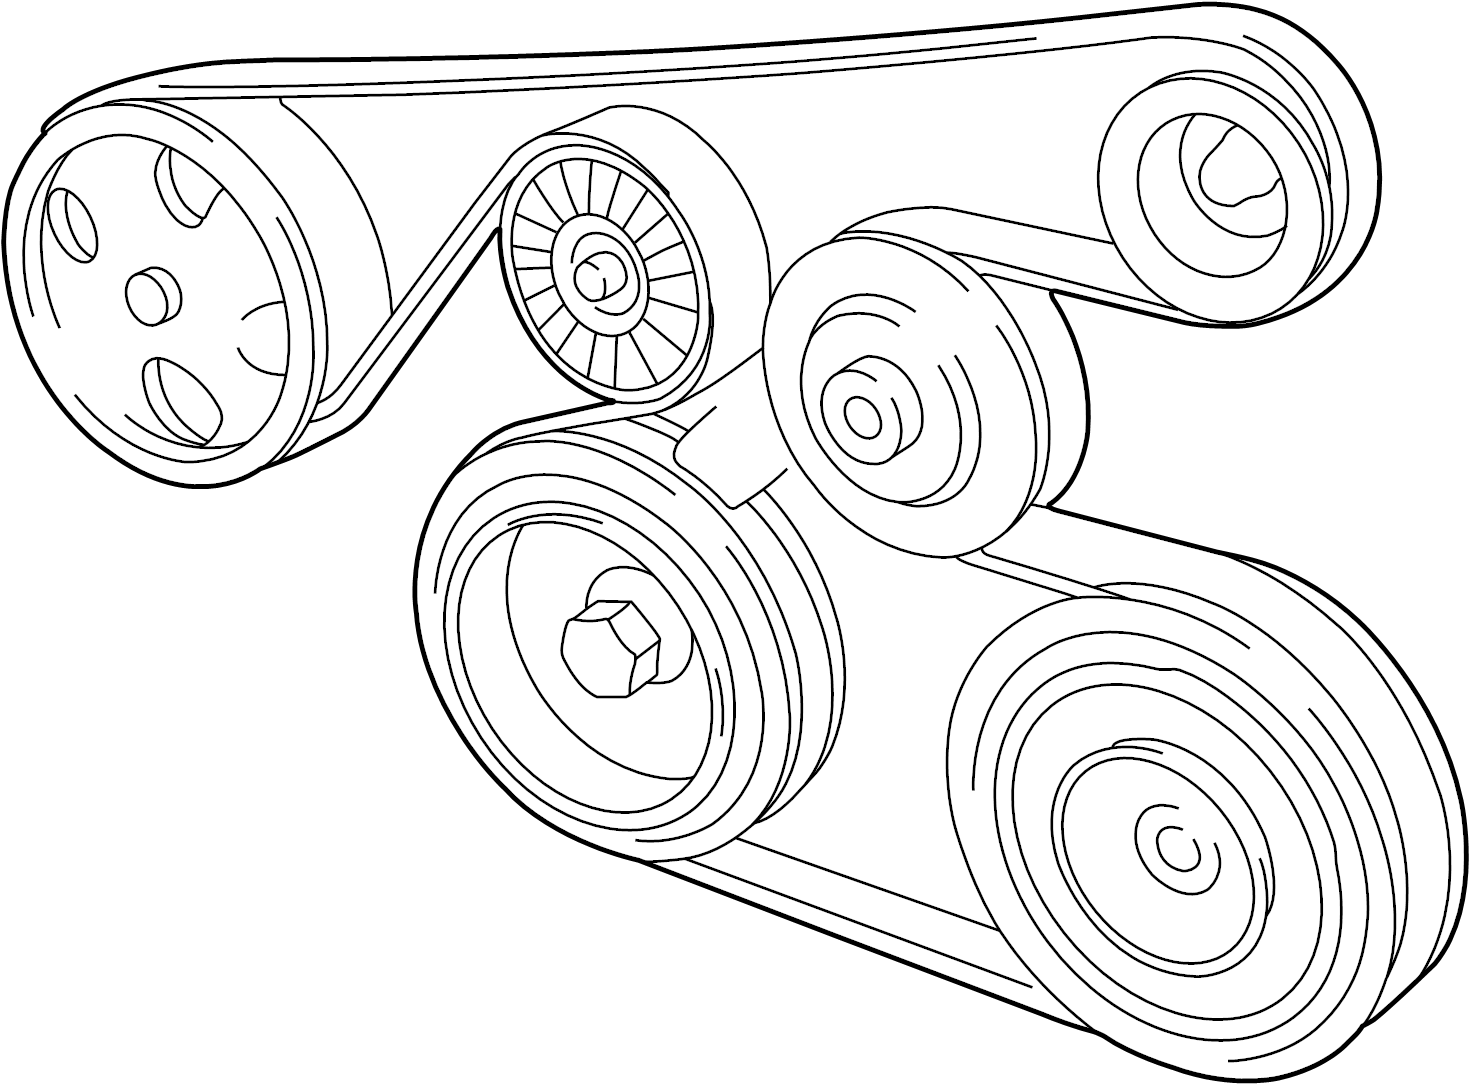
2007 Toyota Corolla Serpentine Belt Diagram
Alright, let's dive into the serpentine belt diagram for a 2007 Toyota Corolla. Whether you're tackling a squealing belt, replacing a worn-out component, or just aiming to deepen your understanding of your Corolla's engine, having a clear understanding of the serpentine belt routing is crucial. This article will break down everything you need to know about that diagram – from its purpose to practical troubleshooting tips.
Purpose of the Serpentine Belt Diagram
The serpentine belt diagram isn't just a pretty picture; it's an essential tool for several reasons:
- Replacement and Maintenance: The most common use is for replacing the serpentine belt itself. Knowing the correct routing ensures the new belt is installed properly, avoiding damage and ensuring all accessories function correctly.
- Troubleshooting: A diagram helps diagnose problems. For example, if an accessory (like the power steering pump) suddenly stops working, the diagram allows you to quickly check if the belt is properly routed and tensioned.
- Learning and Understanding: Studying the diagram can improve your overall understanding of how your engine's accessories are driven, which is invaluable for DIY maintenance and repairs.
- Accurate Reassembly: After removing components for other repairs (e.g., water pump replacement), the diagram serves as a reliable reference to guarantee correct reassembly.
In short, the serpentine belt diagram saves you time, money, and potential headaches by ensuring you're working on your Corolla's belt system safely and effectively.
Key Specs and Main Parts in the Serpentine Belt System
Before we dissect the diagram itself, let's identify the core components involved:
- Serpentine Belt: The star of the show – a long, continuous belt made of durable rubber that transmits power from the crankshaft to various engine accessories.
- Crankshaft Pulley (or Damper): Connected directly to the crankshaft, this pulley is the driving force behind the entire serpentine belt system.
- Alternator Pulley: The alternator generates electrical power for your car. The belt drives the alternator pulley.
- Power Steering Pump Pulley: Operates the hydraulic power steering system.
- Air Conditioning Compressor Pulley: Compresses refrigerant for the air conditioning system.
- Water Pump Pulley: Circulates coolant through the engine to prevent overheating.
- Tensioner Pulley: A spring-loaded pulley that maintains the proper tension on the serpentine belt. This is critical for preventing slippage and ensuring optimal accessory performance. There are generally two types: automatic (spring-loaded) and manual (adjustable). The 2007 Corolla uses an automatic tensioner.
- Idler Pulley: A smooth, unpowered pulley that guides the belt and helps maintain the correct wrap angle around other pulleys.
The 2007 Toyota Corolla typically uses a single serpentine belt configuration for all engine variants (1.8L 1ZZ-FE). The specific belt length can vary slightly between manufacturers, but generally falls in the range of 81-82 inches. Always verify the correct part number for your specific Corolla's engine. Common aftermarket part numbers include Gates K060815, Dayco 5060815, and Bando 6PK2070.
Symbols in the Serpentine Belt Diagram
Understanding the diagram's symbology is crucial for accurate interpretation:
- Solid Lines: Represent the path of the outside of the serpentine belt.
- Dotted Lines: Usually indicate the path of the inside (grooved side) of the belt, showing where it contacts the pulleys.
- Arrows: Show the direction of belt rotation. Following these arrows is key to understanding the belt's travel and ensuring correct routing.
- Pulleys: Represented as circles. Some diagrams might include small icons within the circles to indicate which accessory the pulley belongs to (e.g., a lightning bolt for the alternator).
- Tensioner: Often depicted with a spring or an arrow indicating the direction of tension. It might also be labeled explicitly as "Tensioner" or "Auto Tensioner".
Pay close attention to the distinction between solid and dotted lines. This is the most common source of errors when reinstalling a serpentine belt. Imagine the diagram as a topographical map for your belt; the lines tell you which way to go.
How It Works: The Flow of Power
The serpentine belt system works by transferring rotational energy from the crankshaft to the various accessories. The crankshaft, driven by the engine's combustion, spins the crankshaft pulley. This pulley, in turn, drives the serpentine belt. The belt wraps around each accessory pulley (alternator, power steering pump, etc.), causing them to rotate. The tensioner pulley maintains the correct belt tension, preventing slippage. Think of it like a chain reaction, where one spinning component sets off the others. The automatic tensioner is crucial because it automatically adjusts to compensate for belt stretch and engine vibrations, ensuring consistent performance. Without the tensioner, the belt would quickly become loose and start to slip, leading to reduced accessory performance and potential damage.
Real-World Use and Basic Troubleshooting
Let's explore some practical applications and common issues:
- Squealing Belt: A squealing belt is often caused by slippage due to insufficient tension. Check the tensioner pulley and the belt's condition. A worn or glazed belt can also cause squealing.
- Accessory Failure: If an accessory stops working, first check the serpentine belt. Is it still intact and properly routed? A broken or misrouted belt will obviously prevent the accessory from functioning.
- Belt Wear: Inspect the belt for cracks, fraying, or missing chunks. Replace the belt if you find any significant damage. Also, check the pulleys for damage that could be causing the belt to wear prematurely.
- Replacing the Belt: Use the diagram to ensure you route the new belt correctly. It's often helpful to take a picture of the old belt before removing it as a reference. Use a wrench or socket to relieve tension on the tensioner pulley, allowing you to slip the belt off. Install the new belt, ensuring it is seated properly in all the pulley grooves.
When troubleshooting, always remember that the diagram is your guide. Double-check the routing, tension, and condition of the belt and pulleys. Small problems, if left unaddressed, can quickly escalate into larger, more costly repairs.
Safety Considerations
Working on the serpentine belt system involves some inherent risks:
- Moving Parts: The engine must be off and cool before working on the serpentine belt system. Never work on the system while the engine is running.
- High Temperatures: Even after the engine is off, components like the exhaust manifold and catalytic converter can remain extremely hot for a considerable time. Allow the engine to cool completely before starting work.
- Spring Tension: The tensioner pulley is spring-loaded and can snap back with considerable force if not handled carefully. Always use the correct tools and techniques to relieve tension gradually and safely.
- Sharp Edges: Be mindful of sharp edges on pulleys and other engine components. Wear gloves to protect your hands.
Prioritize safety at all times. Disconnect the negative battery terminal before starting any work to prevent accidental starts or electrical shorts. If you're not comfortable with any aspect of the repair, consult a qualified mechanic.
We have a detailed serpentine belt diagram for the 2007 Toyota Corolla available for download. This high-resolution diagram will provide you with a clear visual reference for your repair or maintenance project.