2007 Toyota Rav4 V6 Serpentine Belt Diagram
For the seasoned DIY mechanic or aspiring car enthusiast tackling projects on a 2007 Toyota Rav4 V6, understanding the serpentine belt routing is absolutely critical. This comprehensive guide will walk you through the 2007 Rav4 V6 serpentine belt diagram, covering its purpose, components, how it functions, troubleshooting tips, and crucial safety considerations. Think of this as your trusted shop manual excerpt focused specifically on the serpentine belt system.
Purpose of the Serpentine Belt Diagram
The serpentine belt diagram is more than just a picture; it's a roadmap for replacing and maintaining a vital engine component. Specifically, the serpentine belt diagram serves several crucial purposes:
- Repair and Replacement: The primary reason for consulting the diagram is to ensure correct routing when replacing a worn or broken serpentine belt. Incorrect routing can lead to component failure or even engine damage.
- Inspection and Troubleshooting: The diagram helps you quickly identify the components driven by the belt (alternator, power steering pump, A/C compressor, etc.) for troubleshooting related issues. If your A/C suddenly stops working, the diagram will tell you if the belt powers it.
- Learning and Understanding: For car enthusiasts, the diagram is an invaluable tool for understanding how the various engine accessories are driven and how the entire system works together.
- Preventative Maintenance: Familiarity with the routing allows for easier inspection of the belt and pulleys for wear and tear, enabling proactive maintenance.
Key Specs and Main Parts of the Serpentine Belt System
Before diving into the diagram itself, let's outline the key specifications and components involved in the 2007 Rav4 V6 serpentine belt system:
Key Specs
- Engine: 3.5L 2GR-FE V6 Engine
- Belt Type: Multi-ribbed (usually 6 ribs)
- Belt Length: Varies slightly depending on manufacturer, but typically around 90-92 inches. Always check the part number on your old belt or consult your local auto parts store for the correct replacement.
- Tensioner Type: Spring-loaded automatic tensioner
Main Components
- Serpentine Belt: The heart of the system, transferring rotational power from the crankshaft to the various accessories.
- Crankshaft Pulley (Harmonic Balancer): Driven directly by the engine, this pulley is the source of the serpentine belt's power.
- Alternator Pulley: Powers the alternator, which charges the battery and provides electrical power to the vehicle.
- Power Steering Pump Pulley: Drives the power steering pump, enabling power-assisted steering.
- A/C Compressor Pulley: Engages when the A/C is turned on, driving the compressor to cool the cabin.
- Water Pump Pulley: Circulates coolant through the engine to prevent overheating.
- Idler Pulley(s): Smooth, bearing-mounted pulleys that guide the belt and maintain its proper routing. These pulleys do not drive any accessories.
- Belt Tensioner Pulley: A spring-loaded pulley that maintains constant tension on the serpentine belt. This is a critical component for proper operation.
Understanding the Diagram: Symbols and Conventions
Serpentine belt diagrams are generally straightforward, but understanding the conventions makes them much easier to read:
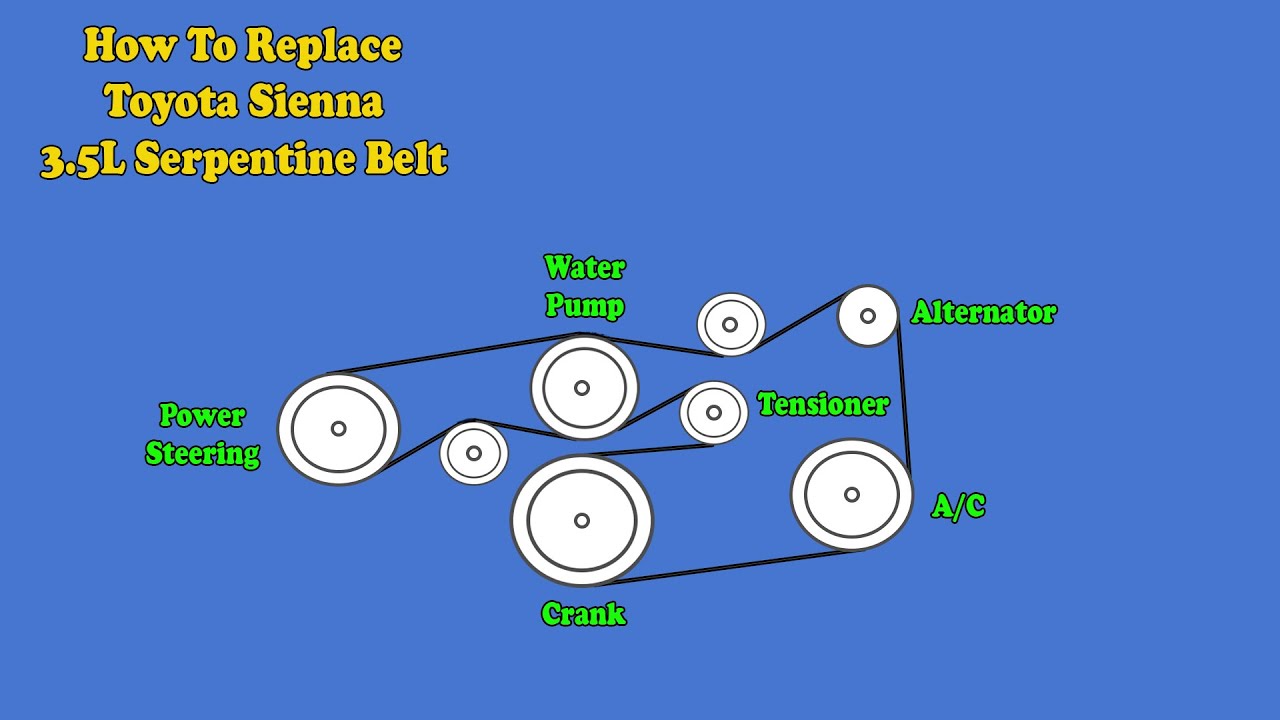
- Solid Lines: Typically represent the serpentine belt itself. The path of the line shows the routing of the belt around the various pulleys.
- Circles: Represent the pulleys. Sometimes these circles will have labels indicating what component they belong to (e.g., "ALT" for alternator, "P/S" for power steering).
- Arrows: Indicate the direction of belt travel. It’s important to understand that the belt travels in a continuous loop.
- Text Labels: Clearly identify each pulley and component. These labels are usually abbreviations or acronyms.
- Tensioner Marking: The tensioner will usually have a unique symbol, often a spring icon or a specific shape, to distinguish it from the other pulleys.
- Ribbed vs. Smooth Pulleys: The diagram may also differentiate between ribbed pulleys (which drive accessories) and smooth idler pulleys. Ribbed pulleys often have lines representing the ribs.
How the Serpentine Belt System Works
The serpentine belt system is designed for efficiency and simplicity. The crankshaft, driven by the engine, turns the crankshaft pulley. The serpentine belt wraps around this pulley and transfers the rotational energy to all the other pulleys in the system. The belt's tension, maintained by the automatic tensioner, is critical for preventing slippage and ensuring that all accessories are driven at the correct speed.
The belt wraps around the pulleys in a specific path, dictated by the serpentine belt diagram. This path ensures that each accessory receives the necessary power. The tensioner is crucial because it automatically adjusts to compensate for belt stretch and wear, maintaining optimal performance over time. Without a properly functioning tensioner, the belt can slip, leading to reduced performance or even complete failure of the accessories.
Real-World Use and Basic Troubleshooting
Here are some common scenarios where a serpentine belt diagram is invaluable and some basic troubleshooting tips:
- Squealing Noise: A squealing noise, especially when starting the engine or turning the steering wheel, is often a sign of a slipping serpentine belt. Check the belt for cracks, wear, or glazing. Also, inspect the tensioner for proper operation. A weak tensioner spring can cause the belt to slip.
- Accessory Malfunction: If one of your accessories (e.g., alternator, A/C compressor) stops working, the serpentine belt could be the culprit. Check the belt for damage and ensure it's properly routed. Use the diagram to confirm the belt powers the malfunctioning accessory.
- Belt Replacement: When replacing the serpentine belt, always consult the diagram to ensure correct routing. Incorrect routing is a common mistake that can lead to serious problems. Before removing the old belt, take a picture or make a sketch of its routing to help you remember.
- Tensioner Inspection: Inspect the tensioner pulley for smooth operation and listen for unusual noises. A worn tensioner can cause belt slippage and premature belt wear.
Troubleshooting Tips:
- Visual Inspection: Always start with a visual inspection of the belt and pulleys. Look for cracks, wear, fraying, glazing, or missing ribs on the belt. Check the pulleys for damage or excessive wear.
- Tension Check: Verify the tensioner is maintaining proper tension on the belt. You should be able to move the belt slightly between pulleys, but it shouldn't be excessively loose.
- Pulley Alignment: Ensure all pulleys are properly aligned. Misalignment can cause premature belt wear and noise. A straightedge can be used to check pulley alignment.
- Listen Carefully: Pay attention to any unusual noises coming from the engine compartment. Squealing, chirping, or grinding noises can indicate problems with the serpentine belt system.
Safety Considerations
Working on the serpentine belt system involves working near moving engine components. Safety is paramount:
- Disconnect the Battery: Before starting any work on the serpentine belt system, disconnect the negative battery terminal to prevent accidental starting of the engine.
- Hot Engine: Never work on the serpentine belt system when the engine is hot. Allow the engine to cool down completely before beginning any repairs.
- Moving Parts: Keep your hands, clothing, and tools away from moving parts. The serpentine belt and pulleys can cause serious injury if they come into contact with anything.
- Eye Protection: Wear safety glasses to protect your eyes from debris.
- Proper Tools: Use the correct tools for the job. Using the wrong tools can damage components and increase the risk of injury.
- Tensioner Spring: The belt tensioner spring is under significant pressure. Use caution when releasing the tension on the belt. A long-handled wrench provides better leverage and control.
Warning: The crankshaft pulley is directly connected to the engine's rotating assembly. Accidental engagement of the starter motor while working near this area can result in serious injury. Always disconnect the battery.
With this guide, you are well-equipped to understand and troubleshoot the serpentine belt system on your 2007 Toyota Rav4 V6. Remember to always prioritize safety and consult the diagram for accurate routing. Happy wrenching!
Disclaimer: This information is for general guidance only. Always consult a qualified mechanic for specific repairs.