2007 Toyota Tundra 4.7 Serpentine Belt Diagram
Alright, let's dive into the serpentine belt system for your 2007 Toyota Tundra with the 4.7L engine. This article will serve as your comprehensive guide to understanding the serpentine belt diagram, its function, and how to troubleshoot common issues. Whether you're planning a preventative maintenance job, need to replace a worn belt, or are just curious about how it all works, having a solid understanding of this system is crucial.
Purpose of the Serpentine Belt Diagram
Why does this diagram matter? Simply put, the serpentine belt diagram is your roadmap for routing the belt correctly. It’s absolutely essential when replacing the belt to ensure it drives all the accessories in the correct order and with the proper tension. Without the diagram, you risk incorrect installation, leading to:
- Accessory Malfunction: Power steering failure, alternator not charging, AC compressor not working.
- Belt Damage: Premature wear, cracking, and even complete failure due to incorrect tension or rubbing against components.
- Engine Overheating: If the water pump isn't being driven, your engine will overheat rapidly.
Beyond just replacement, the diagram helps you diagnose problems. If an accessory isn't working, you can use the diagram to trace the belt path and see if the belt is slipping on the associated pulley. It also helps identify the locations of the tensioner and idler pulleys, which are often sources of noise or vibration.
Key Specs and Main Parts
The serpentine belt system in the 2007 Tundra 4.7L is a single-belt system, meaning one long belt drives multiple accessories. Here are the key components:
- Serpentine Belt: A multi-ribbed belt made of rubber or a synthetic material that transfers rotational force from the crankshaft to the accessories. The specific belt size for your 2007 Tundra 4.7L is critical – consult your owner's manual or a parts catalog for the exact length and number of ribs.
- Crankshaft Pulley (Damper): The driven pulley, connected to the crankshaft of the engine. This is the *input* that drives the entire system. It's also a harmonic balancer, designed to absorb engine vibrations.
- Alternator Pulley: Drives the alternator, which charges the battery and provides power to the electrical system.
- Power Steering Pump Pulley: Drives the power steering pump, providing hydraulic assistance for steering.
- Air Conditioning (AC) Compressor Pulley: Drives the AC compressor, which circulates refrigerant to cool the cabin.
- Water Pump Pulley: Drives the water pump, which circulates coolant through the engine to prevent overheating.
- Tensioner Pulley: An spring-loaded pulley that maintains the correct tension on the serpentine belt. Proper tension is crucial for optimal accessory performance and belt life.
- Idler Pulley(s): Smooth pulleys that guide the belt and change its direction, preventing it from contacting engine components and optimizing the wrap angle on other pulleys.
Symbols in the Diagram
Understanding the symbols on the diagram is essential for accurate interpretation. These diagrams are usually simple but precise:
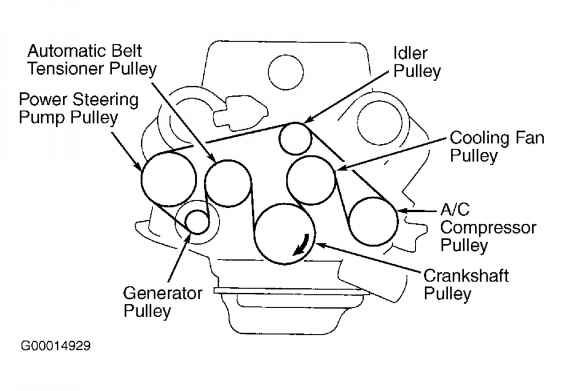
- Solid Lines: Indicate the path of the serpentine belt. Pay close attention to the direction of the line, showing which way the belt wraps around each pulley.
- Arrows: Show the direction of rotation of each pulley. This helps you visualize how the belt is driving the accessories.
- Component Labels: Abbreviations or short descriptions identify each pulley (e.g., ALT for alternator, P/S for power steering, AC for air conditioning, WP for water pump, CRANK for crankshaft).
- Tensioner Symbol: Usually a pulley with an arrow indicating the direction to move the tensioner to release the belt tension. This is critical when installing or removing the belt.
- Routing Marks: Some diagrams might include small marks or notations to indicate specific routing features, such as the belt passing through a guide or bracket.
How It Works
The serpentine belt system is elegantly simple. The crankshaft pulley, powered by the engine, turns the serpentine belt. This belt, in turn, wraps around and drives the pulleys of the accessories (alternator, power steering pump, AC compressor, and water pump). The tensioner pulley automatically adjusts to maintain the correct belt tension, compensating for belt stretch and changes in temperature. The idler pulleys strategically guide the belt, optimizing its path and preventing contact with other components. Think of it as a precisely choreographed dance of mechanical energy transfer.
Real-World Use and Basic Troubleshooting
Let's say your 2007 Tundra's AC suddenly stops working. Here's how you can use the serpentine belt diagram for troubleshooting:
- Visual Inspection: First, pop the hood and visually inspect the serpentine belt. Look for cracks, fraying, missing ribs, or signs of wear. A damaged belt can slip, preventing the AC compressor from working.
- Belt Routing Check: Use the diagram to verify that the belt is correctly routed around the AC compressor pulley. If the belt is misrouted or has slipped off the pulley, the compressor won't turn.
- Tension Check: Check the tension of the belt. If it's too loose, it can slip on the AC compressor pulley. The tensioner pulley should be operating smoothly and maintaining adequate tension. A failing tensioner is a common cause of belt slippage.
- Pulley Inspection: Spin the AC compressor pulley by hand (engine off!). It should rotate smoothly without any binding or excessive noise. A seized or damaged pulley can prevent the belt from turning it, even if the belt itself is in good condition.
If the belt is in good condition, correctly routed, and properly tensioned, but the AC still isn't working, the problem likely lies within the AC compressor itself or the refrigerant system. However, the serpentine belt check is a critical first step.
Safety Precautions
Working on the serpentine belt system involves some inherent risks:
- Engine Heat: Never work on the serpentine belt system immediately after the engine has been running. Allow sufficient time for the engine to cool down to avoid burns.
- Moving Parts: Keep your hands, clothing, and tools clear of the serpentine belt and pulleys while the engine is running. Even at idle, these components can cause serious injury.
- Tensioner Spring: The tensioner pulley is spring-loaded and can snap back forcefully if not handled correctly. Use the correct tools to relieve the tension safely.
- Battery Disconnect: While not always strictly necessary, disconnecting the negative battery cable before starting work can minimize the risk of electrical shock, especially if you're working near the alternator.
The crankshaft pulley is directly connected to the engine's crankshaft, so any tools or body parts that get caught in the belt could be pulled into the engine with considerable force. Be extremely cautious and double-check your work before starting the engine.
Accessing the Diagram
We've got a detailed diagram of the 2007 Toyota Tundra 4.7L serpentine belt routing. To get a downloadable version, please send a message to [email protected] with subject '2007 Tundra 4.7 Serpentine Diagram'.