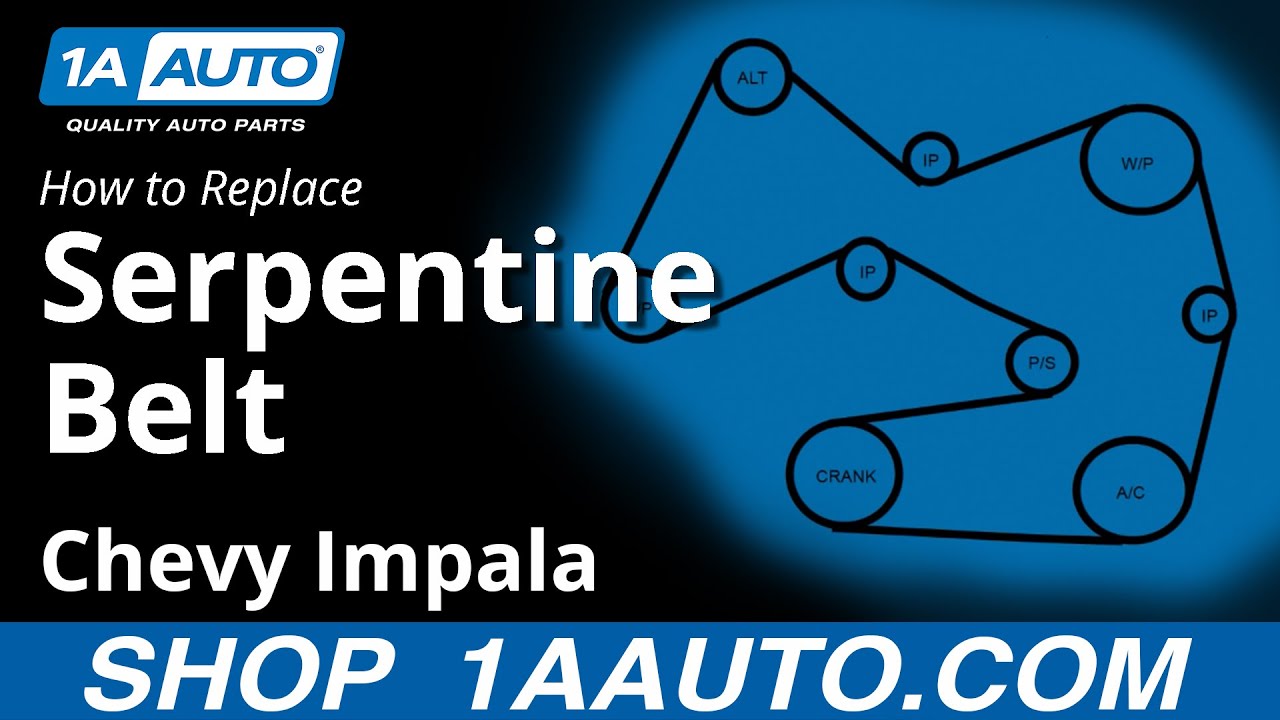
2008 Chevy Impala 3.5 Serpentine Belt Diagram
For the intermediate DIYer tackling maintenance or repairs on a 2008 Chevy Impala with a 3.5L engine, understanding the serpentine belt system is crucial. This article provides a detailed breakdown of the serpentine belt diagram for this specific model, offering insights into its components, operation, troubleshooting, and, most importantly, safety considerations. Having this knowledge not only simplifies repairs but also allows you to diagnose potential issues before they escalate into costly problems.
Purpose of the Serpentine Belt Diagram
The serpentine belt diagram is essentially a roadmap for the accessory drive system. It visually depicts the routing of the serpentine belt around various engine components. This diagram is invaluable for several reasons:
- Correct Belt Installation: Ensuring the belt is routed correctly after replacement is paramount. An incorrectly routed belt can lead to component failure and engine damage. The diagram eliminates guesswork.
- Troubleshooting: When diagnosing accessory problems (e.g., power steering failure, AC malfunction), the diagram helps identify the component and the belt's role in its operation.
- Component Identification: The diagram labels each component driven by the belt, allowing you to quickly identify parts like the alternator, power steering pump, and AC compressor.
- Learning and Education: Understanding the serpentine belt system's layout provides valuable insight into the overall engine operation.
Key Specs and Main Parts
Before diving into the diagram, let's identify the primary components involved in the serpentine belt system of a 2008 Chevy Impala 3.5L:
- Serpentine Belt: A single, continuous belt that drives multiple engine accessories.
- Crankshaft Pulley (Harmonic Balancer): Located at the bottom of the engine, driven directly by the engine's crankshaft. It's the primary driver for the serpentine belt. The term Harmonic Balancer is used because it dampens torsional vibrations from the crankshaft.
- Alternator: Generates electrical power for the vehicle.
- Power Steering Pump: Provides hydraulic pressure to assist with steering.
- Air Conditioning (AC) Compressor: Compresses refrigerant for the air conditioning system.
- Water Pump: Circulates coolant through the engine to regulate temperature.
- Tensioner Pulley: A spring-loaded pulley that maintains proper tension on the serpentine belt. Crucial for preventing slippage and ensuring proper accessory operation.
- Idler Pulley(s): Smooth pulleys that guide the belt around components and optimize its wrap angle.
The belt itself will have a specific part number, usually printed directly on the belt. This number is crucial when sourcing a replacement. Common brands include Gates, Dayco, and Goodyear. Referring to the owner's manual or an auto parts store's computer system is the best way to find the correct part number.
Symbols and Conventions in the Diagram
Serpentine belt diagrams utilize standard conventions to represent components and belt routing. Understanding these symbols is essential for interpreting the diagram correctly:
- Solid Lines: Indicate the primary path of the serpentine belt.
- Arrows: Show the direction of belt travel. Pay close attention to these arrows to ensure proper routing.
- Component Icons: Simplified drawings represent each component (e.g., alternator, power steering pump). These are typically labeled with abbreviations (ALT, P/S, A/C).
- Pulley Grooves: The diagram will illustrate whether the belt makes contact with the pulley's grooved side (for driving components) or its smooth side (for idler pulleys and the tensioner).
Some diagrams may use color-coding to further differentiate components or belt sections, though this is less common. The key is to carefully observe the relationship between the lines, arrows, and component icons to understand the belt's path.
How It Works: The Accessory Drive System
The serpentine belt system is a brilliantly simple, yet vital part of the engine. The crankshaft pulley, driven by the engine's rotation, serves as the power source for the entire system. The serpentine belt wraps around this pulley and then snakes its way around all the other accessories. As the crankshaft rotates, it turns the belt, which in turn spins the pulleys of the alternator, power steering pump, AC compressor, and water pump. The tensioner pulley plays a crucial role in maintaining optimal belt tension. Too loose, and the belt will slip, leading to poor performance and potential damage to the driven components. Too tight, and it can overload the bearings in these components, shortening their lifespan.
The idler pulleys are strategically placed to guide the belt and increase its "wrap angle" around certain pulleys. A larger wrap angle allows for greater contact area, which increases the belt's grip and prevents slippage. This is especially important for components like the alternator and AC compressor, which require significant power to operate.
Real-World Use: Basic Troubleshooting Tips
Here are some common issues related to the serpentine belt and how the diagram can help you diagnose them:
- Squealing Noise: Often indicates a loose or worn belt. Check the tensioner pulley for proper operation. If the belt is glazed or cracked, it needs replacement. Use the diagram to ensure correct routing of the new belt.
- Accessory Malfunction (e.g., power steering failure): If a specific accessory isn't working, check if the belt is properly engaging its pulley. The diagram will help you isolate the affected component and trace the belt's path to identify potential issues.
- Belt Slippage: Can be caused by a loose belt, a worn pulley, or contamination (e.g., oil). Inspect the pulleys for wear and tear, and clean any oil or debris from the belt path.
Always visually inspect the belt for cracks, fraying, or missing chunks. A damaged belt is a ticking time bomb and should be replaced immediately.
Safety Considerations
Working on the serpentine belt system involves several safety risks. Never work on the engine while it is running. The rotating components can cause serious injury. Always disconnect the negative battery cable before starting any work on the electrical system or the accessory drive system.
The tensioner pulley stores considerable spring energy. When releasing the tension on the belt, use the correct tools and proceed with caution to avoid injury. Be especially careful when working near the crankshaft pulley, as it's directly connected to the engine and can rotate unexpectedly.
When installing a new belt, double-check the routing against the diagram before starting the engine. An incorrectly routed belt can damage components and potentially cause the belt to snap, sending debris flying.
Getting the Diagram
While this article provides a comprehensive overview, having the actual diagram for your 2008 Chevy Impala 3.5L is essential for accurate repairs. We have a high-resolution diagram available for download to assist you with your repair. We can provide the file, as well as offer additional support and guidance for your specific project. Contact us for more information.
With a solid understanding of the serpentine belt system and access to the proper diagram, you'll be well-equipped to tackle maintenance and repairs on your 2008 Chevy Impala 3.5L with confidence.