2008 Chevy Silverado Fuse Box Wiring Diagram
Alright, let's dive into the 2008 Chevy Silverado fuse box wiring diagram. Whether you're dealing with a faulty trailer light, trying to install a new aftermarket stereo, or just plain curious about your truck's electrical system, understanding this diagram is crucial. It's your roadmap to troubleshooting electrical issues and confidently making modifications without frying anything. Consider this article your expert guide to deciphering the intricacies of your Silverado's fuse box.
Purpose and Importance
Why even bother with a fuse box diagram? Simple: electrical problems are among the most common headaches in vehicles. The fuse box is the central point of protection for your Silverado's electrical circuits. It contains fuses and relays that safeguard various components from overcurrent situations. When a component fails, it's often due to a blown fuse. Knowing which fuse controls which circuit allows you to quickly diagnose and resolve the problem. Furthermore, if you are planning any modifications, such as installing an auxiliary lighting system or upgrading your sound system, understanding the fuse box layout is essential to tap into the correct circuits safely and efficiently. Without it, you're flying blind and risking serious damage.
Key Specs and Main Parts
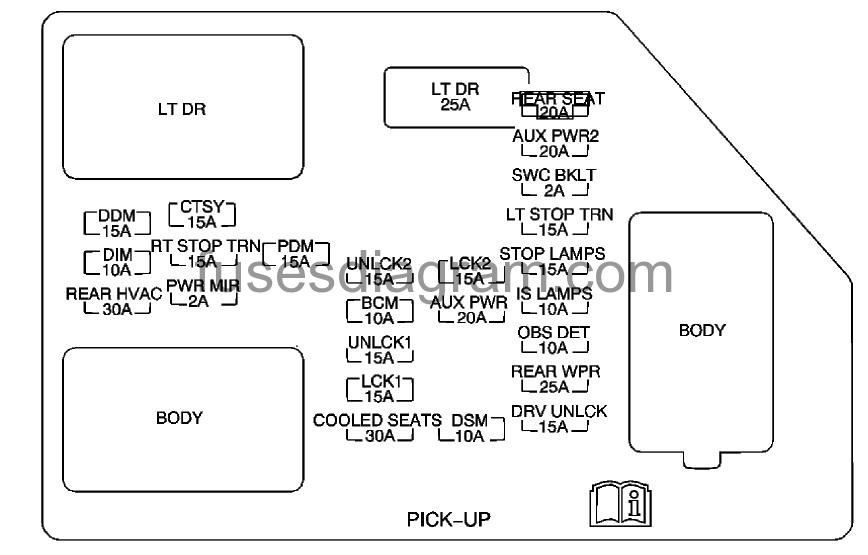
The 2008 Chevy Silverado typically has multiple fuse boxes. The primary one is usually located under the hood, often near the battery. A secondary fuse box is often found inside the cabin, commonly on the driver's side, either under the dashboard or behind a panel. The diagram itself represents the physical layout of these fuse boxes, showing the positions of each fuse and relay. Here are some key components:
- Fuses: These are sacrificial devices designed to break a circuit when the current exceeds a certain limit, preventing damage to the protected component. They are rated in Amperes (Amps or A).
- Relays: These are electromechanical switches that use a small current to control a larger current. They allow low-current circuits to switch on/off high-current circuits like headlights or the starter motor.
- Circuit Breakers: In some cases, circuit breakers are used instead of fuses. They perform the same function but can be reset after tripping, unlike a fuse that needs replacement. While less common in fuse boxes, they might be present for specific high-draw components.
- Bus Bars: These are conductive strips that distribute power to multiple fuses or relays.
- Connectors: The fuse box connects to the rest of the vehicle's electrical system through various connectors.
Understanding the Symbols
Decoding the wiring diagram requires understanding the symbols used. Here's a breakdown:
- Lines: Lines represent wires. A solid line indicates a direct connection, while a dashed line might represent a shielded cable or a connection through a connector. Line thickness doesn't usually represent wire gauge, so always refer to the wire gauge specification on the diagram or the wire itself.
- Colors: Wires are often color-coded. The diagram will have a legend specifying which color corresponds to which wire. Knowing the color-code can be invaluable in tracing wires through the vehicle. Common colors include red (power), black (ground), and various other colors for signals and control circuits. The legend will identify abbreviations such as 'LT BLU' (light blue), 'DK GRN' (dark green), and so on.
- Fuse Symbols: The symbol for a fuse is generally a squiggly line inside a rectangle. The amperage rating is usually indicated next to the symbol.
- Relay Symbols: A relay is typically represented by a coil (representing the electromagnet) and a switch (representing the contacts that open and close).
- Component Symbols: Other components, like lights, motors, and sensors, also have specific symbols. Consult the diagram's legend for a complete list.
- Ground Symbol: The ground connection is typically represented by three lines decreasing in length, resembling an upside-down tree.
Additionally, pay attention to any notes or abbreviations on the diagram. These often provide crucial information about specific circuits or components.
How It Works: A Systems Perspective
The fuse box is a critical part of a complex system. Power from the battery flows through the main power distribution system to the fuse boxes. From there, it's distributed to individual circuits, each protected by a fuse or circuit breaker. When a device like a tail light is switched on, current flows from the battery, through a fuse, through the switch, to the tail light, and finally to ground. If the tail light develops a short circuit, the current draw increases dramatically. This excessive current causes the fuse to blow, interrupting the circuit and preventing damage to the wiring and other components.
Relays work a bit differently. A small current is applied to the relay coil, which creates an electromagnetic field. This field pulls a set of contacts together, completing a separate, higher-current circuit. For example, the starter relay uses a small current from the ignition switch to activate the starter motor, which requires a much larger current.
Real-World Use and Basic Troubleshooting
Let's say your Silverado's power windows stopped working. Here's how the fuse box diagram helps:
- Locate the Fuse Box Diagram: Consult your owner's manual or find a reliable online source (like the one we can provide).
- Identify the Power Window Fuse: The diagram will show which fuse controls the power windows. Look for a fuse labeled "PWR WDW" or something similar.
- Inspect the Fuse: Visually check the fuse. A blown fuse will have a broken filament inside.
- Replace the Fuse: If the fuse is blown, replace it with a fuse of the same amperage rating. Never use a higher-rated fuse, as this could damage the circuit.
- Test: After replacing the fuse, test the power windows to see if they are working.
- Further Diagnosis: If the fuse blows again immediately, there is likely a short circuit in the power window system. This requires further investigation, such as checking the wiring and the window motors themselves.
Another common issue is with trailer lights. If your trailer lights are not working, start by checking the trailer light fuse in the under-hood fuse box. A blown fuse is often the culprit.
Safety Considerations
Working with electrical systems can be dangerous. Here are some important safety precautions:
- Disconnect the Battery: Before working on any electrical system, disconnect the negative (-) battery cable. This prevents accidental short circuits.
- Use Proper Tools: Use insulated tools designed for electrical work.
- Never Replace a Fuse with a Higher Amperage Rating: This can overload the circuit and cause a fire.
- Avoid Working in Wet Conditions: Water conducts electricity, increasing the risk of electric shock.
- Be Careful Around the Airbag System: The airbag system is highly sensitive. Consult the service manual before working near airbag components to avoid accidental deployment. Airbag circuits are usually indicated clearly on the diagram.
High-current circuits, such as those for the starter motor, alternator, and battery, are especially risky. Always exercise extreme caution when working with these circuits.
By following these guidelines and using the fuse box wiring diagram effectively, you can confidently diagnose and resolve many electrical issues on your 2008 Chevy Silverado.
Remember, working on electrical systems can be complex. If you're unsure about any step, it's always best to consult a qualified mechanic.
We have the complete fuse box wiring diagram for the 2008 Chevy Silverado available for download. This detailed diagram will provide you with all the information you need to navigate your truck's electrical system with confidence.