2008 Chevy Silverado Rear Drum Brake Diagram
Hey there, fellow gearheads! Today, we're diving deep into the rear drum brake system of the 2008 Chevy Silverado. This isn't just about spinning wrenches; it's about understanding a crucial part of your truck, whether you're tackling a repair, upgrading components, or simply expanding your automotive knowledge. Having a clear understanding of the rear drum brake system, and especially the diagram, is paramount. We have the rear drum brake diagram for 2008 Chevy Silverado, and can provide the file.
Why Understanding the Rear Drum Brake Diagram Matters
Let's face it, rear drum brakes aren't the sexiest part of your Silverado. But they're reliable workhorses, and when they need attention, knowing your way around a diagram can save you time, money, and a whole lot of frustration. The diagram serves multiple purposes:
- Troubleshooting: Pinpointing the source of brake issues (squealing, grinding, poor stopping power) becomes much easier with a visual aid.
- Repair and Replacement: Knowing the exact location and orientation of each spring, lever, and shoe is critical for correct reassembly.
- Upgrades and Modifications: Planning brake upgrades, such as slotted drums or higher-performance shoes, requires a solid understanding of the existing system.
- General Understanding: Expanding your knowledge of automotive systems can empower you to perform more maintenance tasks yourself.
Key Specs and Main Parts of the 2008 Silverado Rear Drum Brake System
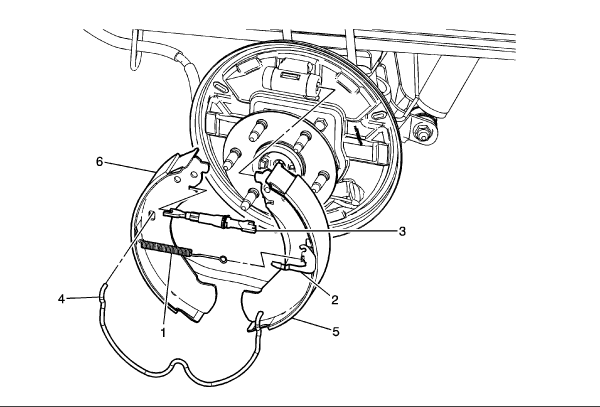
The 2008 Chevy Silverado's rear drum brake system is a fairly standard design, though specific dimensions may vary depending on the truck's configuration (e.g., 1500, 2500, or 3500 series). Here's a rundown of the main components:
- Brake Drum: The large, cylindrical component that rotates with the wheel. The friction material of the brake shoes presses against the inner surface of the drum to slow or stop the vehicle.
- Brake Shoes: Two curved metal pieces lined with friction material (brake pads, in disc brake terminology). These shoes are forced outward against the drum to create braking force.
- Wheel Cylinder: A hydraulic cylinder located at the top of the brake assembly. When you press the brake pedal, hydraulic pressure forces pistons within the wheel cylinder outward, pushing the brake shoes against the drum.
- Return Springs: These springs pull the brake shoes back away from the drum when the brake pedal is released, allowing the wheels to rotate freely. There are typically two return springs: an upper and a lower.
- Hold-Down Springs: Small springs and pins that secure the brake shoes to the backing plate, preventing them from rattling or falling off.
- Adjuster Assembly: A star wheel and threaded link that allows you to adjust the brake shoe clearance. As the brake shoes wear down, you need to adjust them closer to the drum to maintain proper braking performance. This assembly can be manual or automatic (self-adjusting).
- Parking Brake Lever and Strut: A lever connected to the parking brake cable. When the parking brake is engaged, the lever pushes a strut (or link) against one of the brake shoes, forcing it against the drum.
- Backing Plate: A stationary plate that provides a mounting surface for all the other brake components.
- Brake Hardware: This includes all the pins, clips, springs, and retainers needed to hold everything together.
Understanding the Diagram Symbols
Deciphering the diagram is crucial. Here's a breakdown of common symbols you'll encounter:
- Solid Lines: Generally represent physical components or fluid lines. The thickness of the line might indicate the size or importance of the component.
- Dashed Lines: Often indicate hidden lines or components that are behind other parts. They can also represent the path of motion of a component.
- Arrows: Indicate the direction of movement or force. For example, arrows might show the direction the wheel cylinder pistons move or the direction the adjuster star wheel needs to be rotated.
- Circles and Ovals: Can represent holes, fasteners (like bolts and nuts), or the location of springs.
- Rectangles and Squares: Often represent mounting points or specific components like the wheel cylinder.
- Springs: Represented by a coiled line. The number of coils and the thickness of the line may vary depending on the type of spring.
- Colors (in some diagrams): While not universally standardized, colors can sometimes be used to differentiate components. For instance, different colored springs might indicate different spring rates.
It is also important to note the orientation of the components in the diagram. Most diagrams will have a view that shows the complete assembly. In addition, there can also be exploded views that will show individual parts and their relationship to other parts. In the exploded view, you can see exactly how they fit together.
How It Works: A Simplified Explanation
When you press the brake pedal, the master cylinder sends hydraulic fluid through the brake lines to the wheel cylinders in the rear drum brakes. The pressure forces the pistons in the wheel cylinders outward, pushing the brake shoes against the inside of the rotating brake drums. The friction between the shoes and the drums slows the drums (and thus the wheels) down, bringing the vehicle to a stop.
When you release the brake pedal, the hydraulic pressure is released, and the return springs pull the brake shoes back away from the drums. This allows the wheels to rotate freely again.
The adjuster assembly maintains the correct clearance between the brake shoes and the drums. As the brake shoes wear down, the adjuster mechanism automatically (or manually, depending on the system) extends to keep the shoes close to the drums. This ensures that the brakes engage quickly and effectively.
Real-World Use: Basic Troubleshooting
Here are some common issues you might encounter and how the diagram can help:
- Squealing Brakes: Often caused by worn brake shoes or contamination (dirt, rust) inside the drum. The diagram helps you identify the location of the shoes and other components that need inspection and cleaning or replacement.
- Grinding Brakes: Usually indicates that the brake shoes are severely worn down and the metal backing plate is rubbing against the drum. The diagram helps you confirm the condition of the shoes and identify any other damaged parts.
- Poor Braking Performance: Could be due to worn brake shoes, a faulty wheel cylinder, or a misadjusted adjuster assembly. The diagram helps you locate and inspect these components.
- Parking Brake Issues: If the parking brake isn't holding properly, the diagram helps you identify the parking brake lever, strut, and cable, allowing you to troubleshoot the problem.
For example, if you suspect a faulty wheel cylinder, the diagram shows you exactly where it's located within the brake assembly. You can then use the diagram to guide you through the removal and replacement process, ensuring you disconnect the brake line and remove the cylinder correctly.
Safety: Handle with Care!
Working on brakes involves several safety considerations:
- Brake Dust: Brake dust can contain asbestos (in older vehicles) or other harmful materials. Always wear a dust mask and gloves when working on brakes. Clean brake components with a vacuum cleaner or a brake cleaner specifically designed for this purpose. Never use compressed air, as this will spread the dust into the air.
- Brake Fluid: Brake fluid is corrosive and can damage paint and other surfaces. Avoid getting brake fluid on your skin or in your eyes. If you do, flush immediately with water.
- Springs: Brake springs can be very strong and can cause injury if they are not handled properly. Use a brake spring tool to safely remove and install springs.
- Jacking and Support: Always use jack stands to support the vehicle when working on the brakes. Never rely solely on the jack.
- Bleeding Brakes: After working on the brake system, you'll need to bleed the brakes to remove any air from the brake lines. Follow the proper bleeding procedure to ensure that the brakes function correctly.
Critically, remember that the brake system is a safety-critical component of your vehicle. If you're not comfortable working on brakes, it's best to leave the job to a qualified mechanic. Faulty brake work can lead to accidents and serious injuries.
Wrapping Up
Understanding the 2008 Chevy Silverado's rear drum brake diagram is a valuable skill for any DIY mechanic. It empowers you to diagnose problems, perform repairs, and upgrade components with confidence. Take your time, be methodical, and always prioritize safety. Happy wrenching!
As mentioned earlier, we have the file with the rear drum brake diagram available. Please contact us if you'd like to download it.