2008 Chrysler Town And Country Belt Diagram
The serpentine belt system in your 2008 Chrysler Town and Country is a critical component, responsible for powering several essential accessories. Understanding its layout and function, especially by using the correct belt diagram, is crucial for preventative maintenance, diagnostics, and repairs. This article will break down the 2008 Chrysler Town and Country belt diagram, providing you with the knowledge to confidently tackle related tasks. We understand the importance of having a reliable diagram, and we can provide a downloadable version. Simply reach out after reading this article.
Purpose of the Serpentine Belt Diagram
The serpentine belt diagram is essentially a roadmap for the serpentine belt's routing around the various pulleys in your engine bay. Why is this important? Several reasons:
- Replacement: When replacing a worn or broken belt, the diagram ensures you route the new belt correctly. Incorrect routing can lead to accessories not functioning properly, belt slippage, or even engine damage.
- Troubleshooting: Identifying the path of the belt helps diagnose issues related to accessories. For example, if your power steering is failing, the diagram confirms if the belt powers the power steering pump and if it's properly engaged.
- Preventative Maintenance: Periodically inspecting the belt's condition and its routing helps prevent unexpected breakdowns. You can check for cracks, wear, and proper tension.
- Learning and Understanding: Even if you're not actively working on your vehicle, understanding the belt system provides valuable insights into how your engine operates.
Key Specs and Main Parts of the Serpentine Belt System
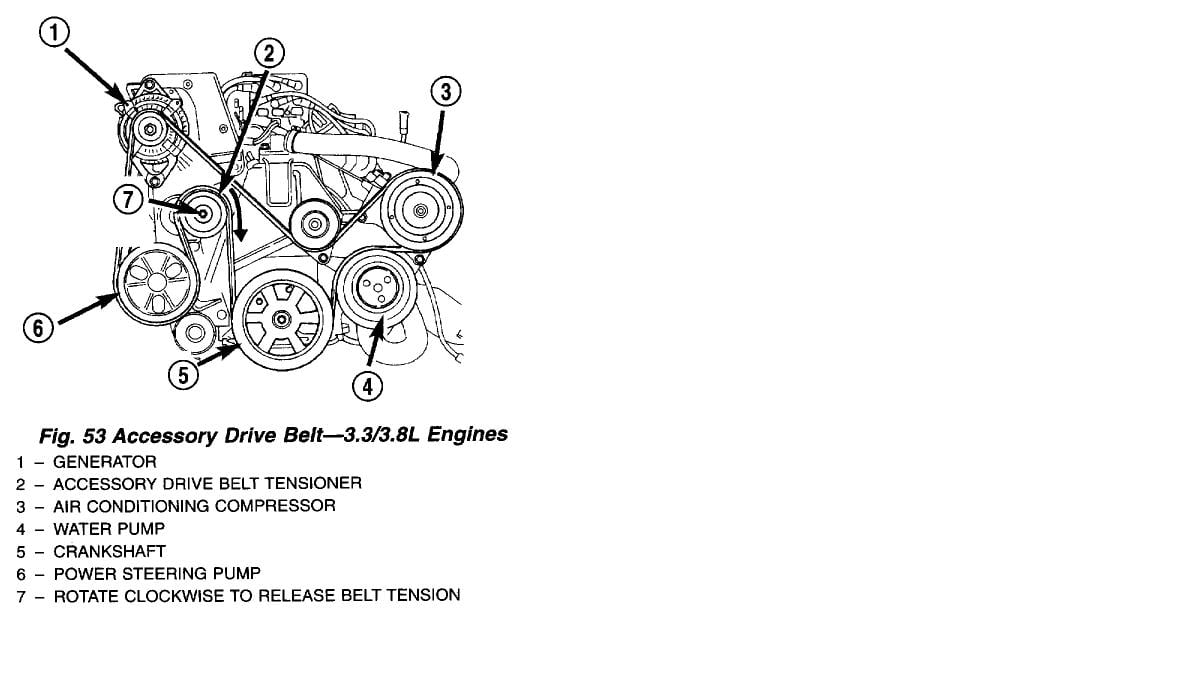
Before diving into the diagram, let's define the key components typically found in the 2008 Chrysler Town and Country's serpentine belt system. Note that configurations may vary slightly depending on engine type (3.3L, 3.8L, or 4.0L).
- Crankshaft Pulley: This pulley is directly connected to the engine's crankshaft and serves as the driving force for the entire system. Engine power is transferred from the crankshaft to the belt via this pulley.
- Alternator Pulley: The alternator generates electricity to power your vehicle's electrical system and charge the battery. The belt turns the alternator pulley.
- Power Steering Pump Pulley: The power steering pump provides hydraulic assistance for steering. The belt spins this pulley to operate the pump.
- Air Conditioning (A/C) Compressor Pulley: The A/C compressor is responsible for cooling the cabin air. The belt drives this pulley when the A/C is engaged.
- Idler Pulley(s): Idler pulleys are smooth, unpowered pulleys that guide the belt and maintain proper tension and routing. They prevent the belt from rubbing against other components and allow it to take the optimal path.
- Tensioner Pulley: This spring-loaded pulley applies the necessary tension to the serpentine belt, preventing slippage and ensuring optimal performance of all driven accessories.
- Serpentine Belt: The single, continuous belt that wraps around all the pulleys, transferring power from the crankshaft to the accessories. It's crucial to use the correct belt length and type for your vehicle.
Understanding the Symbols in the Belt Diagram
A belt diagram isn't just a picture; it's a technical drawing with specific conventions. Here's how to interpret the symbols:
- Solid Lines: These lines represent the path of the serpentine belt. Follow the lines to see how the belt is routed around the pulleys.
- Pulleys: Pulleys are usually represented as circles. The diagrams may include labels indicating the type of pulley (e.g., "ALT" for alternator, "P/S" for power steering). Sometimes arrows are shown on the pulley, indicating the direction of rotation.
- Arrows: Arrows are used to show the direction of belt travel. Following the arrows helps you visualize how the belt moves around the pulleys.
- Tensioner Symbol: The tensioner pulley is often represented with a special symbol, like a spring or an arrow indicating the direction of the tension. This is important for understanding how to release the tension when removing or installing the belt.
Colors are not commonly used on the diagram itself; however, some digital versions may highlight specific sections or components. The key is to pay attention to the lines and the pulley labels to trace the route accurately.
How the Serpentine Belt System Works
The operation is straightforward: the engine's crankshaft rotates, driving the crankshaft pulley. This pulley, in turn, drives the serpentine belt, which transfers rotational force to all the other pulleys connected to the accessories (alternator, power steering pump, A/C compressor, etc.). The tensioner pulley maintains the correct belt tension, ensuring consistent power transfer and preventing slippage. Without the proper tension, the accessories won't operate efficiently.
Real-World Use: Basic Troubleshooting
Here's how a belt diagram can help with common problems:
- Squealing Belt: A squealing belt can indicate slippage due to wear, improper tension, or a misaligned pulley. Use the diagram to inspect the belt's routing and condition. Look for cracks, glazing, or missing chunks. Also, check the tensioner pulley to ensure it's functioning properly and applying sufficient pressure.
- Accessory Malfunction: If your alternator isn't charging, your power steering isn't working, or your A/C isn't cooling, consult the diagram. Verify that the belt is routed correctly around the affected component's pulley. A slipped or broken belt will immediately show as the pulleys aren't spinning, and the accessories connected to them aren't working.
- Belt Replacement: When replacing the belt, carefully observe the old belt's routing before removing it. Compare it to the diagram to confirm you understand the correct path. Take pictures as you remove the old belt to provide a visual reference. This makes installation much easier.
- Visual Inspection: Regularly inspect the belt. Cracks perpendicular to the belt's length are a sign of wear and indicate it needs replacing. Also, look for fraying along the edges, which suggests misalignment.
Safety Considerations
Working on the serpentine belt system involves inherent risks:
- Hot Engine: Never work on the engine when it's hot. Allow it to cool down completely to avoid burns.
- Moving Parts: The serpentine belt system operates with moving parts. Disconnect the negative battery cable before working on the system to prevent accidental engine starting.
- Tensioner Spring: The tensioner pulley is under significant spring pressure. Use the correct tool (usually a wrench or socket) to carefully release the tension before removing the belt. Improper release can lead to injury. Always wear eye protection.
- Electrical Hazards: The alternator is part of the electrical system. Avoid touching any wires or terminals near the alternator while the engine is running.
Important Note: If you're unsure about any aspect of working on your serpentine belt system, it's best to consult a qualified mechanic. Incorrect installation or repair can lead to further damage and safety hazards.
Remember to consult your vehicle's service manual for specific instructions and torque specifications related to your 2008 Chrysler Town and Country. Always double-check the diagram against the actual layout in your engine bay to ensure accuracy.
We have the belt diagram file specifically for your 2008 Chrysler Town and Country available for download. Please contact us to receive the file and ensure you have the correct reference material for your maintenance or repair needs.